
I am now the proud owner of TWO throw pillows. It's hard to believe that I have reached such a high number; I have managed to accomplish this feat in the short time period of nearly ten years of marriage.

All last week I spent knitting. After a particularly long day of knitting, every time I closed my eyes, I literally would see cables floating in front of my eyelids. It's not that it really took that long to knit; it's that I was making my own pattern. I also had an insert I was trying to match, so it had to be the exact right size. That's pretty much a recipe for frogging. A lot. I also have a beautiful new washcloth when I completely finished a front that ended up being too small.
I did not come up with that beautiful cable design myself. It can be found here (criss cross cable with twists). I merely figured out how to put it into pillow form.

So pretty, isn't it? And not as complicated as it looks as long as you keep track of your rows until you get the hang of the pattern.
I would definitely recommend sewing your own pillow insert. That way, your gauge doesn't matter! Also, (this is a huge shocker, I know,) knitting stretches, so you have some leeway in gauge if you want to buy a pillow form or if you already have one on hand.
In case you are interested, I used worsted weight cotton yarn and US size 8 (5mm) needles. I tend to a tight gauge and my pillow ended up about 14x14". I used about 6 oz of yarn (I bought two of the super sized 4 oz. Sugar'n Cream skeins).
So, without further ado, here's the pattern. Please, please let me know if you find any typos. I tried to be careful, but it's been known to happen.
Front
Cast on 56.
Do three rows garter stitch. Repeat rows 1-24 three times, then finish with three rows garter stitch and cast off. (Garter stitch is knitting every row, so that one side has alternating knit and purl rows).
Row 1: p4, c4f, p4, c4f, p4, c4f, p8, c4f, p4, c4f, p4, c4b, p4
Row 2: k4, p4, k4, p4, k4, p4, k8, p4, k4, p4, k4, p4, k4
Row 3: p4, k4, p4, k4, p4, k4, p8, k4, p4, k4, p4, k4, p4
Row 4: k4, p4, k4, p4, k4, p4, k8, p4, k4, p4, k4, p4, k4
Row 5: p4, k4, p4, c4f, p4, c4f, p8, c4f, p4, c4f, p4, k4, p4
Row 6: k4, p4, k4, p4, k4, p4, k8, p4, k4, p4, k4, p4, k4
Row 7: p4, k4, p2, (t4b, t4f) twice, p4, (t4b, t4f) twice, p2, k4, p4
Row 8: k4, p4, k2, p2, k4, p4, k4, p2, k4, p2, k4, p4, k4, p2, k2, p4, k4
Row 9: p4, c4f, p2, k2, p4, c4f, p4, k2, p4, k2, p4, c4f, p4, k2, p2, c4b, p4
Row 10: k4, p4, k2, p2, k4, p4, k4, p2, k4, p2, k4, p4, k4, p2, k2, p4, k4
Row 11: p4, k4, p2, k2, p4, k4, p4, k2, p4, k2, p4, k4, p4, k2, p2, k4, p4
Row 12: k4, p4, k2, p2, k4, p4, k4, p2, k4, p2, k4, p4, k4, p2, k2, p4, k4
Row 13: p4, k4, p2, k2, p4, c4f, p4, k2, p4, k2, p4, c4f, p4, k2, p2, k4, p4
Row 14: k4, p4, k2, p2, k4, p4, k4, p2, k4, p2, k4, p4, k4, p2, k2, p4, k4
Row 15: p4, k4, p2, k2, p4, k4, p4, k2, p4, k2, p4, k4, p4, k2, p2, k4, p4
Row 16: k4, p4, k2, p2, k4, p4, k4, p2, k4, p2, k4, p4, k4, p2, k2, p4, k4
Row 17: p4, c4f, p2, k2, p4, c4f, p4, k2, p4, k2, p4, c4f, p4, k2, p2, c4b, p4
Row 18: k4, p4, k2, p2, k4, p4, k4, p2, k4, p2, k4, p4, k4, p2, k2, p4, k4
Row 19: p4, k4, p2, k2, p4, k4, p4, k2, p4, k2, p4, k4, p4, k2, p2, k4, p4
Row 20: k4, p4, k2, p2, k4, p4, k4, p2, k4, p2, k4, p4, k4, p2, k2, p4, k4
Row 21: p4, k4, p2, k2, p4, c4f, p4, k2, p4, k2, p4, c4f, p4, k2, p2, k4, p4
Row 22: k4, p4, k2, p2, k4, p4, k4, p2, k4, p2, k4, p4, k4, p2, k2, p4, k4
Row 23: p4, k4, p2, (t4f, t4b) twice, p4, (t4f, t4b) twice, p2, k4, p4
Row 24: k4, p4, k4, p4, k4, p4, k8, p4, k4, p4, k4, p4, k4
Back
(Make 2)
Cast on 56.
Rows 1-6: Garter stitch.
Rows 7- 40: Stockinette stitch with the first and last five stitches on each row in garter stitch.
Rows 40, 42, 44, 46: (k5, p5) four times, k5, p6, k5.
Rows 41, 43, 45: (p5, k5) four times, p5, k6, p5.
Bind off.
(Stockinette stitch is knit one row, then purl one row and so on, so that one side is all knit stitches and the other side shows all purl stitches).
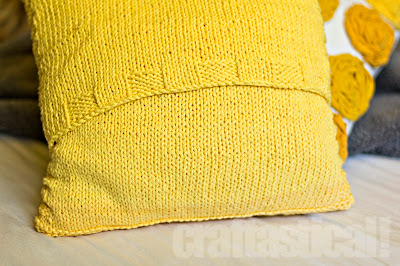
Block all pieces, making sure sides all stay the same measurement. Seam front to back, allowing back pieces to overlap to make envelope to insert pillow form.
The finished back should look something like this:
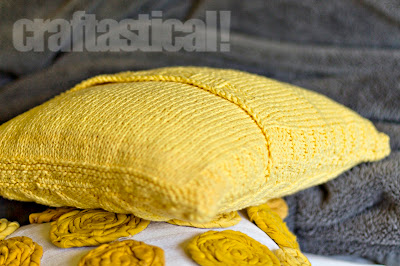
And the finished pillow again, a little closer up:

Ack, so snuggly!

All last week I spent knitting. After a particularly long day of knitting, every time I closed my eyes, I literally would see cables floating in front of my eyelids. It's not that it really took that long to knit; it's that I was making my own pattern. I also had an insert I was trying to match, so it had to be the exact right size. That's pretty much a recipe for frogging. A lot. I also have a beautiful new washcloth when I completely finished a front that ended up being too small.
I did not come up with that beautiful cable design myself. It can be found here (criss cross cable with twists). I merely figured out how to put it into pillow form.

So pretty, isn't it? And not as complicated as it looks as long as you keep track of your rows until you get the hang of the pattern.
I would definitely recommend sewing your own pillow insert. That way, your gauge doesn't matter! Also, (this is a huge shocker, I know,) knitting stretches, so you have some leeway in gauge if you want to buy a pillow form or if you already have one on hand.
In case you are interested, I used worsted weight cotton yarn and US size 8 (5mm) needles. I tend to a tight gauge and my pillow ended up about 14x14". I used about 6 oz of yarn (I bought two of the super sized 4 oz. Sugar'n Cream skeins).
So, without further ado, here's the pattern. Please, please let me know if you find any typos. I tried to be careful, but it's been known to happen.
Front
Cast on 56.
Do three rows garter stitch. Repeat rows 1-24 three times, then finish with three rows garter stitch and cast off. (Garter stitch is knitting every row, so that one side has alternating knit and purl rows).
Row 1: p4, c4f, p4, c4f, p4, c4f, p8, c4f, p4, c4f, p4, c4b, p4
Row 2: k4, p4, k4, p4, k4, p4, k8, p4, k4, p4, k4, p4, k4
Row 3: p4, k4, p4, k4, p4, k4, p8, k4, p4, k4, p4, k4, p4
Row 4: k4, p4, k4, p4, k4, p4, k8, p4, k4, p4, k4, p4, k4
Row 5: p4, k4, p4, c4f, p4, c4f, p8, c4f, p4, c4f, p4, k4, p4
Row 6: k4, p4, k4, p4, k4, p4, k8, p4, k4, p4, k4, p4, k4
Row 7: p4, k4, p2, (t4b, t4f) twice, p4, (t4b, t4f) twice, p2, k4, p4
Row 8: k4, p4, k2, p2, k4, p4, k4, p2, k4, p2, k4, p4, k4, p2, k2, p4, k4
Row 9: p4, c4f, p2, k2, p4, c4f, p4, k2, p4, k2, p4, c4f, p4, k2, p2, c4b, p4
Row 10: k4, p4, k2, p2, k4, p4, k4, p2, k4, p2, k4, p4, k4, p2, k2, p4, k4
Row 11: p4, k4, p2, k2, p4, k4, p4, k2, p4, k2, p4, k4, p4, k2, p2, k4, p4
Row 12: k4, p4, k2, p2, k4, p4, k4, p2, k4, p2, k4, p4, k4, p2, k2, p4, k4
Row 13: p4, k4, p2, k2, p4, c4f, p4, k2, p4, k2, p4, c4f, p4, k2, p2, k4, p4
Row 14: k4, p4, k2, p2, k4, p4, k4, p2, k4, p2, k4, p4, k4, p2, k2, p4, k4
Row 15: p4, k4, p2, k2, p4, k4, p4, k2, p4, k2, p4, k4, p4, k2, p2, k4, p4
Row 16: k4, p4, k2, p2, k4, p4, k4, p2, k4, p2, k4, p4, k4, p2, k2, p4, k4
Row 17: p4, c4f, p2, k2, p4, c4f, p4, k2, p4, k2, p4, c4f, p4, k2, p2, c4b, p4
Row 18: k4, p4, k2, p2, k4, p4, k4, p2, k4, p2, k4, p4, k4, p2, k2, p4, k4
Row 19: p4, k4, p2, k2, p4, k4, p4, k2, p4, k2, p4, k4, p4, k2, p2, k4, p4
Row 20: k4, p4, k2, p2, k4, p4, k4, p2, k4, p2, k4, p4, k4, p2, k2, p4, k4
Row 21: p4, k4, p2, k2, p4, c4f, p4, k2, p4, k2, p4, c4f, p4, k2, p2, k4, p4
Row 22: k4, p4, k2, p2, k4, p4, k4, p2, k4, p2, k4, p4, k4, p2, k2, p4, k4
Row 23: p4, k4, p2, (t4f, t4b) twice, p4, (t4f, t4b) twice, p2, k4, p4
Row 24: k4, p4, k4, p4, k4, p4, k8, p4, k4, p4, k4, p4, k4
Back
(Make 2)
Cast on 56.
Rows 1-6: Garter stitch.
Rows 7- 40: Stockinette stitch with the first and last five stitches on each row in garter stitch.
Rows 40, 42, 44, 46: (k5, p5) four times, k5, p6, k5.
Rows 41, 43, 45: (p5, k5) four times, p5, k6, p5.
Bind off.
(Stockinette stitch is knit one row, then purl one row and so on, so that one side is all knit stitches and the other side shows all purl stitches).
Block all pieces, making sure sides all stay the same measurement. Seam front to back, allowing back pieces to overlap to make envelope to insert pillow form.
The finished back should look something like this:


And the finished pillow again, a little closer up:

Ack, so snuggly!
I've started a new blog: Come follow my crafting adventures on my new blog. Find me at: creativeirony.com.
Beautiful! Love the color and love how you finished off the back.
ReplyDeleteHi Kara,
ReplyDeleteI wondered how you were doing. I can see what you've been doing--amazing knitting! I saw this yarn a while back (http://www.serrv.org/Home/forfun/craft/SilkYarn.aspx) and felt a completely illogical stab of desire to posses it...but then it would have to stay yarn because I'm not a knitter. If I ever figured out anything I need knitted, do you take commissions?
Just clicked over from the Craft Magazine blog. HAD to comment, because this is BEAUTIFUL. I love the color, the cable pattern -- everything about it.
ReplyDeleteI'm not quite to cables yet in my knitting-learning, but I'm totally bookmarking this for when I feel ready to give it a try.
I LOVE this! DO you think it would be possible to only knit the front, then sew that to fabric for the back? Or would that come out funky?
ReplyDeleteAgatha, no reason why you couldn't use fabric as the back (I really LOVE that idea!). The only trick would be sewing it, as knit tends to stretch when you sew it. Just use a lot of pins and go slowly and it should work out fine. :)
ReplyDeleteLovely knit, thanks.
ReplyDeleteThey look so comfortable. I bet they would definitely help you to improve your sleep. How clever is that?
ReplyDeleteI finished a pillow! Thank you for your pattern!
ReplyDelete