Follow My New Blog

I've started a new blog. Follow my crafting adventures on creativeirony.com.

Showing posts with label Saver's. Show all posts

Wednesday, June 01, 2011

Let's Thrift!

I came across this iPhone wallpaper and fell in love!

Let's Thrift iPhone wallpaper

Dang, so cute! One of those things that when I see it, I really, really wish I had designed it. I may not have designed it, but I certainly have been doing as it suggests lately. I've been picking up little treasures at garage sales, antique stores and thrift stores everywhere. (Saver's in a favorite.)

The other day I looked down at my outfit and realized my shoes, pants and shirt were from thrift stores, my bracelet was costume jewelry from an antique store and I'd made my scarf. Maybe I need to start taking photos of my outfits occasionally and sharing.

Because I have soooo much fashion sense (that was dripping with sarcasm). But, I have had some fun trying to be more playful and daring lately.

Anyway, this post is all about what I've bought lately. Some of these still need some major makeovers. Some of them are pretty as they are right now.

This green vase was $5 at the nearby antique mall. I adore its shape! It's now hanging out on my kitchen shelves.

green glass vase found at antique mall--fun, unusual shape

I've started a new blog: Come follow my crafting adventures on my new blog. Find me at: creativeirony.com.

Thursday, July 01, 2010

Share-A-Craft: Cupcake Towers

I saw these adorable cupcake stands ages ago (ages ago in Kara time translates to a few months ago). I've been collecting plates ever since. I had the worst luck in finding the appropriate candlesticks, so I ended up using cups mostly, plus one vase, and a 5-minute epoxy.

We used two of them the other day for family party, and they worked great. We had M&Ms in the top bowls, cookies around the sides and donuts and peanut butter bars on the bottom. They could also work great for cupcakes, or even veggies and dip. I'm sure we'll be using them a lot.


I picked up the plates and bowl for the blue ones from Walmart on clearance, and they were $1.50 each, with the glass coming from the dollar store. Total cost was $5.50.

These plates came from Savers for $1 each, and the glass from the dollar store. Total cost was $3.

These plates and the glass also from Walmart on clearance at $1 each, for a total cost of $3.

I think this is my favorite. The everything came from Savers. The plates were a dollar each, as was the vase and the little metal cup on top, for a total cost of $4.

The 5 minute epoxy was about $4. I also used it for something else, so I'm calling it an average of $4 per cupcake stand. That's a whole lotta cute for $4.
I've started a new blog: Come follow my crafting adventures on my new blog. Find me at: creativeirony.com.

Friday, June 25, 2010

Project Progress: Kitchen Update Week 6

When I hung my shelves, I left plenty of room underneath for a gallery style collection of artwork. I've already posted a lot of it, like my silhouette frames, my crochet butterfly, and my kitchen message center.

I started collecting larger frames for this a while ago. I bought most of them at Savers or at Dollar Tree. I didn't pay more than $5 for any of them, and I got most of them for a dollar.

When I started to do this, I first put all the frames on the floor, trying to get a good arrangement. After a little tweaking, I had this arrangement:

Yeah, some of what are in those frames are scary, from the evil looking bears on the far left, to the sappy motivational poster on the far right, and those 80s geese prints (one you can't see because of the glare, but completely not my style).

I immediately started plugging in digitally some of the artwork I wanted to use:

Already, I'm feeling better about this.

I spent the better part of two days spray painting these. Of course, I didn't have to sit outside and watch the paint dry, thank goodness. That's so boring, they coined a cliche about it.

After that, I traced them on leftover paper we used to wrap the breakables in, and put them up on my wall with painter's tape. I also put up some of the ones I knew were at key points and not moving anywhere. I used command strips for these, the picture hanging ones. They are expensive, but I love them for projects like this, because they tend to hang much straighter than regular nails and you can tweak them a little bit, or even move them completely if you have some adhesive refills. And my kids don't knock them off the wall when they go by. Usually.

Once I got up the paper, I realized that I needed to make the whole thing a rectangle, and not have the variation in the bottom line, because it was looking messy and busy. It reads much more as a single unit now.

Then I started plugging in my digital images again (how amazing are digital cameras and Photoshop? We live in an age of wonders--there should be a song about that, because, seriously, I feel like breaking into song right now.).

And after a lot more tweaking, and a lot more making of art, my wall is currently looking like this:

Still a few things to do, but it's shaping up nicely.
I've started a new blog: Come follow my crafting adventures on my new blog. Find me at: creativeirony.com.

Thursday, April 29, 2010

Share-A-Craft: More Spoons in a Shadow Box

Share-A-Craft is just as much fun as a tilt-a-whirl, but with less stomach upset and possible vomiting. Every Thursday, I post a project of any type that I've recently or not so recently done.

I thought about doing a tutorial with this, but it's so similar to my other shadow box tutorial, that I decided to share it here. I'm going to tell you basically how I did it, but it's a lot less detailed than my regular tutorials.

I had some more spoons leftover from the first shadowbox, so of course, I wanted to display them too.

I found this great frame at Savers for $1. It looks like it's supposed to be for an embroidery project, but it suits my purposes just fine. No glass, but for a $1, I'll avoid being my usual picky self.

I wanted a longer, thinner frame, so I took a rubber mallet to it and knocked off one of the 10" pieces. Then I used my husband's miter saw (that was a good present, go me for getting it for him!), and trimmed down the 8" pieces to about 6" on both sides, based on my spoon measurements. I glued it back together, and it looked like this:

Then I primed and painted. I made a back for it using a piece of chipboard, covered in two sheets of scrapbooking paper. The green is My Mind's Eye, from the Penny Lane collection and the overlay is KI Memories. I love the combination together. I attached it to the back with a little hot glue (I love this stuff!). Then I adhered the spoons with a little hot glue, added the hanging hook the frame came with, and that's it! So simple to make, but I really find it beautiful and so cheerful. Hopefully it will be hanging in my kitchen before too long.
In other kitchen utensil themed prettiness, aren't these stencils divine? My brain is going like crazy, wanting to work them into my design. We shall see. . .
I've started a new blog: Come follow my crafting adventures on my new blog. Find me at: creativeirony.com.

Monday, April 26, 2010

Once Again, It's Time for Thrift Store Finds

My sister and I went last week to Savers again, for dollar Mondays. I'm starting to learn that you really need to be there right at 9:00 am when they open to get the best stuff. I got in there quick and politely grabbed up all dollar deals. I didn't pay more than 99 cents for any of this stuff.

Ok, first off, this oh so cute candle holder. It's right up my alley. It's not alive, so I can't kill it, but it still seems so pretty to me. It started off white and chipped and pretty dirty:

Now it's all shiny and understated.

Next up, this wire basket/bowl thingy. I love the shape of it and I've seen it there before, but this time it was on sale, so I snatched it up. It also desperately needed a coat of paint.

Before:

After:

I loved the shape of this bottle. A few weeks ago, I bought a charming planter and was teased mercilessly for purchasing a "spittoon," sooooo, if this ever held anything prohibited by the Mormon tradition (coffee, tea, tobacco or alcohol), please let me know so I can be prepared for the teasing. I'm feeling quite paranoid about it now, even though it's just silly.

I love it's shape and it just needed a little spruce on the lid, so I didn't take before pictures.

Love these little green cups (ok, I'm feeling paranoid again here).

This is another something that didn't need a thing done to it:

Did I betray that I have no clue what it's called? A candle holder of some sort? I like the slightly industrial feel of it and the shape of the glass is beautiful.

A pretty wooden platter. I may use this for a platter, or I might end up doing something else with it. Don't you think it would look so cool with some vinyl lettering in the middle and hanging on the wall?

This might be my favorite buy of the day. I have a thing for ceramic animals, even though I'm not a huge fan of real life animals.

He's such a vintage little thing and reminds me of my great-grandma. He's going in my kitchen, although I'm not sure if I'm going to do the traditional scrubber holder thing or not.

The After:

Speaking of my kitchen, we are moving this week, into our very first house, if all goes well! I canNOT wait to show you our new place. Things might be a little different on the blog for a bit, but I will be posting all sorts of fun and exciting things as we move in. Wait till you get a load of the kitchen table my husband built! I even helped a little. And pretty soon I'll be showing off my stuff in its natural habitat.
I've started a new blog: Come follow my crafting adventures on my new blog. Find me at: creativeirony.com.

Thursday, April 08, 2010

Tutorial: Pretty Piggy Bank Makeover

A few weeks ago, I was in Target. I try to stay out of that place, because we would be living on beans and rice if I went in there too often, and I really hate beans and rice. I was having some serious fun, scoping out pieces for my new living room (wherever it turns out to be, we will probably be moving one way or another by summer).

I was totally charmed by these piggy banks:

Look, argyle! Now, in the interest of full disclosure, one of these little guys will only set you back $9.99. Not too bad and I was really tempted to bring one home with me, but I didn't. I am so cheap that shelling out ten dollars for a piggy bank just seemed like too much.

You might remember that I found this little guy at the thrift store and rescued him for the low price of $1:
He's so cute, but a not as chic and funky as the pigs I liked from Target.

I went to work. Here are the steps I took to give him a whole new look.

Step 1: Remove anything you don't want painted, like the stopper. Rough up the finish with some steel wool or medium sand paper. I didn't do this the first time and it made a big difference after I did (some of the paint started to peal up the first time around, so I scrubbed off all the paint and burned the tips of two of my fingers using water that was way too hot).

Step 2: After you've roughed him up, give him a good wash and let dry (somehow that sounds so dirty). Although it didn't not occur to me, I would recommend a primer coat of spray paint.

Step 3: Lightly coat with spray paint. I'm the worst at this. I really want to just spray the heck out of it and be done with it, but it really doesn't look good if you do that on such a round, smooth surface. I used Krylon paint, which I don't really recommend. I did a lot of spray painting that day and the Rustoleum was much better, stuck to my surfaces better and I didn't get nearly as many drips or have to do nearly as many coats. But, the color I wanted was only in Krylon, so there you go. I'm a spray paint newbie, so I apparently have a bit to learn about the different kinds. I probably did six or seven very light coats to get the finish and coverage I wanted. It only takes a minute to do the coats, then I did a bunch of other things (like watch TV) while I let it dry between coats.

After about 4 coats:

All the way done:

Step 4: You can be done at this point (yay!) or you can dress it up a little more. I picked out some Basic Grey rub-ons that I already had to decorate his (cough cough) backside. I'm obsessed with paisley, and I was hoarding and guarding these with a shot gun saving these for a special something and this little piggy is it.

Again, make sure your surface is clean and dry. Work in small sections and cut out your rub on from the sheet before you apply. Find where you want your rub on to go, then start in the center and rub in small circles with a stylus.

You are applying something flat to something with curves, so go slowly and keep the rub on pressed around the pig as you go, which will help smooth out placement. I also wouldn't recommend doing a rub on that had a lot of solid surface area, as you are going to get wrinkles if there are bigger solid areas. Also, if you are applying a colored rub on over a darker paint, you might want to do a test area first, because it might not look so good after it's applied, as colored rub ons tend to be a little on the translucent side.

I was super tempted to bling him up and add little jewels or flowers, but I'm refraining (for now). I don't want him to look too busy.

Step 5: Coat with a clear top coat. Let dry, then find a special place for him in your house. He's going to look too cute, in my dream living room someday. You remember, this, right?

Price Breakdown:
Piggy Bank: $1
Spray Paint: $3
Basic Grey Rub-ons (I used the whole sheet): $4

Total Cost: $8

Yeah, so if I bought everything from scratch, I only saved $2, but since I already had the rub ons and spray paint, the total cost to me was $1. I'm totally going to be on the look out for more friends to add to my piggy collection, and I will probably end up doing one for each of the kids (Xander was especially indignant that I didn't purchase the piggy for him and he wasn't sure I was serious when I told him I was keeping it for myself).

You don't have to limit yourself to piggy banks--how cute would this be on some vases!? Just make sure it's not something you eat off of, because it won't hold up to repeated washing and I'm not sure how safe all those chemicals are.

Linking up on:
The DIY Show Off
Thrifty Decor Chick,div class="separator" style="clear: both; text-align: center;">


&ltimg border="0" alt="Photobucket" src="http://i285.photobucket.com/albums/ll45/huntleygang/idearoom/idearoomlinkup-1.png"/>
I've started a new blog: Come follow my crafting adventures on my new blog. Find me at: creativeirony.com.

Thursday, March 25, 2010

Trip to Savers! A bunch of things get a spray paint makeover.

Last Monday, I went to Savers. I always try to go on Monday, because they have tags of a certain color for $1 and another color is half off. Sometimes, I don't find much, but this week I hit the motherload. It helps that with my plan for my living room in mind, I have a good idea of what I will actually use.

For 38 bucks, I got the following:
3 Glass Jars ($1.99, $1.99 and $.99)
1 Pair of Sunday Shoes for Aubriana ($2.49)
1 Pair of New Pajamas for Aubriana ($4.99, I'm pretty sure they've never been worn)
1 Shirt to upcycle ($.99)
2 Ceramic Candle Holders
1 Photo Tree
3 Iron Candlesticks
1 Bowl
1 Metal Basket
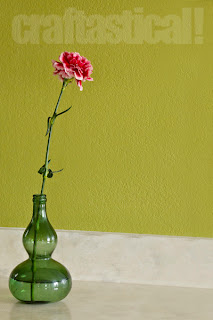
1 Green Glass Bottle ($1.50)
1 Flower Candle Holder
1 Twirly Candlestick
1 Leaf Tray
1 Kitchen Organizer Tray (got left in the car while I took the picture)
1 Bag of Toys (not pictured) with 5 My Little Ponies, 2 Madagascar Penguins and 2 Motorcycles, purchased as a bribe for my kids to be good ($2.99)

Isn't this picture tree (I'm guess that's what it's called) so cool! I can't decide if I want to do seasonal decorations on each clip, or photos, or put my most used recipes on cards and keep it in my kitchen, or just keep it around for it's sculptural quality. It was $2.99 and I didn't do a thing to it.

I got this kitchen organizer for $1.50. I think I'm going to change it into a message center for my kitchen.

A favorite find. These candle holders were $2.99 each, but they are just beautiful. They are probably 6" across. This is pre-cleaning, but they scrubbed up nicely. There was one little chip on the one of the petals, but it's not at all noticeable. I was really tempted to paint them blue, but they are staying white for now.

This cute little piggy was $1. I have something in mind for him, but you're going to have to wait until I can get a tutorial up for it.
These three candlesticks were a buck a piece. A little spray paint later to refresh them, and they look like this:
Not that different in the photographs, but in person, it makes a big difference. They had rust spots in places and just looked worn and tired. Now they are pretty gunmetal grey.

Wire basket was $1, and was an ugly brass color, plus the frame was sagging on the back corner there. A tiny bit of super glue and a coat of paint later (the same gunmetal as the candlesticks), and I have a charming basket. I think this one is headed for the bathroom:
Another dollar purchase. This one wasn't too bad, but it didn't fit in with my kitchen vision (yes, I have developed one of those now too). A coat of chrome and it's looking a lot more cheerful:

This bowl looks so dated with the brass finish, but it was only a dollar (what can I say, I went as soon as they opened and I was great at spotting those green tags). It looks so good as a blue bowl:
So good that I'm showing it off with two pictures. Such a pretty shape!
I loved the idea of this leaf tray, but I think I'm going to put it up on the wall as art. It had some rust spots too, so it got a coat of the gunmetal too. A steal, as this was another dollar item.
This is one I could have left alone, but I was too spray paint happy at this point, and now it matches the other candlesticks. My mom saw it as I brought it in and she was all like, I want this one, and I was like, back off, it's mine. And she was all like, how much did you pay for it? And I was like, a dollar, and back off, or it's coming towards your head.
I've never really used spray paint before. Spray paint and I, we are friends now.

The whole collection after paint (minus the things I've still got plans for):

I also cleaned up the glass jars and put my ribbons and flower in them. I'm getting there. I did buy some gallon sized jars from Walmart and Target, because I knew probably couldn't find them at the thrift store.

My collection is growing!

Link up on:
I've started a new blog: Come follow my crafting adventures on my new blog. Find me at: creativeirony.com.