Follow My New Blog

I've started a new blog. Follow my crafting adventures on creativeirony.com.

Showing posts with label original pattern. Show all posts

Friday, November 28, 2014

Wonder Woman Cosplay

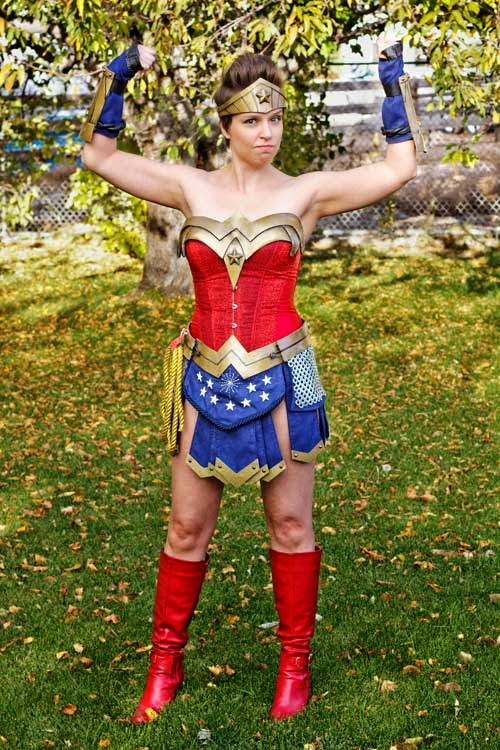
Wonder Woman Cosplay from Craftastical using Wonderflex

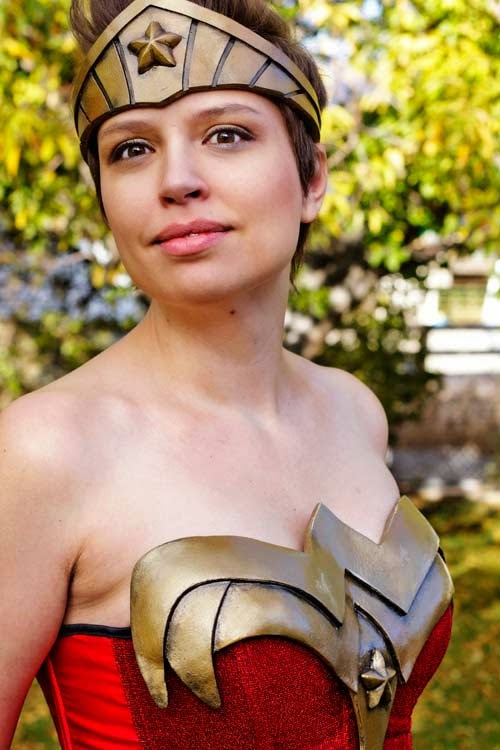
It's been a while since I went all out on a Halloween costume, but David talked me into trying out Wonder Woman this year. Of course, this involved figuring out how to make my own custom-made armor, because why do anything the sensible, easy way?

This tutorial about how to make Wonderflex armor was invaluable in this process.

So, I started with the idea. After looking through hundreds of photos of Wonder Woman online, I sketched my own concept based on what I liked the best.

wonder woman costume sketch

Now, it was time to shop for boots and the corset. We got one corset, and it was too small. I wanted the corset lacing to either meet, or to have a panel, and it probably had a six inch gap with no panel. The peril of ordering on the internet. So, we tried a different style. This time it was too big. Of course. So, I ended up just taking it in.

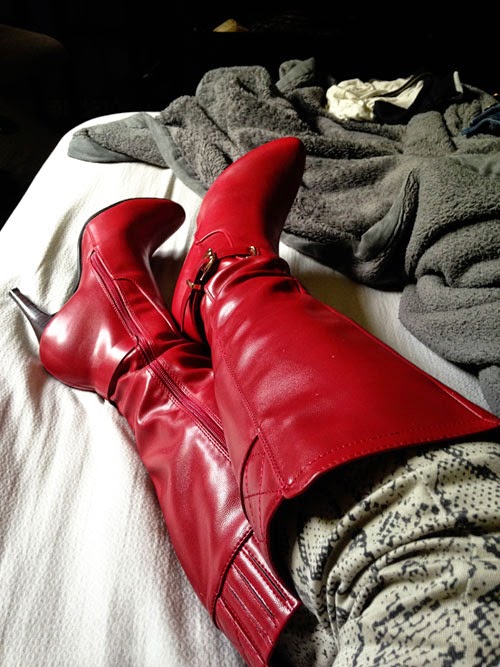
I also looked at probably hundreds of pairs of boots. I could have got the classic Wonder Woman boots, but I thought it would be more fun to go with something a little more realistic looking, to match the mood of the costume, and so I could wear them after Halloween too. I love the pair I got. When they came in the mail, I put them on and told David I was never taking them off.

Wonder Woman Cosplay from Craftastical using Wonderflex


Once we had the corset sorted, we started patterning the armor. It didn't seem like much, but there were a ton of different pieces to pattern, and then the problem of how to actually attach everything so it could come on and off my body had to be worked out before we made pieces.

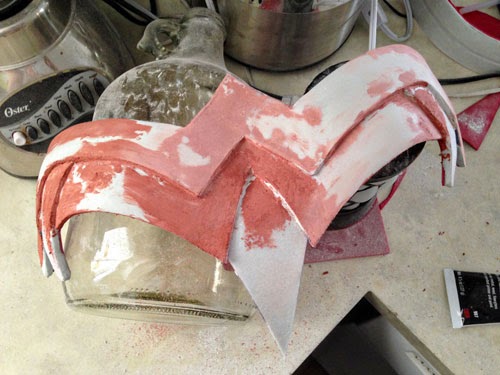
I wish I had taken more photos of patterning, but I didn't start until we started molding. We used mostly Wonderflex backed with craft foam to make the pieces. I wouldn't do that again. The craft foam did not like sticking to the Wonderflex and it was a pain in the butt. I think several layers of Wonderflex is a much better option.

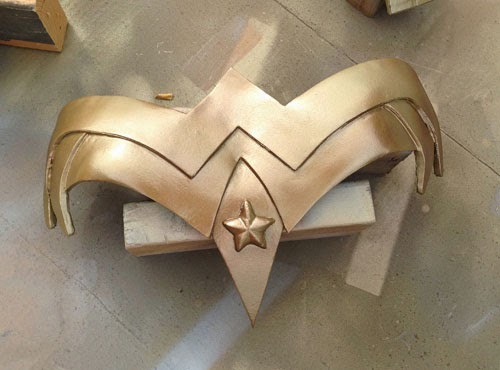
So, here's the front belt piece after the first mold, and then with the layers on top to add dimension.

Wonder Woman Cosplay from Craftastical using Wonderflex

Wonder Woman Cosplay from Craftastical using Wonderflex

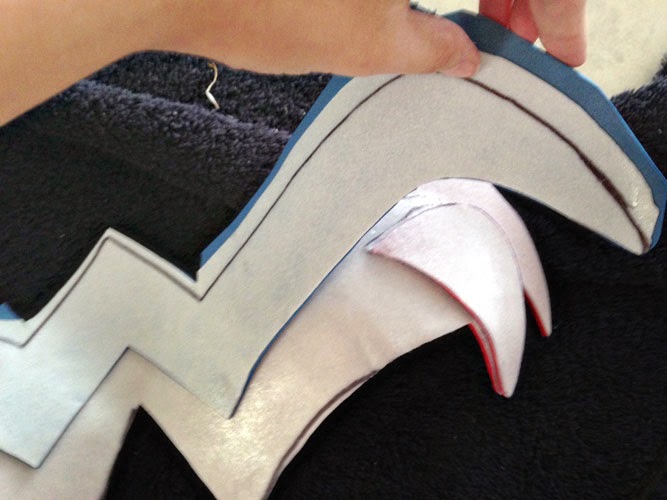
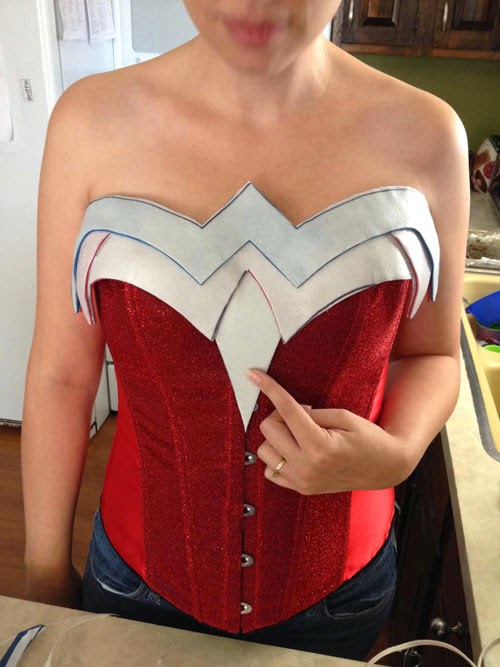
I can't believe I don't have more in progress shots of the breastplate. Urg! It was the most challenging, because it had more complicated curves and levels. I did put in one little dart and that helped mold the curves a bit.

Wonder Woman Cosplay from Craftastical using Wonderflex

There you can see I'm building up the levels.

Wonder Woman Cosplay from Craftastical using Wonderflex

 You can see at this point, there are still a lot of waves and bumps.

Wonder Woman Cosplay from Craftastical using Wonderflex

We ended up covering a lot of it with Apoxie Sculpt, which was another giant pain. I don't think I mixed it correctly, so it was sticky, and impossible to get where I wanted it. And then it dries to concrete. You can sand it, and I spend hours sanding it.

We also made the stars out of Apoxie Sculpt. The stars were also a pain in the rear. I would do them differently now. I knew I wanted that shape and type of star, but how to get the very sticky stuff in the mold (which took us AGES to find--we were even going to make our own mold at one point), and then out again without destroying the star? We end up using olive oil. Which was ok. But, I would have lined it with cling wrap and then coated the inside with olive oil. I bet they would have come out so nicely.

The red you see up there isn't the Apoxie Sculpt, it's filler. Which then had to be sanded. Again.

Wonder Woman Cosplay from Craftastical using Wonderflex

First coat of paint! I actually ended up painting them three times. I wanted a slightly aged look, but couldn't figure out the right balance. Eventually, did a mix of two spray paints, and then mixed gold acrylic paint with browns, yellows, blacks and whites to age the top, and then ever so slightly misted that with spray paint. And then a top coat of polyurethane.

The bracers were actually done with a sheet of ABS plastic, craft foam and a touch of Wonderflex. Same with the tiara. It was a lot harder to heat to mold--but we were using my embossing gun from my stamping days. With an actual heat gun, it might have been a bit easier.

Wonder Woman Cosplay from Craftastical using Wonderflex

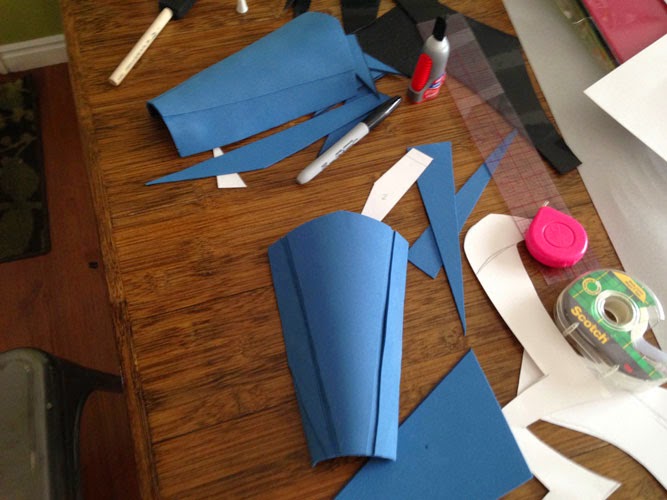
The basic bracer with a layer of craft foam, and then another layer for the dimension. (On the right is one of the paper pattern pieces.)

Wonder Woman Cosplay from Craftastical using Wonderflex

Adding the stars. I had to sand them down for ages to get them to curve. I wish I had figured out a better way to mold them so I could have just stuck down the clay when wet and avoided that whole mess. Next time!

Wonder Woman Cosplay from Craftastical using Wonderflex

The pieces to make the recesses traced and ready to cut out.

Wonder Woman Cosplay from Craftastical using Wonderflex

The tiara ready for paint. You can see the black ABS plastic (Wonderflex is white).

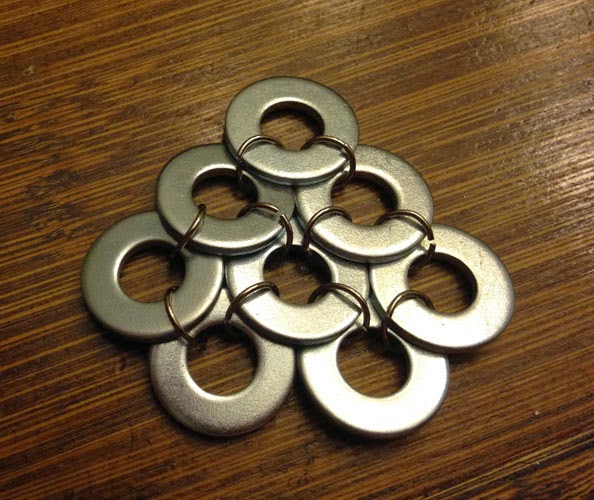
The chainmail was all handmade from washers and jump rings.

Wonder Woman Cosplay from Craftastical--handmade chainmail

Wonder Woman Cosplay from Craftastical--handmade chainmail

We found the red belt on the back at a thrift store and attached it to the armor with screws. The belt also comes apart in the front with overall hooks. Yes, the kind of overalls that are currently coming back into style. I found the hooks at JoAnn Fabrics.

Wonder Woman Cosplay from Craftastical using Wonderflex


The skirt I sewed from suede fabric. The star on the front is hand-stitched, and the other stars are metal--those things that you stick into fabric with the prongs that bend to attach. Studs, maybe? The bottom metal looking things on the end of each flap is wonderflex again, painted, with metal spike studs on each end.

The skirt is all attached to the belt. The back piece velcros so the belt still can unbuckle in the back. I got a swimsuit bikini bottom to wear under the whole thing.


Wonder Woman Cosplay from Craftastical using Wonderflex

Wonder Woman Cosplay from Craftastical using Wonderflex

Wonder Woman Cosplay from Craftastical using Wonderflex

Wonder Woman Cosplay from Craftastical using Wonderflex

Wonder Woman Cosplay from Craftastical using Wonderflex

I've started a new blog: Come follow my crafting adventures on my new blog. Find me at: creativeirony.com.

Tuesday, November 15, 2011

Sunshine Paisley Throw Pillow Tutorial

Ok, here it is. What I've been meaning to write and put up for ages. If I didn't have to keep doing that pesky schoolwork (five more weeks until graduation, five more weeks!), this would have happened a lot sooner.

Once I finished the five embroidered paisley squares (click for pattern), I knew I wanted to make a pillow out of them. I was worried though, because I didn't want it to get too "patchwork quilt." I didn't think that would go with the modern feel of my bedroom.

I wanted to do solid yellows and grays, but the quilt story nearby (Gracie Lou's--sooooo awesome!) didn't have any. This was perplexing. Normally, when I get an idea, there is nothing that can prevent me from doing that idea. I mean, small adjustments, they normally make the project turn out better. Large adjustments like substituting a print for a solid? I will normally not proceed. I think the saleswomen in the shop thought I was being completely unreasonable (although she was very perplexedly kind about it). Like, I had gone into a restaurant and said, "But, these green beans aren't green enough, I wanted more of a Christmas green, not so much an olive green. And I wanted them cut 1/4" longer. Do you have different green beans in the back?" (I did not ask for super-secret back-room fabric, FYI).

I've started a new blog: Come follow my crafting adventures on my new blog. Find me at: creativeirony.com.

Tuesday, November 01, 2011

Halloween!

So, I stayed up sewing until 3:30 am on Sunday night. Maxton, really wanted to be Aang, from Avatar: The Last Airbender. I couldn't find any in the stores and for some reason, it didn't occur to me to check online until it was too late. This is cooler, because he's the cartoon Aang, not the live-action movie Aang.

So, of course, I didn't have a pattern, so this is hodge-podged together. The pants I based off a super easy pattern, then I added elastic around the bottom. The cape I sewed in one try, making up my own pattern, and same with the belt.

The collar took me four tries to get right (it's separate from the shirt). I'd never sewn anything like that, and I had to make my own pattern, so that was some serious trial and error. The shirt was a nightmare. The pattern I chose for the shirt was all wrong--the directions did not make any sense (or I was just not getting it, I'm going with the first because it makes me feel better), so I ended up just doing my own thing with it. But, it's done!
Aang from Avatar: The Last Airbender Halloween costume

I've started a new blog: Come follow my crafting adventures on my new blog. Find me at: creativeirony.com.
Monday, October 10, 2011

Sunshine Paisley Embriodery Pattern

Oooohhhh dear. Pinterest has done me in again. I kept seeing all these beautiful embroidery stitches and projects. Which means, of course, I have been embroidering a lot lately.

I had so much fun trying new stitches. My favorite site is this one, which has the best directions and such beautiful work and I used a bunch of stitches I learned there on my paisley.

I'm very proud to share my very first embroidery pattern. I have a thing for paisley. My sister doesn't get it. I think I may be talking her around with my unrelenting love, but she always compares them to a certain male reproductive cell. If she hadn't just deserted me and moved to St. Louis, she would punch me in the arm for telling you that. I'm sure the comparison has already occurred to you. If it hasn't, my apologies for putting it into your brain. Hopefully my pattern is so awesome that you will now forget about it.

I made five different squares and my recent activities (here and here) may give you a clue as to what I did with them. But, that's coming a different day.


I've started a new blog: Come follow my crafting adventures on my new blog. Find me at: creativeirony.com.

Tuesday, August 16, 2011

Tutorial: Cable Knit Pillow

I am now the proud owner of TWO throw pillows. It's hard to believe that I have reached such a high number; I have managed to accomplish this feat in the short time period of nearly ten years of marriage.

Cable knit pillow tutorial--such a cheery yellow!

All last week I spent knitting. After a particularly long day of knitting, every time I closed my eyes, I literally would see cables floating in front of my eyelids. It's not that it really took that long to knit; it's that I was making my own pattern. I also had an insert I was trying to match, so it had to be the exact right size. That's pretty much a recipe for frogging. A lot. I also have a beautiful new washcloth when I completely finished a front that ended up being too small.

I've started a new blog: Come follow my crafting adventures on my new blog. Find me at: creativeirony.com.

Monday, November 29, 2010

Make It Your Own--Northridge Publishing

A few weeks ago, I had the chance to film with Kristine McKay from Northridge Publishing. It was so much fun to be in front of the camera and I hope I don't seem too goofy, shifty-eyed or nervous. I had a blast, and here's one of the segments we filmed.

Many thanks to them for having me!


And the super-sassy photo of Aubrey I took with her in the skirt (which weirdly printed up backwards on my printer the morning of filming, but I didn't have time to print a second, not-backwards version):

And, a close up of the owl:
I've started a new blog: Come follow my crafting adventures on my new blog. Find me at: creativeirony.com.
Friday, October 29, 2010

Trick Or Treat Bags

Posting again today!

I pulled out the kids' trick or treat bags and remembered that I never shared them last year. I was literally sewing them minutes before we were due out the door.

They came out a lot larger than I was picturing in my head. I was really worried they would be too small and it would be hard for people to get treats into the bags and I overestimated the seam allowances. So I kept adding inches. Then I got the first one sewed and realize it was huge, but I didn't want them to end up different sized and incite a riot.

At least they will last until the kids are too old for trick or treating. No pillow cases for my kids. Well, pillow cases are cool, so maybe they will abandon them at some point.

When we got them out today, Griffin was ticked that his was candy corn. He wanted something hard core like spider webs or skulls. Candy corn is sooooo baby. Tough cookies, darling. I have no (working) sewing machine, no fabric and no time to sew him a new one, so he could be happy about candy corn or have no bag (by the way, he picked out the fabric last year). He seems to have made peace with it, as he was just pretending to be the "Candy Corn Power Ranger" a minute ago.
The names I printed out--the font is Century Gothic (funny considering my video I posted today--really, I love that font), and then I traced it onto the fabric and embroidered it by hand, adding the little x's for the dots on the i's.

David picked out the zebra fabric. I'm telling you, the mad has an obsession with zebra print. You can see how I used the leftovers in this skirt here.
I've started a new blog: Come follow my crafting adventures on my new blog. Find me at: creativeirony.com.
Thursday, June 03, 2010

Share-A-Craft: Toddler Butterfly Backpack

Aubrey is obsessed with backpacks. I believe it's the combination of her adoration of Dora the Explorer and jealousy that her older brothers go to school and she doesn't get to go. She had an ugly backpack she would tote around with her for hours. Of course, when I thought about sewing most of her birthday presents, a backpack was my first priority. She needed one that was cute and actually fit her.

I do believe that this is the most complicated thing I have ever sewn. I probably should have done a little research to figure out how most people sew lined backpacks, but you know me. I like to do things the hard way. I did mostly figure it out, although I'm certain hand-sewing the lining in could be avoided with a little more forethought.

I did end up sewing the straps and the handle on in reverse order, but I figured it didn't impede the function of the backpack, so that meant they were staying that way.

At least I had the foresight to avoid piping, which would have much things much harder.

There are two pockets on the front that velcro, then a zippered pocket, then the main bag.

The butterfly's wings flap and I sewed some beads on it to embellish it. I was really careful to pick a strong thread and really tacked them down, because experience has taught me that if small, round objects are around, Aubrey is sure to stick them in her nose. It also seems my friend Heidi is tangentially involved, as the first time Aubrey explored this particular form of personal expression, Heidi was watching my kids while we were on the cruise, and the second time, I was talking to her on the phone, and the third time, she was due at my house that day. It's a small price to pay for a friend as fabulous as Heidi and it gives me something to tease her about, because apart from inspiring nostril decoration in small children, Heidi is practically perfect in every way.

The fabric and zippers were all thing I had lying around. The flower fabric is a linen, which I actually made a maternity top from when pregnant with Griffin. It was huge on me and I never wore it. The solid purple was from the stash I inherited from my great-grandma Jensen, and the green is some canvas I got dirt cheap at Walmart about a year ago. The zippers are from thrift stores.


I put pulls on the zippers, using thick gauge wire and wrapped loops at both ends, thereby guaranteeing that none of these beads will end up stuck in any nasal cavities.

Sharing Here:


Get your craft on Thurs.
I've started a new blog: Come follow my crafting adventures on my new blog. Find me at: creativeirony.com.
Monday, May 03, 2010

Tutorial: Knife Pleat Toddler Skirt Pattern

A year ago, I made this skirt for Aubriana. I still love it and she sometimes wears it still. I never made up a pattern to share though, so I made it again recently, so I could share the pattern. I love the jean version just as much as the pink polka dots.

Here's a few shots of the finished skirt. The bottom is knife pleats, which are the simpliest kinds of pleats. The back is elastic and there's a little belt built into the front. It's a pretty easy pattern, although the pleats are a little time consuming. Still, it's a project you could do in a day.

Not sure I'm crazy about this shirt with it, but hey, I was running out of light, so I went with it. I love this shirt, but it might be a tad bit busy with the skirt.

Ok, first off, supplies (may vary depending on the size you're making, my yardage is based on size 3T):
1/3 yard main fabric (I used denim, but you can easily use a lighter cotton)
1/3 yard accent fabric
1 yard 1/4" elastic
A little fusible interfacing (a piece about 13X4" is all you will need)
1.5 yards bias binding tape

Step 1:
Measure your subject. This pattern should work for sizes up to 5T. You need the waist measurement. Once you have this, divide by two, then add 1 inch. The guide line on your pattern should be this long when you print it. I made size 3T, with a guide measurement of 11".

Step 2:
Download the pattern, then print to size. Cut out pattern pieces as indicated.

Step 3:
Iron the belt pieces in half, with right sides together.

Stitch around the curve, then down the open side. Turn. Press flat. Top stitch all around the edges. Set aside.

Step 4:
Next, prep the belt loops. Iron in half, then fold the outsides to meet the fold in the center. It will look something like this.

Fold in half, encasing the rough edges along the length, then topstitch the sides. I probably didn't get quite as close to edge as I would normally want.

Set aside.

Step 5:
Ok, now the real stuff begins. Adhere the interfacing to the wrong side of the front facing. I didn't want to hem it, so I just zig zag stitched along the bottom edge since it will be on the inside, but I didn't want any fraying to happen.

Put right sides together with front piece, and stitch along top, with about a 1/2" seam allowance. Iron open.

Step 6:
Iron back band in half lengthwise, wrong sides together. Stitch 1/2" from bottom, then 1/2" below that, then 1/2" below that.

Cut 3 pieces of elastic the same length as the guide. Using a safety pin, feed the elastic through. I usually tack it down once it gets close to the end, then I finish pulling it through, then tack that side down (see photos). You want it to be just a tiny bit (like within 1/2") shorter than the front piece.

Trim elastics and pull taut to evenly distribute gathers.

Pin together the right side of the back piece and band (doesn't have right or wrong sides yet), evenly distributing the gathers.

Sew, with 3/8" seam allowance. Press.

Step 7:
Pin the belt to the sides of the skirt, about 1/4" from the top. Baste in place, leaving the facing free.

Pin the ends of the belt to the center and out of the way. You might want to use safety pins, because I kept poking my fingers with the straight pins.

Step 8:
I've started a new blog: Come follow my crafting adventures on my new blog. Find me at: creativeirony.com.