Follow My New Blog

I've started a new blog. Follow my crafting adventures on creativeirony.com.

Showing posts with label tutorial. Show all posts

Monday, March 16, 2015

How to Convert a Dress into a High-Low Tunic

How to convert a dress into a high-low tunic from Craftastical!

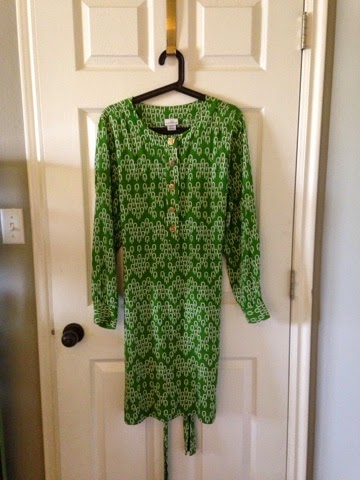
Saint Patrick's Day is upon us, and I realized I have very little green in my wardrobe, which is unacceptable. I searched through three stores, not finding anything green that looked good on me, and finally found a cute green dress at the local thrift store in town, AND it was half off day, so the grand total for this dress? $2.50. Only, it was a bit. . . frumpy? Action had to be taken.

Dress before high-low tunic conversion

I decided to modernize it by making it into a high-low tunic. It was actually a lot easier than I was expecting and only took me about 30 minutes. I love any sort of thrift store find (half my wardrobe is from thrift stores or consignment shops), and I love all things upcycled and restyled.

Here's my tutorial, so you can try it too.

STEP ONE
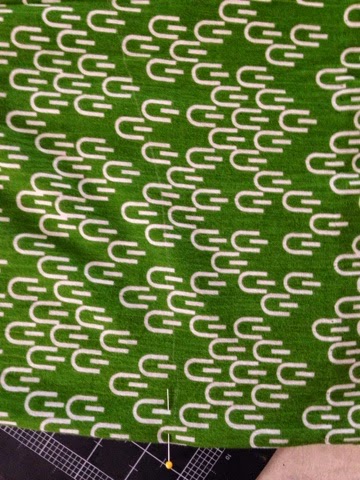
First, put on your dress/skirt/extremely long shirt, whatever you are converting. Mark the length of the front hem with a pin exactly in the middle (I would actually use safety pins--one of mine fell out when I took off the dress). Do the same with the back. Obviously, the back is going to be anywhere from 3-4 inches longer to, well, as long as you want. Drama, baby.

Front pin (hard to see with that pattern, but it's there):
Marking the dress hem in the front

Back pin:
marking the dress hem in the back

STEP TWO
Next, you're going to cut your hem. Remember to leave 1-2" of seam allowance.

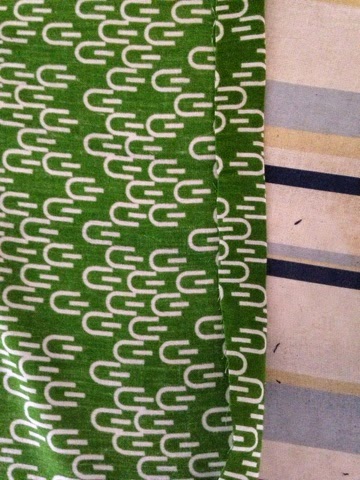
To mark the hemline, lay the garment on its side, with the side seams matched up. This should leave your marking pins on the fold lines for the front and back.

Side seams matching and folded exactly along the front and back:
setting up the hem to be cut

Draw your line for your hem (remember seam allowance). This is probably the trickiest bit. Remember you're going to want to hit the fold at a right angle so you don't create a point, and you're going to want most of the "high-low" movement to happen at the sides, leaving the front and back fairly level.

I used a white fabric pencil to mark my line:
marking the hem line

I used a rotary cutter to make a smooth cut. Fabric scissors will do the same thing though. Cut through both layers of fabric at the same time. Once you've cut your line, try on the garment again before hemming, to make sure you like the line. I realized my cut wasn't curvy enough the first time, and cut a tiny bit more off, after I lined everything back up again.

My finished cut:
the finished cut hem line

STEP THREE
Once I had my hem line like I liked it, it was time to iron the hem. Turn up however much you allowed, and iron. You're going to want to finesse this a bit--you've got some curves and that's always a bit tricky to get to iron flat, but most fabrics will adjust if you work them a bit.

Raw edge turned up:
ironing the hem line

Then turn the raw edge under again, making it meet the ironed fold and press.

Raw edge turned under again towards fold:
ironing the hem line

Once that's all done, stitch the hem down. You can use a machine or hand sew. I chose to hand-stitch my hem, but a machine will do the job just as well. Just make sure to ease as you go, since you're sewing curves here.

Hand stitching my hem down with matching thread:
hemming upcycled dress

Then wear your new tunic with pride! I love how mine turned out.

How to upcycle a dress into a high-low tunic from Craftastical!

Also, one of my friends calls this hemline a mullet hem, and I'm pretty sure that wins the internet.

Linked Up Here:
Tatertots and Jello
I've started a new blog: Come follow my crafting adventures on my new blog. Find me at: creativeirony.com.

Friday, September 07, 2012

Simple Rules to Create Organization that Sustains Itself Plus Master Bath Organization


This is Part 2 of my How I Organized My Entire House for $0.00 (Really!) series. Part 1 (Intro) is here.

Simple Rules (well, more like guidelines) to create organization that sustains itself

I want to start off this series by giving myself a set of rules (more like guidelines) to follow. It's easy to get carried away and easy to lose sight of your goals, so this will help keep me on-track.
  1. Think about how you live your life. It doesn't make sense to have a system that doesn't work with how you live. Have the things you use together grouped together, not always like with like*. You usually use tape and scissors and wrapping paper together. Have them together. You usually use toothpaste and toothbrushes together (if I'm making any weird assumptions here, feel free to educate me! :) )--make it so you only open one drawer or one cabinet to get them. Think efficiency.
  2. Have the things you use the most in easiest reach. The stuff you use less can be harder to get to. Make things easier on yourself.
  3. Along with number 2, have the things where you use them, or put them where you are more likely to use them.** Don't get too caught up in where things are "supposed" to go. Put them where they work for you.
  4. Make things easy to put away. If they aren't (and you are like me), they won't get put away.
  5. Make it simple. Don't go overboard labeling stuff. Don't make a tiny compartment for everything. Have a place for everything, but there's no need to make it more complicated than it needs to be. If you want. Simple systems are the most self-perpetuating.***
  6. Reevaluate. Organize, then go back a week later and see if it's working. If not, tweak. Just because you organized it one way doesn't mean it has to stay that way. And it's easier to rework it when it's still somewhat organized than when it's completely disorganized because the system didn't work with the way you live.
  7. Get rid of stuff you don't use. I've heard if you haven't used it in the last year, get rid of it. But, I think that's unrealistic. I have things I haven't used in the last year that I want to keep and it would tick me off to replace. But, there is a lot of good in honestly evaluating if you are going to use it. Are you holding onto something because of guilt? Because of what it represents?**** When getting rid of stuff, the biggest thing is to be honest with yourself.
  8. Educate your family on your new system, but don't overwhelm them. Make it fun. Get their input if it affects them (I've found it works a lot better if ideas come from everyone, instead of my trying to impose a top down approach).
  9. It doesn't have to be perfect. It won't be perfect. What you organize now will probably have to be organized again at some point. Hopefully a long, long time from now. But, your life will change. Your needs will change. Don't get caught up in perfectionism or get overwhelmed. One little piece at a time.
*For example, put a pair of scissors in the places where you need them the most--not all the scissors in the same spot. Then the scissors will be where you need them, they won't travel all around the house, end up in tossed random drawers and never make it back to the scissor drawer and then you can't find a pair when you need them. For example, I have a pair of scissors in my bedside table, so does David, a pair in the kitchen for opening food packages, a pair in the office, a pair in the wrapping paper box, a pair in the kids' art box, and then the specialty scissors where they go--do not touch my sewing scissors please

**I have a topical acne medication I need to use every day, but not within 30 minutes before or after showering. When it was in the bathroom, I didn't use it regularly. But, put it by my laptop, and suddenly I remembered to use it twice a day like I am supposed to.

***It's my experience that I will put something box in a drawer, but not necessarily a certain spot in that box in drawer. For example, if I have a box for often-used medicines: works great! If I have a certain spot for Tylenol in the box, it doesn't get put there every time by everyone and I get frustrated. It doesn't work across everything (forks have a certain spot, dang it!), but it's a generally good rule of thumb.

****Sometimes that's ok--you may pry my great-grandma's quilts out of my bloody fingers--but sometimes it means you need to let go of that to get rid of it. I kept some kitchen gadgets for a long time, because if I had kitchen gadgets, then surely it meant that someday I was going to be fabulous and motivated to cook all the time, right? And, it would make life easy, and I would transform into super chef-type "good mom" person. I was invested in seeing myself as "person with cool kitchen gadgets" and invested in thinking that a good mom cooks every night. Once I let go of that--good moms don't have to cook every night--then I could get rid of the clutter that wasn't helping my life. Or my cooking.

Do you all have any other tips? I'd love to hear what has and hasn't worked for you! 

(Also, I need to take my own advice! I am just horrible at putting things away and not always good at setting up things that work for me, but that's the point--right? To take time to set this stuff up; to stop and think about it.)

Now, onto the bathroom!

I've started a new blog: Come follow my crafting adventures on my new blog. Find me at: creativeirony.com.
Tuesday, November 15, 2011

Sunshine Paisley Throw Pillow Tutorial

Ok, here it is. What I've been meaning to write and put up for ages. If I didn't have to keep doing that pesky schoolwork (five more weeks until graduation, five more weeks!), this would have happened a lot sooner.

Once I finished the five embroidered paisley squares (click for pattern), I knew I wanted to make a pillow out of them. I was worried though, because I didn't want it to get too "patchwork quilt." I didn't think that would go with the modern feel of my bedroom.

I wanted to do solid yellows and grays, but the quilt story nearby (Gracie Lou's--sooooo awesome!) didn't have any. This was perplexing. Normally, when I get an idea, there is nothing that can prevent me from doing that idea. I mean, small adjustments, they normally make the project turn out better. Large adjustments like substituting a print for a solid? I will normally not proceed. I think the saleswomen in the shop thought I was being completely unreasonable (although she was very perplexedly kind about it). Like, I had gone into a restaurant and said, "But, these green beans aren't green enough, I wanted more of a Christmas green, not so much an olive green. And I wanted them cut 1/4" longer. Do you have different green beans in the back?" (I did not ask for super-secret back-room fabric, FYI).

I've started a new blog: Come follow my crafting adventures on my new blog. Find me at: creativeirony.com.

Monday, November 07, 2011

Black and White Mod Podge Stool Makeover (With Tutorial!)

A few weeks ago, I had a friend coming over to see my house for the first time. I was (frantically) cleaning the morning before she was supposed to come. (Clarice, if you're reading this, that's a total lie. My house is always immaculately clean. I was lounging on the couch eating organic, designer doughnuts and pirouette rolled wafers without making a single crumb and miraculously not taking in calories for hours and hours before your visit. I swear it.)

I was cleaning the bathroom, and I decided that my white stool was never going to look clean on top and that painting it white was the worst decision of my life. Because, clearly, paint weighs out over anything else, including the credit card debt I started accumulating in college. Nope, nope, white paint on this stool--MUCH, MUCH worse.

I bought it for $5 at an antique shop, and it was clearly someone's shop stool. It had drill marks down through the top. But, I liked it. I think it has charm.

The Before:

The After:

I've started a new blog: Come follow my crafting adventures on my new blog. Find me at: creativeirony.com.

Monday, October 10, 2011

Sunshine Paisley Embriodery Pattern

Oooohhhh dear. Pinterest has done me in again. I kept seeing all these beautiful embroidery stitches and projects. Which means, of course, I have been embroidering a lot lately.

I had so much fun trying new stitches. My favorite site is this one, which has the best directions and such beautiful work and I used a bunch of stitches I learned there on my paisley.

I'm very proud to share my very first embroidery pattern. I have a thing for paisley. My sister doesn't get it. I think I may be talking her around with my unrelenting love, but she always compares them to a certain male reproductive cell. If she hadn't just deserted me and moved to St. Louis, she would punch me in the arm for telling you that. I'm sure the comparison has already occurred to you. If it hasn't, my apologies for putting it into your brain. Hopefully my pattern is so awesome that you will now forget about it.

I made five different squares and my recent activities (here and here) may give you a clue as to what I did with them. But, that's coming a different day.


I've started a new blog: Come follow my crafting adventures on my new blog. Find me at: creativeirony.com.

Tuesday, August 16, 2011

Tutorial: Cable Knit Pillow

I am now the proud owner of TWO throw pillows. It's hard to believe that I have reached such a high number; I have managed to accomplish this feat in the short time period of nearly ten years of marriage.

Cable knit pillow tutorial--such a cheery yellow!

All last week I spent knitting. After a particularly long day of knitting, every time I closed my eyes, I literally would see cables floating in front of my eyelids. It's not that it really took that long to knit; it's that I was making my own pattern. I also had an insert I was trying to match, so it had to be the exact right size. That's pretty much a recipe for frogging. A lot. I also have a beautiful new washcloth when I completely finished a front that ended up being too small.

I've started a new blog: Come follow my crafting adventures on my new blog. Find me at: creativeirony.com.
Thursday, May 19, 2011

Tutorial: Ampersand for a Shelf

A little while back, I bought a K and D from Hobby Lobby to put on my picture ledges once they were built. The plan was to get an ampersand to put between them. Awww, too adorable, right? Kara and David=forever. But, I couldn't find one I liked. I'm sort of a font snob. Ok, not sort of. I am. Like nearly every other female craft blogger, I started a Pinterest account, and there are a lot of snobby font things pinned to my funny board. Most of them make fun of Comic Sans. Poor Comic Sans. If only people wouldn't put it where it has no business being! Then Comic Sans wouldn't be the ugly dog of the font world.

Anyway, I pondered on this problem for several months. I could have cut my own ampersand out of wood with my mom's scroll saw, but it's about 20 minutes away, and that's kind of annoying to get exactly right. I've cut out complicated things with a scroll saw before (see the cake topper here), so I could do it, I was just being moody about it.

Then it hit me. A way in which I didn't have to drive round trip 40 minutes and get out the scroll saw from the caverns of my parents' garage. And this is that tutorial.

cardstock ampersand, made by layering cardstock cut with Cricut


Supplies needed:
Scrap cardstock (or pretty cardstock in pretty colors)
Cricut machine or Silhouette machine or traditional die cut machine--I used a Cricut and Plantin Schoolbook cartridge
Mod podge
Sandpaper or rotatory tool
Wood filler
Spray Primer
Spray Paint

Step 1: Cut out a bunch of shapes of the same size. I didn't care about color, because I knew I was going to paint mine later. If you don't want to paint, you can use pretty colors in the same shades or coordinating shades for very pretty effects, or use all the same colors.

I've started a new blog: Come follow my crafting adventures on my new blog. Find me at: creativeirony.com.

Wednesday, October 06, 2010

Tutorial: Quilt Top Paper Piecing Style

If you remember, I've been working on a new quilt. It's a hexagon quilt, and I'm trying out paper piecing. This is all new to me. I've been enjoying it, although it's a crazy amount of work.

There are several ways to piece a quilt this way. In one way, you baste through the paper, and then later take the basting out. In the way I'm doing, I'm tacking down the corners, and then removing the templates so I can reuse them, and I don't take the basting out.

If you're interested in my method (for those of you who don't think I should be committed for attempting a project this time consuming), here's what I'm doing. I think this would be stunning to do smaller and frame to hang as a piece of art.

I printed my templates from this website.

Step One:
Cut and print a template. After a few uses, my corners started to get a little questionable, so I used some shiny tape just over the corners (if you do them along the whole edge, the template doesn't stick to the fabric as well). Cut a square of fabric a little more than 1/4" bigger around each edge of the template.

Step Two:
Fold over one edge and finger press.

Step Three:
Insert the needle with a smallish knot tied on the end of the thread into the fold. Pull through. You can see my needle in the above photo ready to be pulled through the fabric.

Step Four:
Fold over the next edge (I work counter-clockwise) and finger press. This is the hardest part to get lined up. You can sort of tell where your template should go by lining it up with your previous finger fold from step two. This will hide your knot, which appeals to my sense of neatness, although it's probably really unnecessary.

Step Five:
Back tack (I'm not really sure if back tacking is necessary, but I'm paranoid, so I do it--it does seem to help the hexagons keep their shape a bit better). To back tack, insert your needle a tiny bit behind where your thread is already coming out of your fabric, make sure you are catching all your layers of fabric, then come out again, close to your original thread, and pull through. My needle in this photo is all poised to back tack. I just need to pull it to complete the back tack.

Step Six:
To do the next corner, fold down the fabric, again making sure your template is secure into your corner and lined up with your first fold. Once you have it all lined up, finger press it. Then take a small stitch on the corner, making sure to go through all the layers of fabric.

Step Seven.
Back tack.

Step Eight:
Continue around, keeping the template tight and back tacking at each corner. When you get to the last corner, it's going to look like this.

Step Nine:
Pull taut, then tuck corner under, making sure the fold goes all the way to the edge. I use my thumb nail to make sure I get a crisp fold. This is the same method I use for each corner, but it was the easiest to see with this corner.

Step Ten:
Fold down, and tack.

Step Eleven:
Put needle back under first knot. Pull up through fabric.

Step Twelve:
Tie a square knot around string (my mom always helped me remember where I was by saying I should make a rainbow and a smiley face). Cut thread.

The front will look like this:

And the back will look like this:

Then you can pop the template out and carefully press with your iron to keep sharp corners and crisp edges.
I've started a new blog: Come follow my crafting adventures on my new blog. Find me at: creativeirony.com.
Wednesday, August 11, 2010

Tutorial: Soda Can Pin Cushion

So, I know there are pin cushion tutorials all over blogland, but I was looking at the scads of soda cans I've been keeping around for soda can bracelets and had a little idea. And I can't keep ideas to myself, so here's my little version of a pin cushion, inspired by oh so many people.

Supplies:
Empty and clean soda can (I recommend Dr Pepper, but your taste may vary)
Craft knife
Scrap piece of chipboard, cardboard or mat board
Hole punch or Crop-A-Dile
Fabric
Scissors
Trim
Hot Glue
Stuffing
Button (optional)
Needle and Thread (optional, but only if you decide to also skip the button)

Step 1:
Carefully put a slit vertically in your soda can, leaving about an 1 1/4" at the bottom. Cut the top off your can with a pair of scissors to make the bottom easier to remove. Cutting as straight as you can, cut the bottom off your can. This is the part we are interested in. Be careful. Cans are sharp.

Step 2:
Turn your can over onto your cardboard and trace a circle. Cut out circle slightly smaller than traced line. Make sure it fits into your can easily. If it doesn't, keep trimming until it does. If you want a button tuft in your cushion, punch two holes in the center of your circle. Set aside. Someplace safe. But not too safe, you don't want to forget where you put it (I always do that!).

Step 3:
Cut a circle out of your fabric. You want it approximately 2.5 times the diameter of your can, or between five and six inches. I used a bowl to trace mine. The nice thing about this is that it doesn't have to be exact, but somewhere around there. If you're putting a button on your pin cushion, fold the circle in fourths, and mark center with a fabric marker.

Step 4:
Using hot glue, attach the fabric to the cardboard circle at four points, with the right side of the fabric facing outward. Start stuffing it. As it gets fuller, glue one side shut. Stuff quite full. Glue fabric all the way down, closing all the openings.

Step 5:
If you want a button tuft, thread a needle with thread. Come up from one of the bottom holes and to the hole you marked in the center of your fabric. Thread the button on and come back down the through the button hole and out the 2nd hole in the bottom of the cardboard. Tie down. Don't tie too tightly, or your button will disappear when put into your can. Go through the button a few more times for added strength, then make a final knot. Trim ends.

I tried to take pictures of this, but failed miserably. I hope the description and the finished photos are enough to get the general idea.


Step 6:
Dry fit into your can. You kind of have to squeeze it a bit (or a lot) to get it in. If it looks good, put hot glue on the center of your cardboard and stuff it into the bottom of the can. If it doesn't, perhaps I have led you astray. One thing I did wrong the first time was not put the poofy thing far enough into my can.

Step 7:
Starting at the bottom, hot glue ribbon around the can to cover up the print on the can. Work slowly and spread the glue a little so you don't get lumpy glue. Add any other trim you might want. Add pins.

I really want to make some more of these. Considering my propensity for making everything in sets of twenty lately, I think I see at least a few more in my future.

Linking Up Here:
Life in the Pitts
Someday Crafts
Blue Cricket Design
So Much Ado
I've started a new blog: Come follow my crafting adventures on my new blog. Find me at: creativeirony.com.

Monday, July 19, 2010

Tutorial: Tips for Arranging Knick Knacks

I really hope you all aren't sick of my kitchen.

I'm not yet. I still love walking in there. And get this: a few weeks ago, I took a cooking class. You might not believe me, but I am a decent cook. I just never did it, between all the bipolar stuff, I was never stable enough to cook. My focus was keeping my kids fed, clean and happy, and anything above that was fluff.

So, this class wasn't so much the basics of cooking, but how to get more whole grains and more veggies into your cooking.

Which came at a great time, because I've been feeling good enough to be in the kitchen, cooking dinners for my family. And we've been eating together, which the kids love to do. Sometimes I have major mommy guilt that we didn't do that too much before; they love eating at our new table, with everyone together. But, then I have to just get over it, and move on, and feel hopeful about the future, and eat my salad and delicious whole-grain chicken salad with homemade ranch, and smile, because life is good.

Anyway, what was the point of this post? Oh, yeah, kitchen is good. And I thought it might be fun to give you a few tips of how to pick, group and display knick knacks so that they look cohesive and not disjointed.

This is something I don't think comes naturally to me, so this is what I've learned so far. Plus, this way you can get a closer look at what is on my kitchen shelves.

So, I have a light fixture that comes down in the center of the shelves. It's so hard to get a good photo of it all together. I took a bunch and then tried to put them all together. My photoshop skillz weren't serving me that great this time and it's a bit wonky, but you get the idea.


Tip 1:
Color. Pick things that are tied together with color, and repeat throughout the display, adding in plenty of neutrals. These teapots, which came from my great-grandma, were the inspiration for the entire room. I'm not too picky about exact shade, but rather, tried to pick from these families.

You'll notice I gave a lot of leeway to the greens, with tones ranging from olive to leaf to much more blue undertones, but then kept my blues much more tight, sticking closely to teals and aquas. Same with the yellows--I tried to avoid any bright yellows, instead going with mustard and muted colors. I stuck in a hint of navy, which will go nicely with the fabric I choose.

If you're unsure of color, go with all neutrals, then pick one color and put pops of color throughout your display. It will look amazing every time.

Tip 2:
Numbers. For some reason, our eye likes to try to pair things up, so odd numbers will always look more interesting and will keep the eye moving. I'm pretty loose with my interpretation of this "rule" but it does help if I can't figure out why something isn't working.

Tip 3:
Scale. Varying heights and size within a group will always help the eye travel and make a display more appealing.

Tip 4:
White Space. Don't cram everything you can up there. We need breaks. Leave some empty space for your eye to rest.

Notice in the photo of everything together, there are definite groupings, with space between. It might have been a good idea to leave even a little bit more space, and I might play with that some more.

Tip 5:
Stack stuff. I really love stacking old books (or new ones) and putting something on top of them. Or stacking matchboxes and putting something on top of them. Or plates. Or bowls. Don't forget to stack.

Tip 6:
Repetition. If things are looking too crazy, go buy three of something and put them in a row. It immediately calms things down. These bamboo utensil holders were at the dollar store, and they cut down on the clutter factor instantly.

Tip 7:
Variation: Across a long space like these shelves, you want to make sure you have groups of busy things (like the shadow box spoons/bowl/matchboxes/insulators) followed by groups of not at all busy things, like the white pitcher. Play with it until you find what works. Sometimes it takes a while. This also goes for varying things like color, size, height, etc.

One thing I like to do if I'm not sure is to blur my eyes. If the shape is still fairly interesting and things aren't fuzzing right into each other, it's probably working ok.

Tip 8:
Mounting Tape is your friend. I bought a roll of mounting tape and it's been great for helping me with things like the plates. Once I was sure they were going to stay there for a while, I put a little strip so they would stay in place (they were already resting on the shelf itself) and not roll off. It also helped the frame the spoons were in from going crooked. Every time I walked by the dang spoons, they were crooked!

See, nice and straight now.

I am loving these floating shelves! It's great for displaying all my vintage knick knacks, but it brings in that modern flair I need to keep it from being too little old lady, ya know? And I think I'm getting down this arranging trinkets thing too.

Linking Up Here:
mmm button

Sumo's Sweet Stuff

Keeping It Simple
I've started a new blog: Come follow my crafting adventures on my new blog. Find me at: creativeirony.com.