
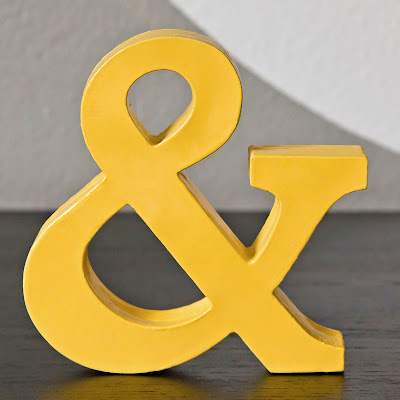
A little while back, I bought a K and D from Hobby Lobby to put on my picture ledges once they were built. The plan was to get an ampersand to put between them. Awww, too adorable, right? Kara and David=forever. But, I couldn't find one I liked. I'm sort of a font snob. Ok, not sort of. I am. Like nearly every other female craft blogger, I started a Pinterest account, and there are a lot of snobby font things pinned to my funny board. Most of them make fun of Comic Sans. Poor Comic Sans. If only people wouldn't put it where it has no business being! Then Comic Sans wouldn't be the ugly dog of the font world.
Anyway, I pondered on this problem for several months. I could have cut my own ampersand out of wood with my mom's scroll saw, but it's about 20 minutes away, and that's kind of annoying to get exactly right. I've cut out complicated things with a scroll saw before (see the cake topper here), so I could do it, I was just being moody about it.
Then it hit me. A way in which I didn't have to drive round trip 40 minutes and get out the scroll saw from the caverns of my parents' garage. And this is that tutorial.
Supplies needed:
Scrap cardstock (or pretty cardstock in pretty colors)
Cricut machine or Silhouette machine or traditional die cut machine--I used a Cricut and Plantin Schoolbook cartridge
Mod podge
Sandpaper or rotatory tool
Wood filler
Spray Primer
Spray Paint
Step 1: Cut out a bunch of shapes of the same size. I didn't care about color, because I knew I was going to paint mine later. If you don't want to paint, you can use pretty colors in the same shades or coordinating shades for very pretty effects, or use all the same colors.
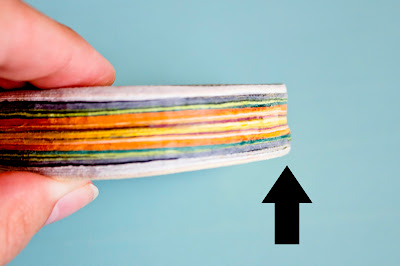
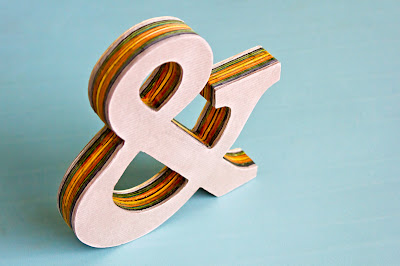
I just used a bunch of scrap cardstock paper. I made mine 6 inches so I could get the most out of my scrapbook paper scraps (sometimes I was able to get 4 out of one large scrap on my Cricut because it's 6" tall, not wide). I cut out 50 ampersands for a finished thickness of about 3/4". It stands up on it's own. You could do a lesser thickness and hang it on the wall or prop it up--even a charm for a necklace in a small size. I can envision all sorts of possibilities! I want to do another one so badly!

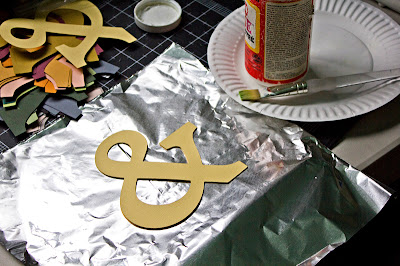
Stop to let it dry every 10-15 pieces. This will help you avoid buckling. This is a project that needs to be done in stages. The most important part is to get glue on every single part of the die cut and to make sure each layer is adhered well before moving on to the next.


Once you are done, it will look something like this:

Step Three: Once you have all your layers glued together, you may decide you like the uneven layered look. I so, you will probably still want to sand it to stand up. I used my rotatory tool (wear safety goggles!) and sand paper to make my ampersand able to stand up at the bottom. I sanded a little dip in the center along the bottom to give it "legs" (so I didn't have to try to get it perfectly flat along the bottom), then I just stood it up, saw where it needed a little bit off and worked until it stood up.
Step Four: Now, here's where you can go several ways.
1. You may decide you like the uneven, layered look and you picked pretty colors. In which case, you can seal it in Mod Podge and you are done! Or, sand the edges at an angle to reveal the layers.
2. You may decide the uneven look is fine with you (I think it looks pretty cool myself), but you want it a different color, in which case, you can skip to the priming and painting steps.
3. You want to even out your edges. In which case, start sanding! This will be so much easier if you have a rotatory tool. Especially if your shape has inside spaces like mine. Sand until you get an even edge. Fill in any spaces with wood filler, let dry, then lightly sand.
Step Five: Spray with primer and allow to dry. Then spray paint. I found that it worked a lot better to do tons of light coats. I probably did six or seven coats at different angles to get good even coverage and to get all the angles.
Aaaaaannnnd, that's it! This probably took me three or four hours if I take out in the in between waiting time, but it's one of those projects that you do in very small steps. Also, I picked a somewhat complex shape. With a simpler shape (a solid heart, for example), this project would go more quickly.


Its home is now my picture ledges. These are all decorated for now. They are on my side of the bed and it makes waking up in the morning slightly more cheerful.

The corner of my bedroom now looks like this:

I still want to swap out the lamp (too small and the shade is the wrong shape and color). If you'll notice, I solved my cord problem from this post--I tucked it under the baseboard--which was much easier than I was thinking it would be. I still have not lengthened my curtains--it's on the list. Still, I am really starting to feel like my room is actually a room and not just furniture thrown in a room without a purpose. I dearly love to make furniture feel like it has a purpose in life. (I give you permission to snicker at that last sentence).
And a close up with my Hobby Lobby letters. T-woo Wuv.

Anyway, I pondered on this problem for several months. I could have cut my own ampersand out of wood with my mom's scroll saw, but it's about 20 minutes away, and that's kind of annoying to get exactly right. I've cut out complicated things with a scroll saw before (see the cake topper here), so I could do it, I was just being moody about it.
Then it hit me. A way in which I didn't have to drive round trip 40 minutes and get out the scroll saw from the caverns of my parents' garage. And this is that tutorial.

Supplies needed:
Scrap cardstock (or pretty cardstock in pretty colors)
Cricut machine or Silhouette machine or traditional die cut machine--I used a Cricut and Plantin Schoolbook cartridge
Mod podge
Sandpaper or rotatory tool
Wood filler
Spray Primer
Spray Paint
Step 1: Cut out a bunch of shapes of the same size. I didn't care about color, because I knew I was going to paint mine later. If you don't want to paint, you can use pretty colors in the same shades or coordinating shades for very pretty effects, or use all the same colors.
I just used a bunch of scrap cardstock paper. I made mine 6 inches so I could get the most out of my scrapbook paper scraps (sometimes I was able to get 4 out of one large scrap on my Cricut because it's 6" tall, not wide). I cut out 50 ampersands for a finished thickness of about 3/4". It stands up on it's own. You could do a lesser thickness and hang it on the wall or prop it up--even a charm for a necklace in a small size. I can envision all sorts of possibilities! I want to do another one so badly!

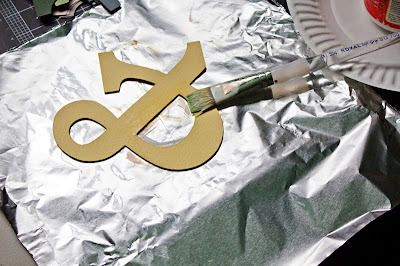
Step Two: Using Mod Podge, put a thin coat, even coat of glue on on of the pieces. Line up another piece and smooth it out. It's important that you don't have gaps or places where it doesn't adhere. I alternated putting die cuts on the back and front of my piece and I had new pieces of tin foil ready so I could have a clean workspace immediately whenever any glue dripped. If glue drips down the side, just catch it with your brush. It's going to be nearly impossible to get these to line up perfectly, so just go with it. We're going to sand down the edges later--just be as precise and clean as you can.


Stop to let it dry every 10-15 pieces. This will help you avoid buckling. This is a project that needs to be done in stages. The most important part is to get glue on every single part of the die cut and to make sure each layer is adhered well before moving on to the next.


Once you are done, it will look something like this:

Step Three: Once you have all your layers glued together, you may decide you like the uneven layered look. I so, you will probably still want to sand it to stand up. I used my rotatory tool (wear safety goggles!) and sand paper to make my ampersand able to stand up at the bottom. I sanded a little dip in the center along the bottom to give it "legs" (so I didn't have to try to get it perfectly flat along the bottom), then I just stood it up, saw where it needed a little bit off and worked until it stood up.

Step Four: Now, here's where you can go several ways.
1. You may decide you like the uneven, layered look and you picked pretty colors. In which case, you can seal it in Mod Podge and you are done! Or, sand the edges at an angle to reveal the layers.
2. You may decide the uneven look is fine with you (I think it looks pretty cool myself), but you want it a different color, in which case, you can skip to the priming and painting steps.
3. You want to even out your edges. In which case, start sanding! This will be so much easier if you have a rotatory tool. Especially if your shape has inside spaces like mine. Sand until you get an even edge. Fill in any spaces with wood filler, let dry, then lightly sand.

Step Five: Spray with primer and allow to dry. Then spray paint. I found that it worked a lot better to do tons of light coats. I probably did six or seven coats at different angles to get good even coverage and to get all the angles.
Aaaaaannnnd, that's it! This probably took me three or four hours if I take out in the in between waiting time, but it's one of those projects that you do in very small steps. Also, I picked a somewhat complex shape. With a simpler shape (a solid heart, for example), this project would go more quickly.


Its home is now my picture ledges. These are all decorated for now. They are on my side of the bed and it makes waking up in the morning slightly more cheerful.

The corner of my bedroom now looks like this:

I still want to swap out the lamp (too small and the shade is the wrong shape and color). If you'll notice, I solved my cord problem from this post--I tucked it under the baseboard--which was much easier than I was thinking it would be. I still have not lengthened my curtains--it's on the list. Still, I am really starting to feel like my room is actually a room and not just furniture thrown in a room without a purpose. I dearly love to make furniture feel like it has a purpose in life. (I give you permission to snicker at that last sentence).
And a close up with my Hobby Lobby letters. T-woo Wuv.

I've started a new blog: Come follow my crafting adventures on my new blog. Find me at: creativeirony.com.
Just a quick note to let you know that a link to this post will be placed on CraftCrave today [20 May 02:15am GMT]. Thanks, Maria
ReplyDeletelove it, Kara!!! I love the multicolor effect that you get on the sides and think that would be so cool in jewelry! I can't wait to give this a try!
ReplyDeleteOoh, I like that!
ReplyDeletewhere did you get your curtains!?
ReplyDeleteAesaLina, I actually made them. You can read all about it in this post: Curtains, if you'd like. :)
ReplyDeleteYou are very clever! I love how it turned out...Thanks for sharing!
ReplyDeleteI love everything about the shelves! Where did you get your tree of life?
ReplyDelete