Follow My New Blog

I've started a new blog. Follow my crafting adventures on creativeirony.com.

Friday, May 27, 2011

Flying Birds

I've crossed off a few more things from my UFO list! I'm determined to finish that list this summer. I realized the oldest thing on there is a cross stitch I started back before I was married, about 11 years ago. 11 years (that's a little over 1/3 of my life). I guess I should just be happy there aren't older objects sitting about. The cross stitch is actually all finished, but it's never been framed; it's been sitting in a box for 11 years. I think I'm going to make a pillow out of it.

Anyway, that has nothing to do with my post today! I hung up some art in the corner of my bedroom where my chair sits.

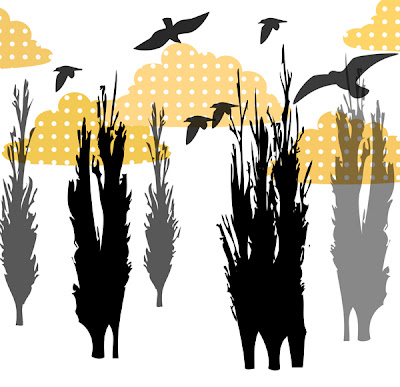
I happened to see this tray by Eskil Design on Young House Love somewhere in the advertising sections and was very attracted to the graphic elements of the trees, clouds and birds. I designed something highly inspired by it (ok, I nearly copied it--although I went off memory and tried not too look at it and also put my own spin on it).

The tray:
Eskil Design tray with birds and clouds
  My version:
Eskil Design inspire graphic design print

I've started a new blog: Come follow my crafting adventures on my new blog. Find me at: creativeirony.com.

Tuesday, May 24, 2011

Unfinished Craft Project--Finished! 1 of One Hundred Thousand Six Hundred Three

I have organized my poor (it ends up being the junk dumping room, since we don't have a garage) craft room  so many times since we moved in a year ago.

This is what the closet looks like when it's organized (if the closet is put away, the rest of the room does ok). Which is never. Because to find anything, I have to take down all those stacked boxes. And you can guess how often then make it back up into a stack (hint: never).

craft closet


And it occurs to me that Flylady is right and that you can't organize clutter (or in my case, excessive amounts of craft crap). I tried to get rid of some of it, but my brain kept thinking up uses for it. Stupid brain.

Anyway, I pulled out all my unfinished projects. Every single one. Well, not counting scrapbook pages. I'm trying to motivate myself here. Not send myself to craft place-where-there-is-fire-and-brimstone-and-unfinished-scrapbook-pages-scream-at-you-all-day-inducing-high-levels-of-guilt. I don't mind the scrapbooking I haven't done--I never intended to scrapbook every photo I ever took. It's the scrapbook pages I've started and never finished that get to me. But that's another post for another day.

Anyway, I did manage to get rid of a few projects that I no longer wish to complete, but here is the list of projects I still want to complete. These are strictly projects I've started, not projects I want to start. That list is significantly longer. Some of these are biiiiiiig projects.

Spray paint frames (I'll show you these soon)
Tree tote bag (look below for pictures)
Pettycoat skirt (also coming soon!)
Ampersand (this was my last post)
White floaty scarf
Pink shirt refashion
Wrap around vest refashion
Crochet fingerless gloves
Repair pink and grey hair flower
Hexagon quilt (Somehow, I stopped working on this one)
Thanksgiving wall hanging
Rehang crochet butterfly in kitchen (See the butterfly almost the bottom left-hand corner? My kids keep knocking off the wall and breaking the glass--need to put acrylic in it or something)
Garden quilt
Grandkid silhouettes
Gold sweater
Yellow flower/pink flower/pink felted flower/purple headband/pink cuff
Yellow rosette pillow
Curtains (They need to be a tiny bit longer)
Green knitted buckets
Painted linen skirt
Braided rug (I got sidetracked on this project too)
Patches on jeans
Mom's messenger bag
Santa Claus wall hanging
Box purse
Grandma Jensen quilt--blues and purples
Crochet beaded bag
Let out Citrus halter (Aubrey never wore this much and it has some room to let it out--she could wear it as a top now)
Sew pom pom on poncho
Butterfly embroidery
Blue and brown hoodie
Wool scarf
Cross stitch Noah's Ark
Blue and Pink diamond quilt
Orange and green diamond quilt
Mom's Christmas present albums
Bag embroidery

Hummm, maybe it just seems much bigger in my mind? Because that list is looking quite do-able right now. I'm hoping I can have most of these done by the end of the summer. Maybe?

Crossed off items are ones I've already finished!

Speaking of finished, here's one I finished yesterday!

fall colored, ruched, handmade tote bag (also has link to basic tote tutorial)

I've started a new blog: Come follow my crafting adventures on my new blog. Find me at: creativeirony.com.

Thursday, May 19, 2011

Tutorial: Ampersand for a Shelf

A little while back, I bought a K and D from Hobby Lobby to put on my picture ledges once they were built. The plan was to get an ampersand to put between them. Awww, too adorable, right? Kara and David=forever. But, I couldn't find one I liked. I'm sort of a font snob. Ok, not sort of. I am. Like nearly every other female craft blogger, I started a Pinterest account, and there are a lot of snobby font things pinned to my funny board. Most of them make fun of Comic Sans. Poor Comic Sans. If only people wouldn't put it where it has no business being! Then Comic Sans wouldn't be the ugly dog of the font world.

Anyway, I pondered on this problem for several months. I could have cut my own ampersand out of wood with my mom's scroll saw, but it's about 20 minutes away, and that's kind of annoying to get exactly right. I've cut out complicated things with a scroll saw before (see the cake topper here), so I could do it, I was just being moody about it.

Then it hit me. A way in which I didn't have to drive round trip 40 minutes and get out the scroll saw from the caverns of my parents' garage. And this is that tutorial.

cardstock ampersand, made by layering cardstock cut with Cricut


Supplies needed:
Scrap cardstock (or pretty cardstock in pretty colors)
Cricut machine or Silhouette machine or traditional die cut machine--I used a Cricut and Plantin Schoolbook cartridge
Mod podge
Sandpaper or rotatory tool
Wood filler
Spray Primer
Spray Paint

Step 1: Cut out a bunch of shapes of the same size. I didn't care about color, because I knew I was going to paint mine later. If you don't want to paint, you can use pretty colors in the same shades or coordinating shades for very pretty effects, or use all the same colors.

I've started a new blog: Come follow my crafting adventures on my new blog. Find me at: creativeirony.com.

Tuesday, May 17, 2011

In which I Go to Disneyland

I keep thinking about my blog and how much I want to update it. I keep doing 10 projects in steps and rotating them in such a way that I never finish one project. Ever. I have some really cool things to show you. Probably one or two more cycles through my rotation and I'll be exploding with things to show you.

In the meantime, we went on a trip to Disneyland last week or so. It was my kids' first trip. We didn't tell them we were going--which was so fun! We picked up the older two from school and left. It was literally snowing huge snowflakes as we left. In MAY! I was never so glad to leave.

I had a huge bag of activities for the kids to do in the car. Every 30 minutes (I brought a timer), they got something new out of the bag. I'll do a post with a list soon. It worked amazingly well. Almost no whining.

We decided to only go to Las Vegas the first day and stay overnight there (about a six hour drive). We drove with the kids down the strip and let them see all the cool hotels. We saw the volcano going and the fountains in front of the Bellagio. Nice timing.

Then, we woke up and drove the rest of the way to California. We went with my parents and my youngest brother, Ty, and we all rented a house. It was a great vacation--you know, all the regular vacation cliches. Which is why the rest of this post is going to be photos with a tiny bit of commentary.

Maxton waiting to leave the Las Vegas hotel.


The kids getting a bit restless now. We did eventually leave.


Griffin lying on the bed of nails at the Discovery Science Center.


I've started a new blog: Come follow my crafting adventures on my new blog. Find me at: creativeirony.com.