
Step 1: Determine what size quilt you are going to make. Smaller quilts are faster, but a twin size will grow with them. I picked a twin size for mine because Aubrey didn't have a larger sized quilt and I had a lot of clothes to choose from. I had clothes I ended up not using.
Check out this quilt size guide to get you started. It's in PDF format.
This quick visual guide to mattress sizes might also help in determining your size:

Don't feel like you can't play with this a little, especially if you're going bigger. Sometimes once you pick your block size, it makes sense to add a few inches instead of dealing with cutting squares that are 4 3/8". That's just not a fun number.
Determine your block size and how you are setting them in your quilt. I picked a 4.5" block, with sashing that was 2" and squares between that were 2". You don't have to do a sashing and if you are low on baby clothes, mix it up with fabric bought by the yard. I added flannel to my quilt and it is super snugly.
My clothes in a bin:

Step 2: Draft your quilt using graph paper. Determine the finished size of your quilt, the size of any boarders. Then calculate how many squares of what size and what type fabric you need. This will be so helpful when you're cutting out your quilt. You will also need enough fusible interfacing or stable, non-stretch fabric to back your clothing quilt squares.
I didn't use graph paper, but here's my sketch:

Step 3: Start cutting. I highly recommend a quilting mat, ruler and rotary cutter. These are a bit pricey, so look for sales or % off coupons. You will be so glad you didn't decide to do this all with a pair of scissors. Please keep your fingers on the ruler and never put them past the edge. My aunt cut her finger so badly once--it's really worth it to get into the habit.
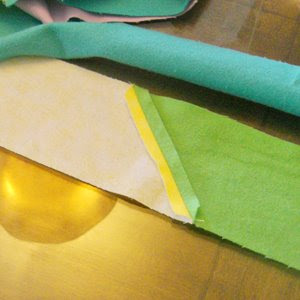
I cut the clothing down the seams using a pair of scissors, although it would be possible to do it freehand with the rotary cutter. Then, I cut my flannel to size, then used a quilting spray adhesive (it washes out) to adhere it to my clothing. I made sure to include ruffles and gathers and bows and pockets, but this is really just extra and you can do it out of the fabric that lies flat as well. Be careful not to stretch the knits as you put them on. Then I used the ruler and rotary cutter to cut the extra clothing from my square. You could do the same process using fusible interfacing--they come with directions on how to fuse them to fabric.
Squares rough-cut and waiting for flannel:

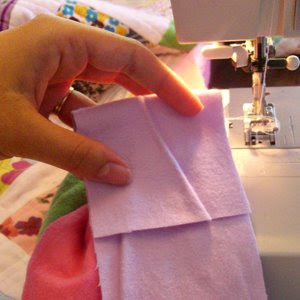
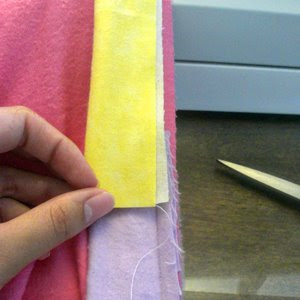
Close up of a the back of a square (with another square facing up behind it).

Be sure to check for any hidden snaps. Remove them if you can. If not, mark them so you don't break a needle (I broke one sewing my blocks together)
Step 4: Count your squares to make sure you have enough. I always cut a few extra and I'm usually glad I did.
Step 5: Layout your quilt. This is like dry fitting tile. It allows you the first peek at what your finished quilt is going to look like and makes it much easier to mix up the fabric so you get a good randomness going.One at a time, I turned my squares over and used a washable fabric marker to write a grid system on the white flannel on the back, ie, A1, A2. . . B1, B2. . . etc. This was something I'd never done before and was a stroke of genius. I can't tell you how many times I've wondered if my squares were out of order. It was simple to tell I was getting it right and worth the extra time it took to write. You can buy a pen at any fabric supply store and it should wash out. Even if it didn't, I wasn't too worried, since they were on the back of my squares.
The top part of my quilt, the first row turned over and marked:

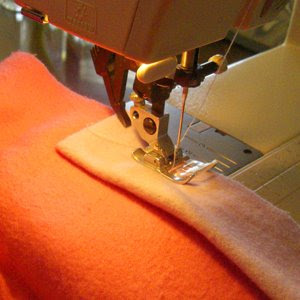
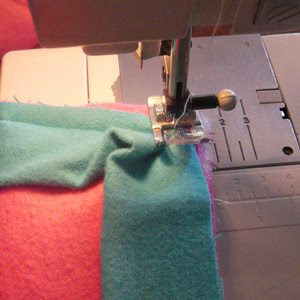
Step 6: Start sewing. I always chain stitch, which means I don't lift my presser foot between squares. I just stitch off the end, then put the next block on and keep sewing. Then at the end, it's a simple matter of clipping the stitches between the squares. There's no need to back tack quilting blocks.
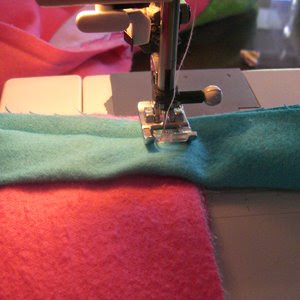
Rows sewn together:

Step 7: Press your blocks as you go. This means you put your iron down and lift it straight up without moving the iron along the fabric. This will help your seams not stretch and create much better fitting blocks.
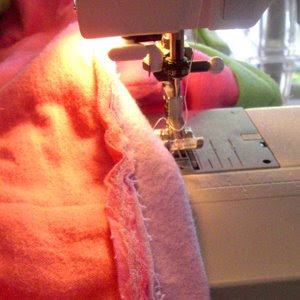
Step 8: Sew your rows together. Sew on any borders you want to add.
Before borders:

The finished top:

Step 9: Sew backing. Measure your quilt and cut your backing into two long pieces. Sew the two pieces together so that there is a long seam. This seam should run lengthwise down the very center of your quilt. Press the seam open.
If your quilt is less than 45" wide, you can use one big piece without any seams, as most quilting fabric comes in 45" wide.
Measuring my backing:

Step 10: Determine how you are going to quilt. The easiest thing to do is to take your quilt to a quilting shop to have it professionally quilted. You can check your local prices, but around here, it's $20 an hour and a twin would take 2-3 hours (a screaming deal, if you ask me).
If you're going to quilt it yourself, you have a few options. You can tie it, if you know someone with a quilting frame. You can machine stitch it, but you will need a walking foot. This helps feed the fabric on the top at the same rate as the bottom. Without it, it's a mess. My mom's Pfaff has one built in and it's amazing. If you're truly crazy, you can hand quilt it with a hoop or frame. In the rest of the directions, I'm assuming you choose to machine quilt it yourself.
Step 11: Prepare your layers for quilting. I always choose a low-loft batting because it looks so much more professional when machine quilted. I always start out with the backing on the bottom, the right side facing the ground. Then smooth out your batting over it. Then center your quilt top, facing up. Spray in sections and smooth out from the middle. It will be easier if you can talk someone into helping you. Basting is also an option, but I dislike it greatly.
Flip your quilt sandwich over and adhere the back, using the same method as the front. You should have at least 3" overhang on each side, but not more than 6 or 7".
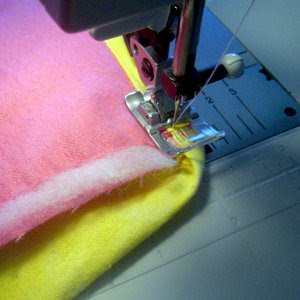
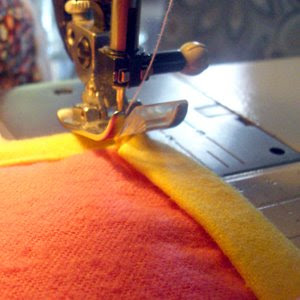
Step 12: Quilt. Start in the middle and work your way out to the ends. Stitch length should be 2.5 to 3.5 mm. Most batting has a recommended distance. Mine was 2-4" inches. Sew out from the center to the edge, then turn and start in the middle again, quilting out to the edge.
The quilt under the sewing machine.


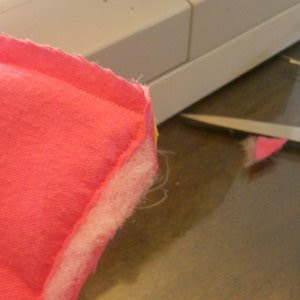
Step 13: Trim the border. Using your quilting ruler and rotary cutter, trim the border to a uniform size. The batting should come to the edges of the fabric.
Trimming up the edges:

All trimmed up:

Step 14: Bind the edges. You can buy double fold bias tape for this, or make your own. Or, use the following tutorial on a simple way to avoid ironing long strips into double fold bias tape. It's not traditional, but I love it because it uses the sewing machine for both sides (no hand stitching!) and no folding or ironing.
Cut bias strips at between 2.5-3". Sew strips together until they are long enough to go around the perimeter of your quilt:
Start on the wrong side on of the quilt. Turn under the end about two inches:
Fold raw edges together lengthwise and match them with raw edges of quilt. Start stitching about 1.5" from the end of the binding and 3/8" from the side:
Stitch until you get to the corner. At 3/8" from the end, put your needle into the fabric. Lift your presser foot and turn the quilt:
Pulling taut, turn the binding so that the raw edges match up again. Continue sewing:
When you get back around to where you started, stop about 6 or 7" from the beginning. Pull taut and trim just shorter than where your stitching starts:
 Tuck end into folded binding. Stitch remaining distance, tacking once you are past the start of the stitches.
Turn quilt over and wrap binding around to front:
Being sure to hide the visible stitches underneath the front fold, start stitching about 1/8" from the edge of the fold. Pull and fold over as you go.
When you get close to a corner, stop a little away from it and trim the corner off:
As you approach the corner, pull it taut and square: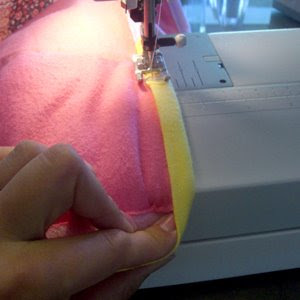 Then continue stitching until you reach the corner point, like this:
Put the needle into the fabric, then turn the quilt. Pull the fabric around to the front, put your presser foot down and continue stitching.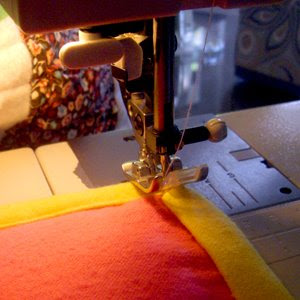
 When you get around, tack your stitches down and trim the ends.
Picture of the finished binding:

Enjoy your finished quilt!


Check out this quilt size guide to get you started. It's in PDF format.
This quick visual guide to mattress sizes might also help in determining your size:

Don't feel like you can't play with this a little, especially if you're going bigger. Sometimes once you pick your block size, it makes sense to add a few inches instead of dealing with cutting squares that are 4 3/8". That's just not a fun number.
Determine your block size and how you are setting them in your quilt. I picked a 4.5" block, with sashing that was 2" and squares between that were 2". You don't have to do a sashing and if you are low on baby clothes, mix it up with fabric bought by the yard. I added flannel to my quilt and it is super snugly.
My clothes in a bin:

Step 2: Draft your quilt using graph paper. Determine the finished size of your quilt, the size of any boarders. Then calculate how many squares of what size and what type fabric you need. This will be so helpful when you're cutting out your quilt. You will also need enough fusible interfacing or stable, non-stretch fabric to back your clothing quilt squares.
I didn't use graph paper, but here's my sketch:

Step 3: Start cutting. I highly recommend a quilting mat, ruler and rotary cutter. These are a bit pricey, so look for sales or % off coupons. You will be so glad you didn't decide to do this all with a pair of scissors. Please keep your fingers on the ruler and never put them past the edge. My aunt cut her finger so badly once--it's really worth it to get into the habit.
I cut the clothing down the seams using a pair of scissors, although it would be possible to do it freehand with the rotary cutter. Then, I cut my flannel to size, then used a quilting spray adhesive (it washes out) to adhere it to my clothing. I made sure to include ruffles and gathers and bows and pockets, but this is really just extra and you can do it out of the fabric that lies flat as well. Be careful not to stretch the knits as you put them on. Then I used the ruler and rotary cutter to cut the extra clothing from my square. You could do the same process using fusible interfacing--they come with directions on how to fuse them to fabric.
Squares rough-cut and waiting for flannel:

Close up of a the back of a square (with another square facing up behind it).

Be sure to check for any hidden snaps. Remove them if you can. If not, mark them so you don't break a needle (I broke one sewing my blocks together)
Step 4: Count your squares to make sure you have enough. I always cut a few extra and I'm usually glad I did.
Step 5: Layout your quilt. This is like dry fitting tile. It allows you the first peek at what your finished quilt is going to look like and makes it much easier to mix up the fabric so you get a good randomness going.One at a time, I turned my squares over and used a washable fabric marker to write a grid system on the white flannel on the back, ie, A1, A2. . . B1, B2. . . etc. This was something I'd never done before and was a stroke of genius. I can't tell you how many times I've wondered if my squares were out of order. It was simple to tell I was getting it right and worth the extra time it took to write. You can buy a pen at any fabric supply store and it should wash out. Even if it didn't, I wasn't too worried, since they were on the back of my squares.
The top part of my quilt, the first row turned over and marked:

Step 6: Start sewing. I always chain stitch, which means I don't lift my presser foot between squares. I just stitch off the end, then put the next block on and keep sewing. Then at the end, it's a simple matter of clipping the stitches between the squares. There's no need to back tack quilting blocks.
Rows sewn together:

Step 7: Press your blocks as you go. This means you put your iron down and lift it straight up without moving the iron along the fabric. This will help your seams not stretch and create much better fitting blocks.
Step 8: Sew your rows together. Sew on any borders you want to add.
Before borders:

The finished top:

Step 9: Sew backing. Measure your quilt and cut your backing into two long pieces. Sew the two pieces together so that there is a long seam. This seam should run lengthwise down the very center of your quilt. Press the seam open.
If your quilt is less than 45" wide, you can use one big piece without any seams, as most quilting fabric comes in 45" wide.
Measuring my backing:

Step 10: Determine how you are going to quilt. The easiest thing to do is to take your quilt to a quilting shop to have it professionally quilted. You can check your local prices, but around here, it's $20 an hour and a twin would take 2-3 hours (a screaming deal, if you ask me).
If you're going to quilt it yourself, you have a few options. You can tie it, if you know someone with a quilting frame. You can machine stitch it, but you will need a walking foot. This helps feed the fabric on the top at the same rate as the bottom. Without it, it's a mess. My mom's Pfaff has one built in and it's amazing. If you're truly crazy, you can hand quilt it with a hoop or frame. In the rest of the directions, I'm assuming you choose to machine quilt it yourself.
Step 11: Prepare your layers for quilting. I always choose a low-loft batting because it looks so much more professional when machine quilted. I always start out with the backing on the bottom, the right side facing the ground. Then smooth out your batting over it. Then center your quilt top, facing up. Spray in sections and smooth out from the middle. It will be easier if you can talk someone into helping you. Basting is also an option, but I dislike it greatly.
Flip your quilt sandwich over and adhere the back, using the same method as the front. You should have at least 3" overhang on each side, but not more than 6 or 7".
Step 12: Quilt. Start in the middle and work your way out to the ends. Stitch length should be 2.5 to 3.5 mm. Most batting has a recommended distance. Mine was 2-4" inches. Sew out from the center to the edge, then turn and start in the middle again, quilting out to the edge.
The quilt under the sewing machine.


Step 13: Trim the border. Using your quilting ruler and rotary cutter, trim the border to a uniform size. The batting should come to the edges of the fabric.
Trimming up the edges:

All trimmed up:

Step 14: Bind the edges. You can buy double fold bias tape for this, or make your own. Or, use the following tutorial on a simple way to avoid ironing long strips into double fold bias tape. It's not traditional, but I love it because it uses the sewing machine for both sides (no hand stitching!) and no folding or ironing.
Cut bias strips at between 2.5-3". Sew strips together until they are long enough to go around the perimeter of your quilt:

Start on the wrong side on of the quilt. Turn under the end about two inches:

Fold raw edges together lengthwise and match them with raw edges of quilt. Start stitching about 1.5" from the end of the binding and 3/8" from the side:

Stitch until you get to the corner. At 3/8" from the end, put your needle into the fabric. Lift your presser foot and turn the quilt:

Pulling taut, turn the binding so that the raw edges match up again. Continue sewing:

When you get back around to where you started, stop about 6 or 7" from the beginning. Pull taut and trim just shorter than where your stitching starts:
 Tuck end into folded binding. Stitch remaining distance, tacking once you are past the start of the stitches.
Turn quilt over and wrap binding around to front:

Being sure to hide the visible stitches underneath the front fold, start stitching about 1/8" from the edge of the fold. Pull and fold over as you go.
When you get close to a corner, stop a little away from it and trim the corner off:

As you approach the corner, pull it taut and square:
 Then continue stitching until you reach the corner point, like this:
Put the needle into the fabric, then turn the quilt. Pull the fabric around to the front, put your presser foot down and continue stitching.

 When you get around, tack your stitches down and trim the ends.
Picture of the finished binding:

Enjoy your finished quilt!


I've started a new blog: Come follow my crafting adventures on my new blog. Find me at: creativeirony.com.
Thank you so much for all the helpful tips! I can't wait to get started!!
ReplyDeleteWow Kara! This is absolutely stunning.
ReplyDeleteThank you for the detailed (yet easy) instructions. I love the idea of using baby clothes for a quilt. My daughter has so many adorable outfits that I just know I won't be able to part with.
ReplyDeleteI'm getting ready to make (attempt) my first quilt and I will be using your blog as a reference. Thank you!
This is such a great help. I have been thinking about doing this for some time now, but just didn't know how to get started. Can't wait to get started.
ReplyDeleteAll of your details will be a GREAT help.
I LOVE THIS.... but I might need some additional help- are you up for questions?
ReplyDeleteHelga Marie, ask away! I'd love to help you through the process. You ask here or you can email me at karah99 @ gmail.com. :)
ReplyDeleteI love this idea. I have so many cute outfits from my son that I want to keep but they take up so much room. This is perfect. I wish I was as talented as you. Thanks for linking up on Tot Tuesdays last week. I hope you’ll join me this week for another party. Happy Easter!
ReplyDeleteHow beautiful! The colors are gorgeous! I am bookmarking this project so that when I try my first quilt I can refer to your easy to understand directions.
ReplyDeletei love, love love this! I made a quilt (well, semi quilt) out of my daughter's clothes from her first year, but it was the first real thing I sewed so it's only adequate. I posted it on my blog. But yours is amazing - I love it!
ReplyDeleteLOVE THIS! My boys clothes have officially been saved from all garage sales!
ReplyDeleteHappy Day,
Jasey @ Crazy Daisy
crazyjayzplace.blogspot.com
I have been meaning to do this forever! I just don't know if I will ever get around to it.
ReplyDeleteI'm actually in the process of making three of these right now for my three daughters. Many of their clothes have been hand-me-downs so a bunch of them have been worn out and headed for the garbage. As I've been sorting through the clothes I made a stack for donation (stuff still in good shape) and a stack for the garbage (stained, torn, etc.). I used the garbage stack for the quilts. I had enough that I got plenty of usable squares even chucking the bad ones. I divided each matching stack into three piles so each quilt will have mostly similar squares. For the border I used some sheets I found on sale that I loved -- a fun striped cotton. Then got a basic color to alternate with the stripes in a larger square for the border. This will help them really know whose is whose. They love looking over the squares since they're old enough to remember a lot of the pieces (ages 8, 6, and 4).
ReplyDeleteur the best...so detailed that even an amateur like me can do it...i sent a copy to my mom too to get her psyched so that we can start on it together..this way i get some fun time to spend wit her too...thanks alot kara
ReplyDeletethe link does not work :(
ReplyDeleteThanks for letting me know. I fixed the link--the site had moved it. :)
ReplyDeleteThank you so much for posting this! I was just starting to think about making a quilt out of my daughters old clothes, and this is PERFECT! I love the layout, and the instructions are so clear! Thank you thank you thank you! :D
ReplyDeleteThanks - Just a quick question to clarify. You are backing your cloth squares with a piece of flannel for support or using fusible interface prior to the piecing together?
ReplyDeleteMaisie, you can do either. I used flannel in my quilt, but I know a lot of quilters use fusible interfacing, so I wanted to mention that as a possible option.
ReplyDeleteA few questions: Do you recommend cotton batting for this? I am making a twin for my daughter, too. Also, do you not quilt the borders (your pink section)? I'm finished with my top, and getting closer to the actual quilting! Thanks so much for the idea. :)
ReplyDeleteKelly, yes, I always use cotton batting. I didn't quilt my borders yet in these photos, but I would recommend quilting it. Batting usually has a recommended quilting distance, usually 2-4" as a maximum distance--it says on the package, so you don't want to leave more than that distance between your quilting (I mean, it doesn't have to be exact, but as a general rule).
ReplyDeleteSo exciting that you are getting close to quilting! That is a huge accomplishment! I bet you are so excited. :)
Quick question regarding using flannel rather than interfacing. (I am completely a novice and am planning my daughter's clothing quilt to give her for her 1st birthday). Do you use spray adhesive to adhere the clothing squares to a piece of flannel, or do you cut the outfit at the seams (like a onesie) and adhere the whole half to the flannel and then cut? What kind of flannel do you recommend. I like the idea of using flannel because it seems like it would be a cheaper alternative to the (rather highly priced) interfacing. And it will save on ironing! (Which I hate!)
ReplyDeleteAnonymous, I cut the flannel squares first, then adhered the flannel to the outfits that were already cut at the seams. Then I cut the clothes more closely to the flannel, making sure it still stayed the right size of the square. I used a cheap flannel--I bought it at Walmart. I hope that helps a bit!
ReplyDeleteHi! This is beautiful! Question: how did you get from step 6 to step 7? I have never quilted before...I'm more of a crochet(er) ... thanks :-)
ReplyDeleteI posted a question, but i think i lost it :-/ how did you get from step 6, with the rows, to step 7, with all the rows put together? Thank you! Sorry if it's a dumb question.
ReplyDeleteNot a dumb question! I didn't get much detail there. :) So, I would lay out the rows you sewed on the floor. Then, take the top row, and put flip it face down onto the row just below it. If you do that, the seam along the top is the one you want to sew. So, you're going to have one long row facing another long row, and sewing along the longest side. Match up the seams as you go--usually I put in a lot of pins beforehand to make sure everything is working well together. Then, after you sew, open it up, and iron along the long seam you just sewed. Then, pin the next row to the two rows you just sewed together, right sides together, and sew the long seam, and so on until you have all the rows sewn together. Does that make sense? If it doesn't, email me at karah99 @ gmail.com, and I'll try to explain it better.
ReplyDeleteThis is absolutely stunning!
ReplyDeleteI love your quilt! I have a few of those pieces (clothes) also...I never thought to use the parts with a bow or belt...genius! I have been wanting to do this for a long time, but have not had the courage. I am actually starting a (sorta) quilt/blanket for my Granny using my girls recieving blankets...now I am thinking to maybe throw in a few fabric pieces from their onesies. Thanks for the ideas...looks awesome!
ReplyDeleteQuestions from a complete novice: why do you use the flannel backing for each square if you are going to use the batting and the quilt backing? And if some of the squares are already flannel material, do you still need to us flannel backing as well? Also, how did you do the grid pattern in-between the clothing squares?
ReplyDeleteI just finished my son's baby clothes quilt. This was my first huge sewing machine project. Thank you so much for your instructions. They were very easy to understand and follow.
ReplyDeleteMy son has a thing for tags in his blankets. He likes to hold them while he sucks his thumb at night. So, I sewed in a few extra pieces of clothing into the fold of the bias to give him that tag feeling. We both love his blanket very much and I am so glad I found your site and instructions.
THANK YOU!!
I ditto Stacey's question from yesteryear:
ReplyDeletewhy do you use the flannel backing for each square if you are going to use the batting and the quilt backing? And if some of the squares are already flannel material, do you still need to us flannel backing as well? Also, how did you do the grid pattern in-between the clothing squares?
The flannel is to stabilize the knits. Because knit is stretchy, it's really horrible to make quilts with, but if you adhere it to flannel (or to a fusible backing), the other fabric stops it from stretching and you can get accurate squares. The flannel will never be seen, so you still need the batting and quilt backing--it's purely to stabilize the fabric. As far as using it on non-knits, that's up to you. If you feel like it needs it, go ahead. I didn't usually on my jeans, etc, but it is useful sometimes if you want to include any buttons, seams or ruffles, to make sure all the squares are the same size.
ReplyDeleteThe grid pattern is done with rectangles and squares. You can see the white rectangles I did between each of the clothing squares. Then I did rows in between each of the rows of clothing with a white rectangle and then a colored square (the sides the same measurement as the smallest side of the rectangle), then white rectangle, and so on, ending with a white rectangle. Same amount of white rectangles as clothing squares in the other row--then the squares will line up with the white rectangles between the clothing squares. Makes more sense if you look at it. Then just sew the long rows together.
My husband does the quilting in our family and lays out the quilt blocks on our king-sized bed. Easier on the back and the fabric won't get stepped on accidentally by the dog or us.
ReplyDeleteBless you! So kind of you to post this for others to learn from! I love your quilt and I can't wait to make a quilt for my little girl (6 months). But since I just bought my first sewing machine yesterday... I better start with a few smaller projects!
ReplyDeleteThis is an awesome tutorial! Thank you!
ReplyDelete