Follow My New Blog

I've started a new blog. Follow my crafting adventures on creativeirony.com.

Showing posts with label frame. Show all posts

Monday, March 09, 2015

We Can Pickle That! Subversive Cross Stitch

This Christmas, I suddenly had the urge to cross stitch. It's been years since I did cross stitching. I think my last project was a blanket for my oldest son, who is now twelve (pick me off the floor, because I don't believe he is that old). So, it's been a while.

But, I've been seeing those subversive cross stitch projects around, and it's hard to resist the juxtaposition of such a traditional looking project with such an unexpected message.

I searched through a lot of options before finding the perfect one for my sister. It's based on this Portlandia sketch. Although my sister isn't a fan of the show (I don't think she's ever seen it), she is a huge canner. I mean, she cans things. Usually out of her own garden, which she plants from seeds. That is some serious homemaking crap that I cannot keep up with.

The finished project (which she loved by the way):
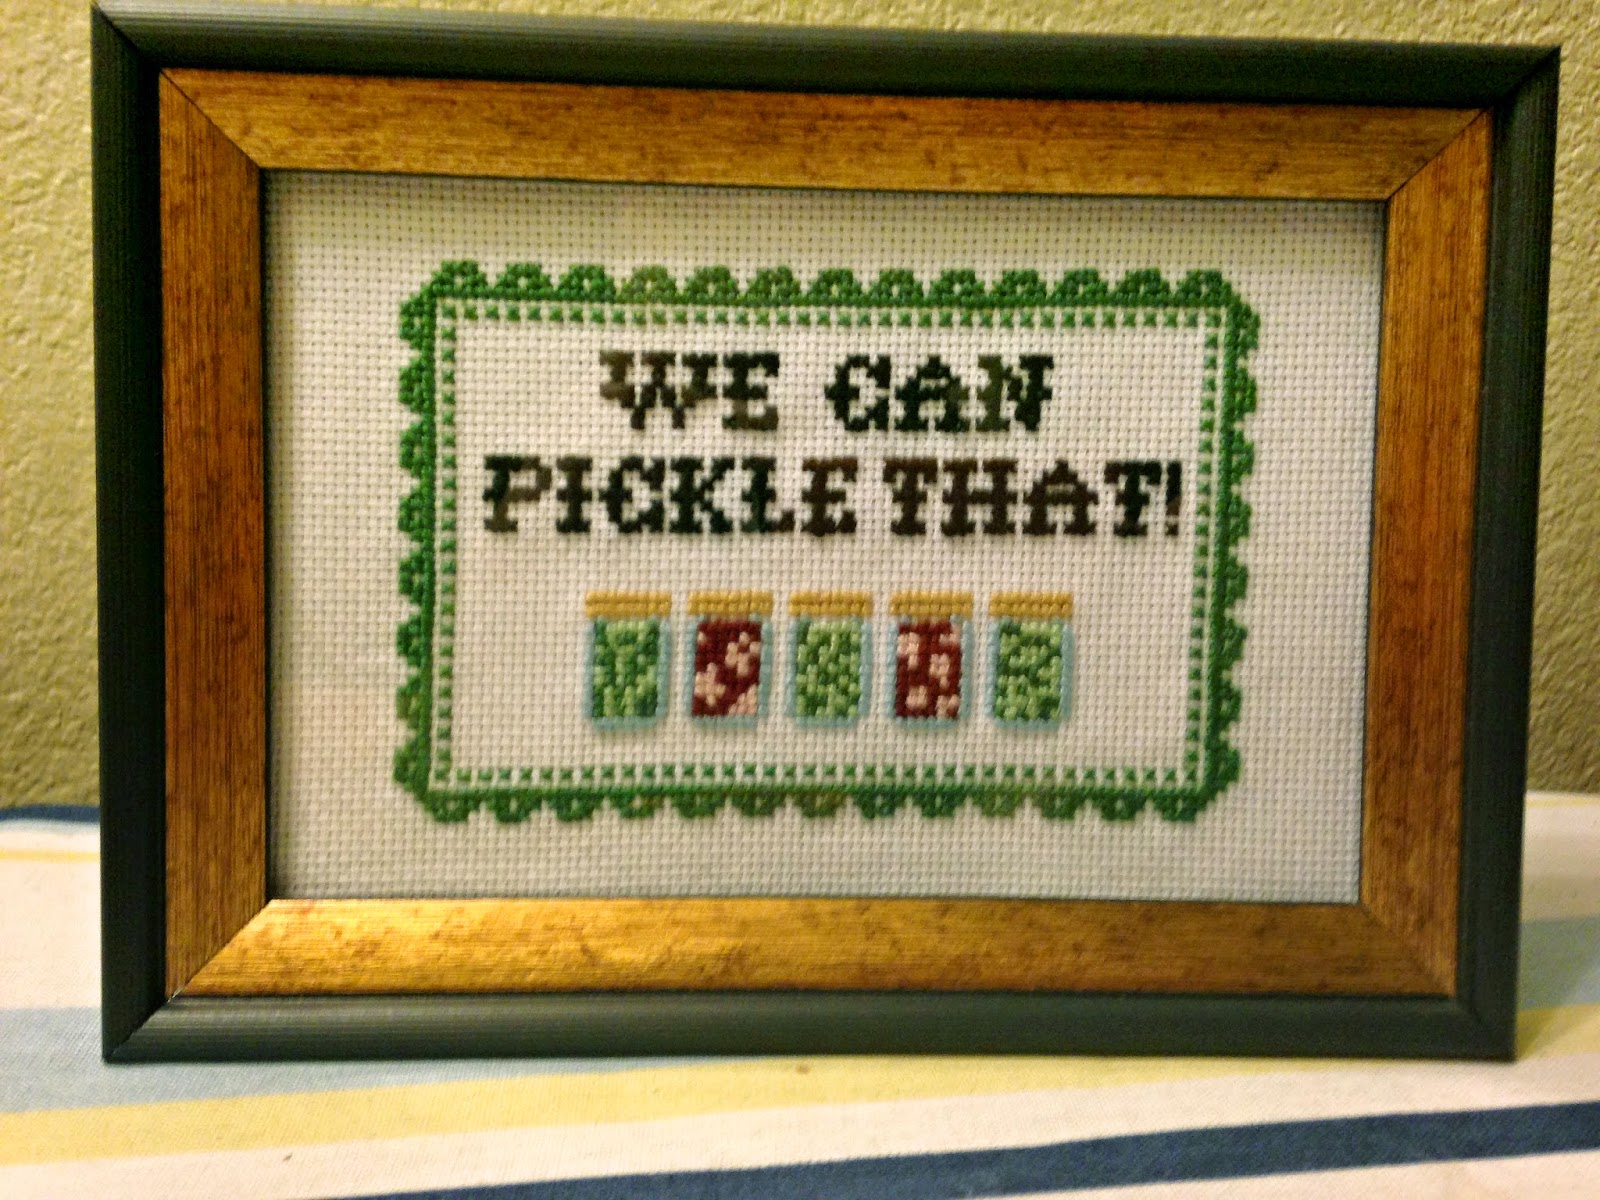
We Can Pickle that Subversive Cross Stitch

You can find the pattern here.
I've started a new blog: Come follow my crafting adventures on my new blog. Find me at: creativeirony.com.

Thursday, April 05, 2012

In which I beg and enter a contest.

I recently read this post on a (feminist) blog I often read, which basically says women don't like to brag for fear they will seem attention-grabbing or not self-effacing enough.

I do and do not have this problem. You don't write a blog about your life and your projects without a certain amount of fondness for navel-gazing. (My navel used to be so cute, by the way, but now it is just so not, after four pregnancies. So wrong. Not sure how long I could stand to gaze at my actual navel before combusting, requiring a ferocious pep talk back into liking my body again.)

Remember this project? (Click on the link for a tutorial.)

Quilled monogram

I've started a new blog: Come follow my crafting adventures on my new blog. Find me at: creativeirony.com.

Friday, May 27, 2011

Flying Birds

I've crossed off a few more things from my UFO list! I'm determined to finish that list this summer. I realized the oldest thing on there is a cross stitch I started back before I was married, about 11 years ago. 11 years (that's a little over 1/3 of my life). I guess I should just be happy there aren't older objects sitting about. The cross stitch is actually all finished, but it's never been framed; it's been sitting in a box for 11 years. I think I'm going to make a pillow out of it.

Anyway, that has nothing to do with my post today! I hung up some art in the corner of my bedroom where my chair sits.

I happened to see this tray by Eskil Design on Young House Love somewhere in the advertising sections and was very attracted to the graphic elements of the trees, clouds and birds. I designed something highly inspired by it (ok, I nearly copied it--although I went off memory and tried not too look at it and also put my own spin on it).

The tray:
Eskil Design tray with birds and clouds
  My version:
Eskil Design inspire graphic design print

I've started a new blog: Come follow my crafting adventures on my new blog. Find me at: creativeirony.com.

Tuesday, March 29, 2011

Picture Ledges (from scrap wood--so basically free!)

David and I are nearly finished with a huge project in the basement family room, which I will show you very soonish. I'm very excited about it and I will give you a clue--it's made out of wood. Soon, my friends, soon.

Anyway, we had some scrap pieces, so I commissioned David to build me some picture ledges out of the scraps. Which apparently annoyed him, as I wanted him to do it while he was building the other thing he was building. I was helping with the other thing he was building here and there, but I was also sitting around sometimes, so I thought it would give me something to paint.

He built them out of MDF and cut the groove in them with the table saw. Then it was a matter of nailgunning the pieces together.

Then I painted quite a few coats.

Then I bugged him again to help me hang them. Apparently, David is a methodical builder who likes to do one project at a time, finish it, and then move onto the next project. I didn't realize that. Technically, I was asking him to help when he wasn't working on the other thing he was building, but oh well. He was nice about it, but he usually doesn't betray that much annoyance with me.

Which reminds me of this morning, actually. I got up when he did (I usually get up right as he leaves for work) and he was in the shower) and I knocked to get into the bathroom. I drank too much water last night right before bed, so I had a bladder about the size and approximate weight of a bowling ball; I hate getting up at night and I probably should have anyway. He was definitely annoyed when he asked what I wanted (we don't technically have a master bathroom--it's across the hall). I said I wanted to use the bathroom and he told me to go downstairs. No way was I using that pit. I make the kids clean it unless we are expecting company (then I double clean it and use highly concentrated cleaners before I will touch it), and I'm not sure when the last time I made them clean it was anyway. We have three boys. Enough said. The bowling ball was staying until he got out the shower.

Apparently he thought I was Maxton.


Anyway, here's some of the stuff I put on it. You can see how I made the dragonfly frame here. The tree and the monogram letters (they are hard to make out in the bottom left corner; I need to set them on something) are from Hobby Lobby. The bird is from Dollar Tree. The frame near the monograms is getting an ampersand and the other two frames will get photos of David and me as soon as I figure out a way to scan our wedding negatives. I never could get my negative scanner to work and I got rid of it.

I don't particularly want to take it to a developer, as it's a medium format negative and I'd like to get them all done and I've only seen 35mm offered. I'm sure I could have it done for a fortune. I'd rather do it myself, but I'd like a negative scanner that would work with my existing scanner and would work with my medium format negatives and I have no idea where to find one. Our photographer let us have the negatives after 5 years--how awesome is that! Just need to have them digitized to make them really useful.
I've started a new blog: Come follow my crafting adventures on my new blog. Find me at: creativeirony.com.

Monday, February 07, 2011

Smooch Projects

That is the most boring title ever. Perhaps I should add a plethera of exclaimation points after it to boost the excitement. "Smooch Projects!!!!!! Yeah!!!"

I don't think I have the energy for that today (I stayed up way too late reading the last book in the Percy Jackson and the Olympians series and I'm in a melancholy now that I've finished--not that they weren't good. I'm just going to miss the characters and I'm pouting). Even though I think these projects are totally rocking. They are the projects from this video. Yep, finally managed to get photos of them. Go me!

Anyway, here are the cards. Pretty standard, except they glimmer. Glimmer is good.


Then there's my favorite project, the birds on the glass.

Their white bodies are on the front, and the designs are on the back. I think it turned out adorable, and this is going to hang out in my craft room forevermore.


I've started a new blog: Come follow my crafting adventures on my new blog. Find me at: creativeirony.com.

Friday, January 28, 2011

Smooch Review--Northridge Publishing Video

Hi everyone! A couple of awesome things coming your way.

First of all, I'm finally getting a new camera (yeah, feels like forever to me, I'm pretty sure I have at least two new gray hairs since my camera broke), it should be here very, very soon, so hopefully, new pictures galore will be flooding the blog soonish! You might get sick of all the pictures I'm going to take.

Secondly, my sister started a food blog and it's awesome. I helped her think of the name, so you definitely want to go check it out. I can personally vouch for her cooking. I generally go over to her house, go straight to the kitchen table, sit down in a chair, pick up a knife and fork, look up at her with my big brown eyes and say, "Feed me." AND IT'S ALWAYS DELICIOUS. So, run to the The Generous Teaspoon.

Lastly, I realized that I had not yet shared this video of me visiting Northridge Publishing studios and Kristine McKay. I'm reviewing Clearsnap Smooch, which I was great to work with! Once I get the camera, I will get some shots of my projects up on the blog.


By the way, I did emphasize its greatness for detail work, but you can tilt it to the side and get larger areas. I feel a little bit bad for not mentioning it, because someone in the YouTube comments got the impression it was only good for small areas and that's not really the case.
I've started a new blog: Come follow my crafting adventures on my new blog. Find me at: creativeirony.com.

Friday, July 09, 2010

Project Progress: Kitchen Update Week 8

This week, on Monday, my husband reminds me that his parents are going to be in town. We've been seriously spoiled in seeing them so much lately. They are two people I greatly admire, and I look up to them in so many ways.

So, I was all like, cool, can't wait to see them. The kids will be excited.

Then he starts wondering how the shade will be in our backyard at that time of day.

And I'm all like, Woah, buddy, back up. Because I missed something.

My husband comes from a family of eight. He's the 7th. Three of his older brothers live in Utah, and one even lives in our town. So, normally, family parties have been held at his brothers' houses, because there are a lot of family members, and we didn't use to have the square feet to handle more than two or three extra people. So, when he said they were going to be in town, I didn't think that meant, in town in our town, more specifically in our house.

Because, while I'm thrilled to show them our new house, my craft room looked like a bomb squad arrived too late to save a Micheal's. Craft crap was everywhere. Movement from one side of the room to other involved risking life and limb, and doing a complicated dance step, and a little butt wiggling. The butt wiggling is for fun.

When I was cleaning it, I misjudged a step and ended up stuck, with one foot in a box of fabric and nearly doing the splits, and calling for my mommy. She was there helping me clean, and she came and rescued me. I don't normally call for my mommy when in peril. I normally call for which ever flesh and blood person is closest to the peril. 

And that's just one room. I've made a lot of progress in our house, it's certainly livable, but there was a long list of things I would want to do before showing it off. Got a lot of them done, some will have to wait.

Don't you always love a good kick in the pants to get your house cleaned?

One of those things I got done was my kitchen gallery art.

I added some vinyl swirls.

And made the rest of the art and got it printed.

Just in time for the party on Wednesday.

Linking Up Here:
I've started a new blog: Come follow my crafting adventures on my new blog. Find me at: creativeirony.com.

Friday, June 25, 2010

Project Progress: Kitchen Update Week 6

When I hung my shelves, I left plenty of room underneath for a gallery style collection of artwork. I've already posted a lot of it, like my silhouette frames, my crochet butterfly, and my kitchen message center.

I started collecting larger frames for this a while ago. I bought most of them at Savers or at Dollar Tree. I didn't pay more than $5 for any of them, and I got most of them for a dollar.

When I started to do this, I first put all the frames on the floor, trying to get a good arrangement. After a little tweaking, I had this arrangement:

Yeah, some of what are in those frames are scary, from the evil looking bears on the far left, to the sappy motivational poster on the far right, and those 80s geese prints (one you can't see because of the glare, but completely not my style).

I immediately started plugging in digitally some of the artwork I wanted to use:

Already, I'm feeling better about this.

I spent the better part of two days spray painting these. Of course, I didn't have to sit outside and watch the paint dry, thank goodness. That's so boring, they coined a cliche about it.

After that, I traced them on leftover paper we used to wrap the breakables in, and put them up on my wall with painter's tape. I also put up some of the ones I knew were at key points and not moving anywhere. I used command strips for these, the picture hanging ones. They are expensive, but I love them for projects like this, because they tend to hang much straighter than regular nails and you can tweak them a little bit, or even move them completely if you have some adhesive refills. And my kids don't knock them off the wall when they go by. Usually.

Once I got up the paper, I realized that I needed to make the whole thing a rectangle, and not have the variation in the bottom line, because it was looking messy and busy. It reads much more as a single unit now.

Then I started plugging in my digital images again (how amazing are digital cameras and Photoshop? We live in an age of wonders--there should be a song about that, because, seriously, I feel like breaking into song right now.).

And after a lot more tweaking, and a lot more making of art, my wall is currently looking like this:

Still a few things to do, but it's shaping up nicely.
I've started a new blog: Come follow my crafting adventures on my new blog. Find me at: creativeirony.com.

Thursday, June 24, 2010

Share-A-Craft: Target-Inspired Print

I did a lot of pretend shopping as I've thought about my kitchen re-do. One of the things I stumbled on was this artwork from Target. It really appealed to me, but it wasn't quite the right colors, not to mention 80 bucks and too big for my wall, so I whipped up my own digital art with a similar idea.

I really like how mine turned out:

And here it is, hanging on my wall. Fun, no?

For handy reference, here's the Target one:
I've started a new blog: Come follow my crafting adventures on my new blog. Find me at: creativeirony.com.

Monday, May 31, 2010

Tutorial: Silhouette Frame

You know from my post last week that I've started collecting art for my kitchen. It started with these alphabet frames (by the way, I found a great spot for them. I'll show you when I do my big kitchen reveal). Then I did the crochet butterfly. Some of my art has been pretty quick, like printing vintage images, but I also wanted to have some meaningful pieces that I made myself.

I've always loved silhouettes. They are popping up all over blogs these days. So, I thought I'd make my own version. I love how it turned out:

Ok, supplies:
Frame
Paper Scraps
Mod Podge
Pictures to turn to silhouettes

Step One:
Cut a piece of cardboard to size or use the inset of your frame. Tear scraps of colored cardstock into smallish pieces. I did all shades of yellow to coordinate with my kitchen colors. Then I started layering them. I found it easiest to put a thinish coat of mod podge on the cardboard, then put the scrap on, then mod podge over it. Keep going until your background is covered. Let dry.

By the way, Allison from House of Hepworths inspired this method with her paper bag background idea, which I also love.


Step Two:
Turn over your piece and cut off any overhanging paper.

Step Three:
Decide on how big to make your silhouettes, then print out pictures. Here's a good tutorial on how to cut them by hand. I actually had silhouettes in vector files from a project I started last year and never finished, so I used my Craft ROBO to cut out mine, but that sort of technology is completely unnecessary.
Like how I cut down a Cricut mat when I couldn't find the one that goes to my Craft ROBO? It worked ok, although I think the Cricut mat is a bit thinner than the ROBO's.

My trusty Craft ROBO.


Step Four:
Cut out silhouettes. Arrange on background. Tape down. I opted not to Mod Podge, but that's totally an option. I just though I might have fun updating it in a few years, so I just used some scrapbook tape runner to attach it.

Step Five:
Put in frame and hang.

The kids adore it. As soon as I hung it up, Aubrey was pointing out who was who and saying she was up there with her friends. I love how cheerful my kitchen is starting to look. Happy Dance Happy Dance.

For other tutorials, check out my full list here.

Linking Up Here:


All Thingz Related
I've started a new blog: Come follow my crafting adventures on my new blog. Find me at: creativeirony.com.

Thursday, May 27, 2010

Share-A-Craft: Crochet Butterfly Artwork

Because of my current Project Progress, I've been doing A LOT of art for my kitchen lately. One of my better ideas was to frame some threaded crochet work. I went to work finding a cute butterfly pattern I could use in one of my frames.

In my search, I found again the most excellent and righteous MyPicot.com. Seriously, she is freakin' amazing (or whoever writes their patterns, because their homepages says our). I love these patterns. They are all in chart format, which can be a little bit challenging, buuuuuuuuttt, they also provide a tutorial section with chart keys and I've mostly managed to figure things out after working on them for a bit.

I used this butterfly pattern, which is just stunning.

I would have loved to do more than just brown, but I had brown in my stash and I'm trying really hard to get rid of and use up my stash of craft stuff before buying new stuff. I ended up quite liking my brown butterfly, particularly after it was mounted (wow, that sounds like I shot and stuffed a butterfly, but I swear, I only used thread and a crochet hook and no butterflies were harmed in this project).

Once it was all done, I realized it was too big for the frame. Doh. So instead of undoing all my work, which took me two episodes of Buffy the Vampire Slayer to finish, I decided just to hot glue it to the outside of my frame. Easy, simple and I sort of like the unexpected twist of it being outside the glass. And, if it ever gets too dirty, the hot glue will peel off the glass, then I can wash it and put it back up again. I think. If not, I can always crochet another one.
I've started a new blog: Come follow my crafting adventures on my new blog. Find me at: creativeirony.com.