Follow My New Blog

I've started a new blog. Follow my crafting adventures on creativeirony.com.

Showing posts with label artwork. Show all posts

Monday, March 30, 2015

"You Octopi My Heart" Nursery Art Print/Printable

Although I'm more than done having children (having four in four and a half years will cure you pretty quickly), I often get uterus cramps while looking at small babies. If anyone knows of any babies locally I could rent for an afternoon, I'm available.

I had to cure my baby hankering somehow, so I created this printable nursery art as a little stopgap. It's 8x10, but should crop smaller. It would be pretty cute as Valentine's Day cards too, now that I think about it.


You Octopi My Heart baby printable from Craftastical!


Please share on Pinterest, if you like! Thanks!
I've started a new blog: Come follow my crafting adventures on my new blog. Find me at: creativeirony.com.

Monday, March 23, 2015

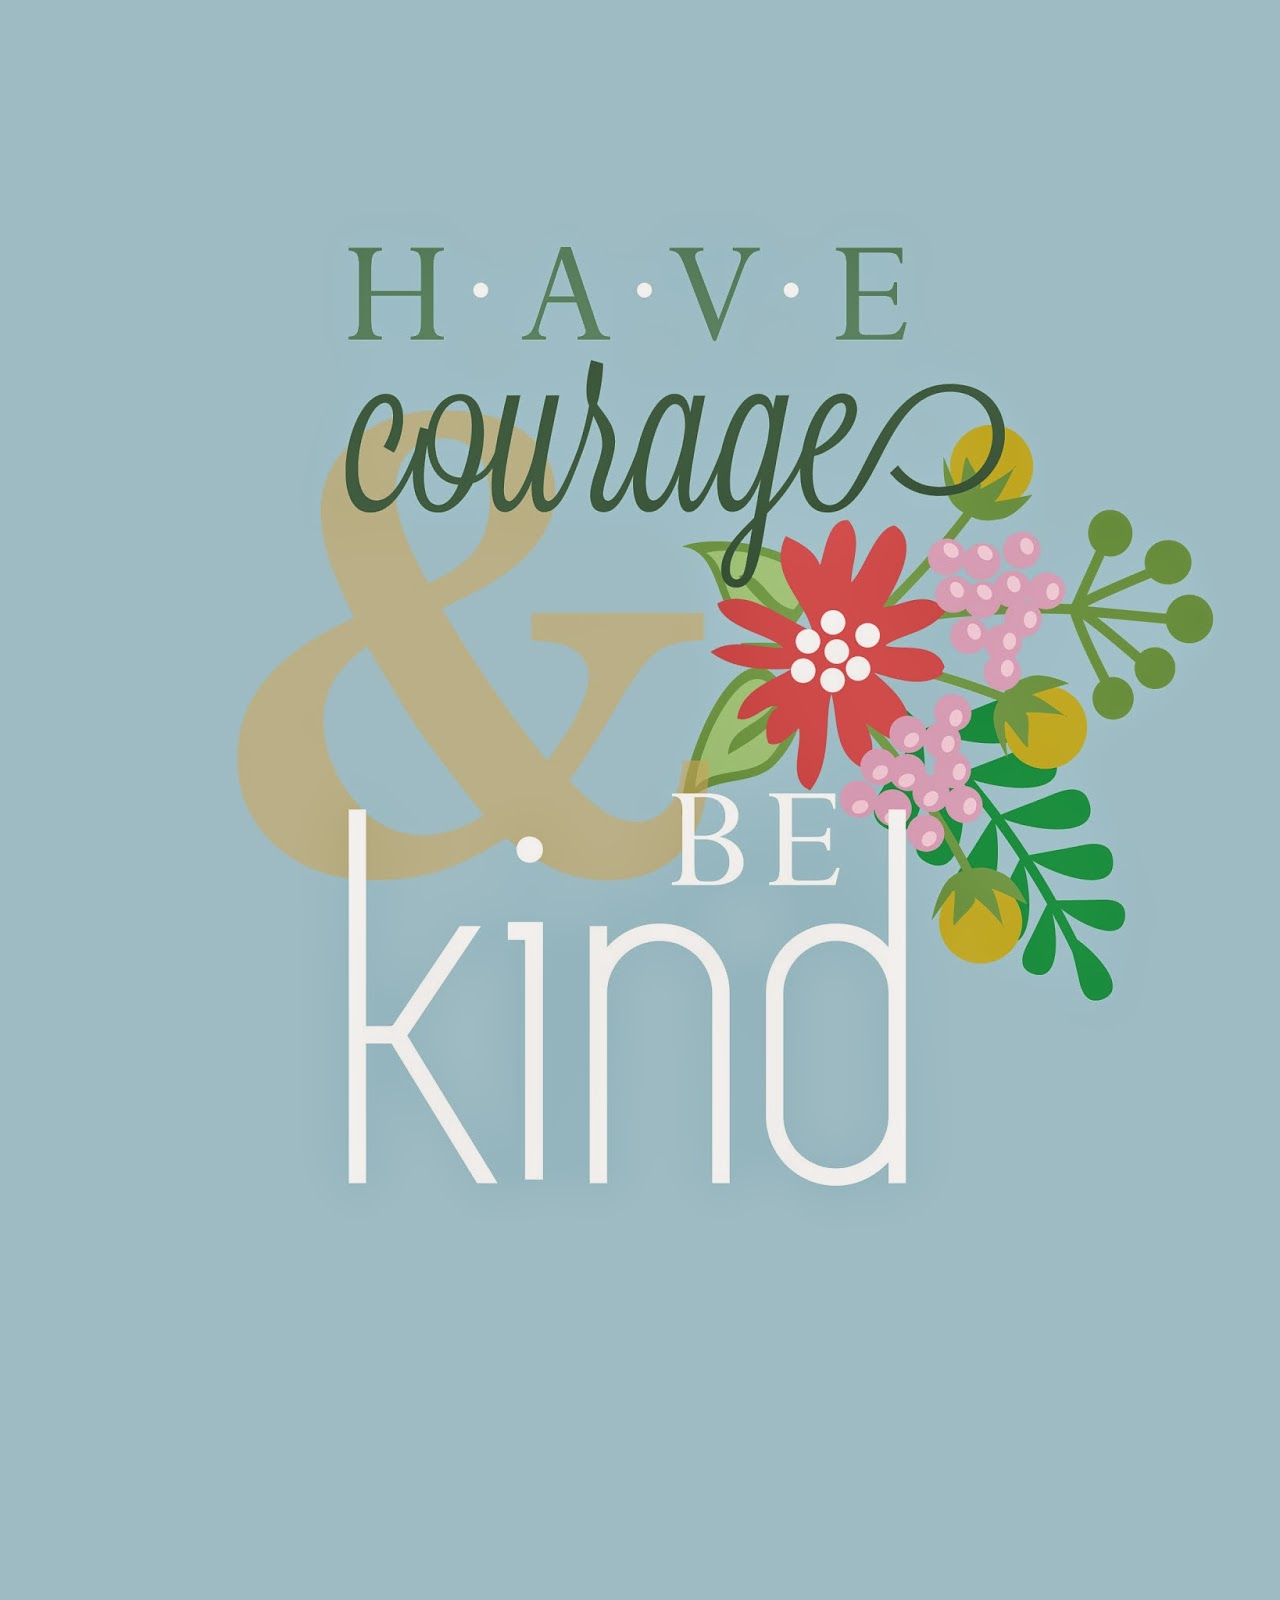
"Have Courage and Be Kind" Free Printable

While my children were sleeping over at Grandma's house this weekend, my husband and I sneaked off to the theater to see Cinderella. Yeah, we were mean and didn't take the kids yet. I didn't expect to love the movie like I did, but even though I aim for misanthrope, I land in big-softy-with-gooey-center territory more often than not. I loved this theme that they wove throughout the movie, and even during the movie, I was thinking, "I have to make a printable with that!"
I've started a new blog: Come follow my crafting adventures on my new blog. Find me at: creativeirony.com.

Thursday, March 19, 2015

Free Printable: Love My Camera

A little while ago, I wanted to replace one of the pieces in my kitchen. It didn't have any glass in the front (it fell off the wall one too many times--kids skirting too close to the wall and before I wised up and used mounting tape for all my picture hanging needs), and it was all gross, from the lack of glass. Or maybe it just got gross because I have children. Whichever.

It was time for a change, and this is what I came up with: an 8x10 print that immortalizes for all time my love of the camera. It doesn't have the border--that's so the wording would fit.

I hope you enjoy!


I've started a new blog: Come follow my crafting adventures on my new blog. Find me at: creativeirony.com.

Tuesday, September 25, 2012

Hulk Birthday Party Invite

My oldest son is turning ten this week and he wants an Incredible Hulk birthday party. I'm not planning anything too elaborate, but I did make this birthday party invite last night (after my show: An Ideal Husband at the Echo Theatre--I'm Lady Basildon, a small but very, very fun part).

Here's to awesome super heroes and fun graphic design and birthday parties and theater and staying up way too late!

Graphic super hero birthday party invite The Incredible Hulk

I've started a new blog: Come follow my crafting adventures on my new blog. Find me at: creativeirony.com.

Tuesday, April 24, 2012

"The Voice of the Rain" Print Download

New to digital scrapbooking? Never downloaded a digital kit before? What in the world are .rar files anyway? Get your answers here: How to Unzip Files So You Can Digi Scrap.

This past week, I needed some new art for my living room. I whipped up this print, using Illustrator and Photoshop. I've never done anything quite like this before, so it was especially fun. I've done a lot work in both programs, but nothing quite so much like an illustration.

The poem making the rain is a beautiful one by Walt Whitman called "The Voice of the Rain" from Leaves of Grass. Bonus points for it being out of copyright. (Obviously, I wouldn't be offering it as a download if it wasn't.)

Right now it's 11x14", but could easily be cropped to a different aspect ratio. I hope you enjoy this print--I'd love to know if you end up using it for anything.


The Voice of the Rain freebie download illustration


I've started a new blog: Come follow my crafting adventures on my new blog. Find me at: creativeirony.com.

Thursday, April 05, 2012

In which I beg and enter a contest.

I recently read this post on a (feminist) blog I often read, which basically says women don't like to brag for fear they will seem attention-grabbing or not self-effacing enough.

I do and do not have this problem. You don't write a blog about your life and your projects without a certain amount of fondness for navel-gazing. (My navel used to be so cute, by the way, but now it is just so not, after four pregnancies. So wrong. Not sure how long I could stand to gaze at my actual navel before combusting, requiring a ferocious pep talk back into liking my body again.)

Remember this project? (Click on the link for a tutorial.)

Quilled monogram

I've started a new blog: Come follow my crafting adventures on my new blog. Find me at: creativeirony.com.

Wednesday, July 06, 2011

A Pretty for My Living Room

joint compound on canvas sculpted with forks and knives, then painted with acrylic paint

The living room of my house was the first I designed in my head. I lost sleep over the thing! I did sketches! I spent hours virtual shopping. I've researched couches and searched and searched for the perfect one. I even posted a mood board of sorts before we even bought our house--you can find it here. I've since changed my mind about the couch. About 30 times.

I've started a new blog: Come follow my crafting adventures on my new blog. Find me at: creativeirony.com.

Friday, May 27, 2011

Flying Birds

I've crossed off a few more things from my UFO list! I'm determined to finish that list this summer. I realized the oldest thing on there is a cross stitch I started back before I was married, about 11 years ago. 11 years (that's a little over 1/3 of my life). I guess I should just be happy there aren't older objects sitting about. The cross stitch is actually all finished, but it's never been framed; it's been sitting in a box for 11 years. I think I'm going to make a pillow out of it.

Anyway, that has nothing to do with my post today! I hung up some art in the corner of my bedroom where my chair sits.

I happened to see this tray by Eskil Design on Young House Love somewhere in the advertising sections and was very attracted to the graphic elements of the trees, clouds and birds. I designed something highly inspired by it (ok, I nearly copied it--although I went off memory and tried not too look at it and also put my own spin on it).

The tray:
Eskil Design tray with birds and clouds
  My version:
Eskil Design inspire graphic design print

I've started a new blog: Come follow my crafting adventures on my new blog. Find me at: creativeirony.com.

Tuesday, March 29, 2011

Picture Ledges (from scrap wood--so basically free!)

David and I are nearly finished with a huge project in the basement family room, which I will show you very soonish. I'm very excited about it and I will give you a clue--it's made out of wood. Soon, my friends, soon.

Anyway, we had some scrap pieces, so I commissioned David to build me some picture ledges out of the scraps. Which apparently annoyed him, as I wanted him to do it while he was building the other thing he was building. I was helping with the other thing he was building here and there, but I was also sitting around sometimes, so I thought it would give me something to paint.

He built them out of MDF and cut the groove in them with the table saw. Then it was a matter of nailgunning the pieces together.

Then I painted quite a few coats.

Then I bugged him again to help me hang them. Apparently, David is a methodical builder who likes to do one project at a time, finish it, and then move onto the next project. I didn't realize that. Technically, I was asking him to help when he wasn't working on the other thing he was building, but oh well. He was nice about it, but he usually doesn't betray that much annoyance with me.

Which reminds me of this morning, actually. I got up when he did (I usually get up right as he leaves for work) and he was in the shower) and I knocked to get into the bathroom. I drank too much water last night right before bed, so I had a bladder about the size and approximate weight of a bowling ball; I hate getting up at night and I probably should have anyway. He was definitely annoyed when he asked what I wanted (we don't technically have a master bathroom--it's across the hall). I said I wanted to use the bathroom and he told me to go downstairs. No way was I using that pit. I make the kids clean it unless we are expecting company (then I double clean it and use highly concentrated cleaners before I will touch it), and I'm not sure when the last time I made them clean it was anyway. We have three boys. Enough said. The bowling ball was staying until he got out the shower.

Apparently he thought I was Maxton.


Anyway, here's some of the stuff I put on it. You can see how I made the dragonfly frame here. The tree and the monogram letters (they are hard to make out in the bottom left corner; I need to set them on something) are from Hobby Lobby. The bird is from Dollar Tree. The frame near the monograms is getting an ampersand and the other two frames will get photos of David and me as soon as I figure out a way to scan our wedding negatives. I never could get my negative scanner to work and I got rid of it.

I don't particularly want to take it to a developer, as it's a medium format negative and I'd like to get them all done and I've only seen 35mm offered. I'm sure I could have it done for a fortune. I'd rather do it myself, but I'd like a negative scanner that would work with my existing scanner and would work with my medium format negatives and I have no idea where to find one. Our photographer let us have the negatives after 5 years--how awesome is that! Just need to have them digitized to make them really useful.
I've started a new blog: Come follow my crafting adventures on my new blog. Find me at: creativeirony.com.

Tuesday, August 10, 2010

Robot Love Digital Download Freebie

New to digital scrapbooking? Never downloaded a digital kit before? What in the world are .rar files anyway? Get your answers here: How to Unzip Files So You Can Digi Scrap. (Applies to any compressed files). 

I don't know what to call these anymore.

I'm planning on printing this one out and hanging it someplace in my craft room at some point. I also think it would be adorable as a card or a gift tag or as a page accent or as part of a collage. So, maybe printable freebie would work?

Anyway, this is one I did all hand sketched and then scanned. I'm surprised I like it as much as I do. Usually I end up with some funky somethings when I hand draw. I love the hybrid freedom of it. It's so easy to correct mistakes on the computer and to add fun effects.

So, here's some robot love for you all. They are 8x10 (but can be easily cropped down) and there's a plain white one and a tan colored one in the compressed file. I hope you enjoy them! As always, I'd love to see if you do anything with them. Link up in the link party on Thursdays!


I've started a new blog: Come follow my crafting adventures on my new blog. Find me at: creativeirony.com.

Tuesday, July 27, 2010

Scribbled Owls Digital Scrapbooking Kit Freebie

New to digital scrapbooking? Never downloaded a digital kit before? What in the world are .rar files anyway? Get your answers here: How to Unzip Files So You Can Digi Scrap. (Applies to any compressed files).

Yesterday, I stumbled upon a really addicting scribbler tool. Basically, you draw a basic line drawing freehand with your mouse and it scribbles on top of it, turning it way cooler looking than your original drawing. David and I kept running back and forth from the desktop and the laptop showing each other our creations. I started drawing owls. Lots and lots of owls. Of course, I couldn't leave it there, I had to turn it into some digital art.

And then, I put my owls on colorful squares. And then I printed it out and put spray adhesive on the back and put it on a piece of mat board. And then I started grabbing pieces and arranging it on a console table. It's not going to stay like this, because I stole one of my art pieces from the kitchen. And I want to eventually frame my owls, but not having a 12x12" frame on hand, this will have to do for now.


I hate to play favorites, but I think this one might be my favorite. I want to pinch his cheeks.


And then I put the owls on a bunch of colors, and stuck them in a folder, with some png images too, so if you want they can end up on your scrapbook pages or cards or whatever.

I had planned to skip this week's download, but sometimes you find something cool and it takes on a life of its own. And you also get a lot of blisters from using your mouse too much.


Kit Contents: 6 Owl Pattern Papers, 4 Owl Stamps

Don't forget to enter the give away!
I've started a new blog: Come follow my crafting adventures on my new blog. Find me at: creativeirony.com.

Friday, July 16, 2010

Mini Make-over: My Sister's Mantle

My sister is about two years younger than I am.

One of our first encounters:

We've always been close. It's pretty darn great. I'm the big sister, and I'm a fairly persuasive person. So, I would get my parents to get me what I wanted. And then, once all the hard work was done, my sister would shortly get whatever I just got, riding on all my hard work.

You know, standing on the shoulders of giants and all that.

My earliest memory of this is getting my ears pieced at age 5. I begged for weeks and weeks to get them. After my turn was done, my sister hopped up on the stool and said, "My turn," and that was all she had to do to get her ears pierced.

Aren't we cute all dressed up for Halloween? About a year before the earring incidenct.

She's been doing stuff like that ever since, right up to getting married 6 months after me and having her first baby six months to do the day after my first. It's been fun to do everything together.

My sister (Melissa), me and my cousin (Shanna) on my wedding day:

Anyway, all that to say that she had her four children and my four children for all of a Tuesday a few weeks ago. Yes, she is a saint. She had eight children under the age of seven for an entire day. My kids were even all asleep when I got there.

She was really, really nice when I asked her. I didn't even have to pull out my super effective big brown eyes. I didn't even have to beg or bribe her or offer chocolate or undying devotion (when I say pull out my eyes, I mean use my eyes, not pull out as in remove. You probably got that, but just for clarification).

This clearly means I needed to pay her back big time.

So, I promised I would come over and help her decorate her living room. She already has a lot of the basics, but they needed a little polishing. I'll probably show you more of her make over as we finish up more of it, but here's a little taste of some of what we did.

Her mantle had some great pieces, but it was missing some polish:
My mom and my sister did the faux painting. They are renting their place, but the landlord is a pretty laid back guy. So laid back that he hasn't ever fixed their upstairs shower and they have lived there four years. So, on the downside, broken shower. On the upside, he lets them paint pretty much whatever whichever colors they want.

It's a pretty bright green, but stops just short of neon. In case on your monitor it looks like a lime otter pop explosion, just know that it isn't.

So, Thursday night, I had David cut me out some boards of all different sizes. Last Friday I showed up with them and we got to work.

Then we taped a bunch of newspaper together the size of the wall above her mantle, then arranged the wood in a balanced arrangement. Looks a bit crazy on the newspaper, but I knew it would work.

You can see my numbered map in the bottom. I only glued one pattern paper over the numbers on the blocks, so that worked pretty well, all told.
Luckily, my nephew, Graham, who just turned one a while back, slept through most of this, otherwise DISASTER. He actually slept for most the day, luckily. I think those are Xander's feet in the above photo.

We painted the edges black, then used Mod Podge to glue some scrapbook paper she already had on hand (in some really amazing patterns in grey, black and greens) to the blocks, distressed the edges a tiny bit, and then inked them. We stuck them up with mounting tape, and arranged some things she had on hand and I think we achieved that polished look we were going for:

It's so totally her and her husband, and it's a great start to her new living room!

PS My kitchen makeover is on hold for a little bit. I think I will have a few things to show you next week though, but nothing too big. :)

Linking Up Here:


Decor Mamma
I've started a new blog: Come follow my crafting adventures on my new blog. Find me at: creativeirony.com.

Tuesday, July 13, 2010

Printable Download Freebie Man Cannot Live. . .

Today's freebie is just a quick little something I whipped up for my kitchen. It's 8.5x11 size, so it would be easy to print off on a regular piece of paper. I love this verse for the kitchen, and of course it matches my colors, but it probably wouldn't be too hard to change will a little fussing in Photoshop.

Enjoy!


I've started a new blog: Come follow my crafting adventures on my new blog. Find me at: creativeirony.com.

Friday, July 09, 2010

Project Progress: Kitchen Update Week 8

This week, on Monday, my husband reminds me that his parents are going to be in town. We've been seriously spoiled in seeing them so much lately. They are two people I greatly admire, and I look up to them in so many ways.

So, I was all like, cool, can't wait to see them. The kids will be excited.

Then he starts wondering how the shade will be in our backyard at that time of day.

And I'm all like, Woah, buddy, back up. Because I missed something.

My husband comes from a family of eight. He's the 7th. Three of his older brothers live in Utah, and one even lives in our town. So, normally, family parties have been held at his brothers' houses, because there are a lot of family members, and we didn't use to have the square feet to handle more than two or three extra people. So, when he said they were going to be in town, I didn't think that meant, in town in our town, more specifically in our house.

Because, while I'm thrilled to show them our new house, my craft room looked like a bomb squad arrived too late to save a Micheal's. Craft crap was everywhere. Movement from one side of the room to other involved risking life and limb, and doing a complicated dance step, and a little butt wiggling. The butt wiggling is for fun.

When I was cleaning it, I misjudged a step and ended up stuck, with one foot in a box of fabric and nearly doing the splits, and calling for my mommy. She was there helping me clean, and she came and rescued me. I don't normally call for my mommy when in peril. I normally call for which ever flesh and blood person is closest to the peril. 

And that's just one room. I've made a lot of progress in our house, it's certainly livable, but there was a long list of things I would want to do before showing it off. Got a lot of them done, some will have to wait.

Don't you always love a good kick in the pants to get your house cleaned?

One of those things I got done was my kitchen gallery art.

I added some vinyl swirls.

And made the rest of the art and got it printed.

Just in time for the party on Wednesday.

Linking Up Here:
I've started a new blog: Come follow my crafting adventures on my new blog. Find me at: creativeirony.com.

Tuesday, July 06, 2010

Teapots and Forks Printable Freebie

New to digital scrapbooking? Never downloaded a digital kit before? What in the world are .rar files anyway? Get your answers here: How to Unzip Files So You Can Digi Scrap. (Also applies to any compressed files, like this artwork).

A while ago, I did this tutorial with the alphabet frames.

I put this digi art work in it. It's pretty simple, as they print up as 5x7s. Thought I would share with you, if you like.

It would be really easy to change the colors on these, because they are just two colors each, so you could easily use the paint bucket tool. Wouldn't they look fabulous in reds and yellows? Or maybe even black and white?

PS Happy birthday to my younger brother, Tyler! See a movie for me, and eat double popcorn. I hate you and your fast metabolism. :D
I've started a new blog: Come follow my crafting adventures on my new blog. Find me at: creativeirony.com.

Friday, June 25, 2010

Project Progress: Kitchen Update Week 6

When I hung my shelves, I left plenty of room underneath for a gallery style collection of artwork. I've already posted a lot of it, like my silhouette frames, my crochet butterfly, and my kitchen message center.

I started collecting larger frames for this a while ago. I bought most of them at Savers or at Dollar Tree. I didn't pay more than $5 for any of them, and I got most of them for a dollar.

When I started to do this, I first put all the frames on the floor, trying to get a good arrangement. After a little tweaking, I had this arrangement:

Yeah, some of what are in those frames are scary, from the evil looking bears on the far left, to the sappy motivational poster on the far right, and those 80s geese prints (one you can't see because of the glare, but completely not my style).

I immediately started plugging in digitally some of the artwork I wanted to use:

Already, I'm feeling better about this.

I spent the better part of two days spray painting these. Of course, I didn't have to sit outside and watch the paint dry, thank goodness. That's so boring, they coined a cliche about it.

After that, I traced them on leftover paper we used to wrap the breakables in, and put them up on my wall with painter's tape. I also put up some of the ones I knew were at key points and not moving anywhere. I used command strips for these, the picture hanging ones. They are expensive, but I love them for projects like this, because they tend to hang much straighter than regular nails and you can tweak them a little bit, or even move them completely if you have some adhesive refills. And my kids don't knock them off the wall when they go by. Usually.

Once I got up the paper, I realized that I needed to make the whole thing a rectangle, and not have the variation in the bottom line, because it was looking messy and busy. It reads much more as a single unit now.

Then I started plugging in my digital images again (how amazing are digital cameras and Photoshop? We live in an age of wonders--there should be a song about that, because, seriously, I feel like breaking into song right now.).

And after a lot more tweaking, and a lot more making of art, my wall is currently looking like this:

Still a few things to do, but it's shaping up nicely.
I've started a new blog: Come follow my crafting adventures on my new blog. Find me at: creativeirony.com.

Thursday, June 24, 2010

Share-A-Craft: Target-Inspired Print

I did a lot of pretend shopping as I've thought about my kitchen re-do. One of the things I stumbled on was this artwork from Target. It really appealed to me, but it wasn't quite the right colors, not to mention 80 bucks and too big for my wall, so I whipped up my own digital art with a similar idea.

I really like how mine turned out:

And here it is, hanging on my wall. Fun, no?

For handy reference, here's the Target one:
I've started a new blog: Come follow my crafting adventures on my new blog. Find me at: creativeirony.com.
Monday, May 31, 2010

Tutorial: Silhouette Frame

You know from my post last week that I've started collecting art for my kitchen. It started with these alphabet frames (by the way, I found a great spot for them. I'll show you when I do my big kitchen reveal). Then I did the crochet butterfly. Some of my art has been pretty quick, like printing vintage images, but I also wanted to have some meaningful pieces that I made myself.

I've always loved silhouettes. They are popping up all over blogs these days. So, I thought I'd make my own version. I love how it turned out:

Ok, supplies:
Frame
Paper Scraps
Mod Podge
Pictures to turn to silhouettes

Step One:
Cut a piece of cardboard to size or use the inset of your frame. Tear scraps of colored cardstock into smallish pieces. I did all shades of yellow to coordinate with my kitchen colors. Then I started layering them. I found it easiest to put a thinish coat of mod podge on the cardboard, then put the scrap on, then mod podge over it. Keep going until your background is covered. Let dry.

By the way, Allison from House of Hepworths inspired this method with her paper bag background idea, which I also love.


Step Two:
Turn over your piece and cut off any overhanging paper.

Step Three:
Decide on how big to make your silhouettes, then print out pictures. Here's a good tutorial on how to cut them by hand. I actually had silhouettes in vector files from a project I started last year and never finished, so I used my Craft ROBO to cut out mine, but that sort of technology is completely unnecessary.
Like how I cut down a Cricut mat when I couldn't find the one that goes to my Craft ROBO? It worked ok, although I think the Cricut mat is a bit thinner than the ROBO's.

My trusty Craft ROBO.


Step Four:
Cut out silhouettes. Arrange on background. Tape down. I opted not to Mod Podge, but that's totally an option. I just though I might have fun updating it in a few years, so I just used some scrapbook tape runner to attach it.

Step Five:
Put in frame and hang.

The kids adore it. As soon as I hung it up, Aubrey was pointing out who was who and saying she was up there with her friends. I love how cheerful my kitchen is starting to look. Happy Dance Happy Dance.

For other tutorials, check out my full list here.

Linking Up Here:


All Thingz Related
I've started a new blog: Come follow my crafting adventures on my new blog. Find me at: creativeirony.com.