Follow My New Blog

I've started a new blog. Follow my crafting adventures on creativeirony.com.

Showing posts with label Cricut. Show all posts

Thursday, May 19, 2011

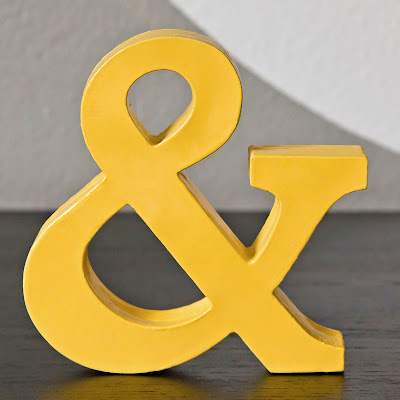
Tutorial: Ampersand for a Shelf

A little while back, I bought a K and D from Hobby Lobby to put on my picture ledges once they were built. The plan was to get an ampersand to put between them. Awww, too adorable, right? Kara and David=forever. But, I couldn't find one I liked. I'm sort of a font snob. Ok, not sort of. I am. Like nearly every other female craft blogger, I started a Pinterest account, and there are a lot of snobby font things pinned to my funny board. Most of them make fun of Comic Sans. Poor Comic Sans. If only people wouldn't put it where it has no business being! Then Comic Sans wouldn't be the ugly dog of the font world.

Anyway, I pondered on this problem for several months. I could have cut my own ampersand out of wood with my mom's scroll saw, but it's about 20 minutes away, and that's kind of annoying to get exactly right. I've cut out complicated things with a scroll saw before (see the cake topper here), so I could do it, I was just being moody about it.

Then it hit me. A way in which I didn't have to drive round trip 40 minutes and get out the scroll saw from the caverns of my parents' garage. And this is that tutorial.

cardstock ampersand, made by layering cardstock cut with Cricut


Supplies needed:
Scrap cardstock (or pretty cardstock in pretty colors)
Cricut machine or Silhouette machine or traditional die cut machine--I used a Cricut and Plantin Schoolbook cartridge
Mod podge
Sandpaper or rotatory tool
Wood filler
Spray Primer
Spray Paint

Step 1: Cut out a bunch of shapes of the same size. I didn't care about color, because I knew I was going to paint mine later. If you don't want to paint, you can use pretty colors in the same shades or coordinating shades for very pretty effects, or use all the same colors.

I've started a new blog: Come follow my crafting adventures on my new blog. Find me at: creativeirony.com.

Monday, July 12, 2010

Tutorial: Aged Compass Decor Stand

Back when I begged David to help me do the great epoxy cake stand marathon, I also stuck together this hideous dollar store candle stand and a slightly less ugly plate, and got this:

Yeah, we can do way better than that. Pretty sure that mottled mess on the bottom needs to go.

A little later, after some spray paint, aging and vinyl, I had this pretty thing:

So much better! This is pretty much the exact green that is on my kitchen walls, although this is probably going to end up in our downstairs family room.

For this project, you will need:
A candle stand
A plate
Epoxy glue or other strong adhesive
Spray primer
Spray paint
Black acrylic paint
Paint brush
Spray bottle
Rag
Round vinyl decal
Clear spray sealer

Step 1:
Mix epoxy according to directions. Apply to surface of candle stand. Center on plate. Allow to sit for 5 minutes. You can move after time specified on epoxy, although full strength is usually not reached until 24 hours. You are probably ok to move onto step 2 before 24 hours.

Step 2:
Prime and paint with desired color. Allow to dry overnight.

Step 3:
After letting it dry overnight, I aged it a bit with some black acrylic paint. This was my first time trying this sort of aging technique, and I really liked the way it turned out. First, have on hand a largish paint brush, a spray bottle filled with water and a rag. Squirt a little paint on the surface, and spread around in different directions with paint brush, squirting with water. Once you have it everywhere, wipe off the excess with the rag. Work quickly. Repeat on underside. Let dry (it dries pretty quickly).

One of my kids needs to hurry up and get old enough to press the button on my camera in a reliable manner so I can get action shots of these sorts of things. I didn't get great shots of this process cause it was just so fast to do.

Step 4:
Cut out vinyl with Cricut. I used the Graphically Speaking cartridge, which has this cool compass star. My plate was 10.25", so I cut it out 8.75" tall. If you are using your Cricut to cut the vinyl, I used the settings blade depth 6, speed 4, pressure 2 to cut through the vinyl, but not the paper backing (you may need to adjust slightly).

Find the center of your plate and mark. I use a quilting pencil, which will rub right off. Apply your vinyl, and burnish. I admit to cheating a bit and not using transfer tape, although that probably would have been a lot easier.

Step 5:
Coat with a clear spray to protect the finish and your vinyl. This is going to go perfectly in my world/travel themed family room. . .

Linking Up Here:


Keeping It Simple
mmm button
I've started a new blog: Come follow my crafting adventures on my new blog. Find me at: creativeirony.com.

Monday, June 28, 2010

Tutorial: Funky Kids' Water Bottles

One of the things on my camping box list was water bottles for each of us. When I went to the dollar store, they had some really cute ones, but they only came in three colors. Of course, this is a problem. There is no way my kids are going to be ok with that kind of ambiguity.

I knew when I bought them that I was going to put their names or something on them as identification. I guess writing on them with a sharpie would have worked, but I had to have more fun than that.

So, my kids' water bottles went from this:

to this:

Wanna make your own? Read on, read on.

Supplies:
Water Bottle
Vinyl
Cricut if you are cutting your own  vinyl (you can also custom buy vinyl all over the place. try etsy for some really cute stuff)
Plastic Spray Paint
Painters' Tape
Transfer Tape/Masking Tape

Step One:
Clean your bottles.

Step Two:
Cut vinyl initials and symbols. I used my Cricut and the Hello Kitty and Indie Art cartridges. My kids all choose the symbol they wanted.

If your interested, I used the following settings to cut through the top layer of vinyl and not the backing (might vary from machine to machine, but this a good starting place). Blade Depth: 6, Speed: 4, Pressure: 2.

Step Three:
Cull the extra vinyl from your image. You are doing a positive image, so remove all the positive parts, and leave the extra.


My kids LOVED pretending their culled pieces were tattoos. I'm not so sure about the direction they are taking their lives. . .

Step Four:
Put your vinyl piece on a piece of transfer tape with the vinyl side down on the sticky part. Peel off the back of the vinyl so that the sticky parts are all exposed (if you bought your vinyl, it may come with the transfer tape already).

Step Five:
I did my vinyl application in two steps, with the monogram first and then the symbol underneath it. Line everything up, and burnish it. I used the handle of a pair of scissors to do mine. Peel off the transfer tape.

If I'm not making much sense to you, try this video from the Nth (with me and the very talented Jen Gallacher), and that might help a little with the whole vinyl transfer thing.

Step Six:
Tape up everything you don't want painted.

Step Seven:
Using spray paint made for plastics, give an even coat of paint and let dry.

Step Eight:
Remove tape and vinyl. Tada! My kids love theirs! I'm not certain I'm going to be able to make them stay in the camping box.

Linking Up Here:
Making


Mad Skillz

The Girl Creative

I've started a new blog: Come follow my crafting adventures on my new blog. Find me at: creativeirony.com.