Follow My New Blog

I've started a new blog. Follow my crafting adventures on creativeirony.com.

Showing posts with label Halloween. Show all posts

Friday, November 28, 2014

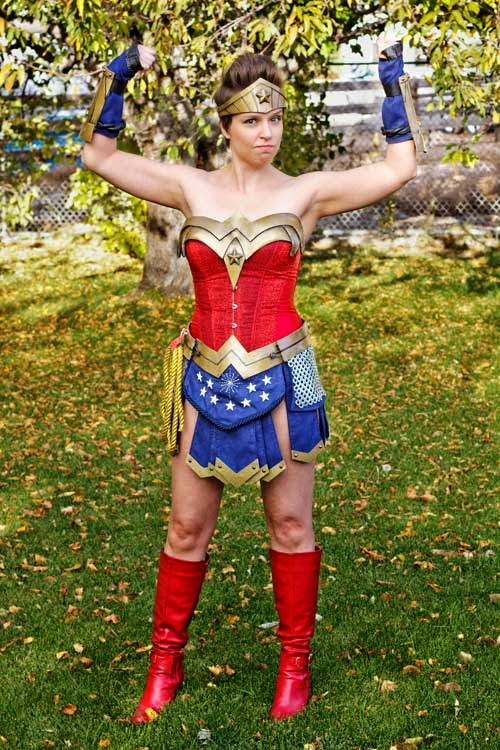
Wonder Woman Cosplay

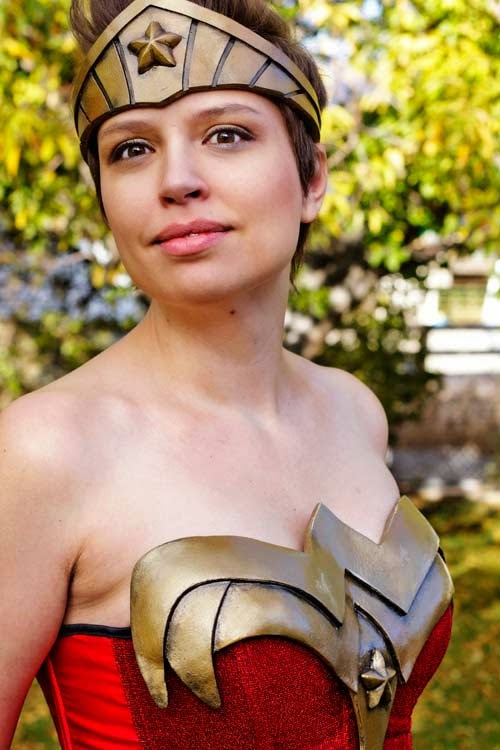
Wonder Woman Cosplay from Craftastical using Wonderflex

It's been a while since I went all out on a Halloween costume, but David talked me into trying out Wonder Woman this year. Of course, this involved figuring out how to make my own custom-made armor, because why do anything the sensible, easy way?

This tutorial about how to make Wonderflex armor was invaluable in this process.

So, I started with the idea. After looking through hundreds of photos of Wonder Woman online, I sketched my own concept based on what I liked the best.

wonder woman costume sketch

Now, it was time to shop for boots and the corset. We got one corset, and it was too small. I wanted the corset lacing to either meet, or to have a panel, and it probably had a six inch gap with no panel. The peril of ordering on the internet. So, we tried a different style. This time it was too big. Of course. So, I ended up just taking it in.

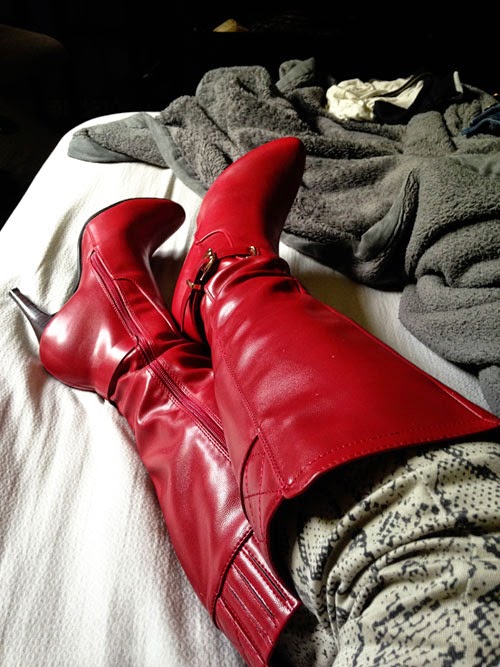
I also looked at probably hundreds of pairs of boots. I could have got the classic Wonder Woman boots, but I thought it would be more fun to go with something a little more realistic looking, to match the mood of the costume, and so I could wear them after Halloween too. I love the pair I got. When they came in the mail, I put them on and told David I was never taking them off.
Wonder Woman Cosplay from Craftastical using Wonderflex


Once we had the corset sorted, we started patterning the armor. It didn't seem like much, but there were a ton of different pieces to pattern, and then the problem of how to actually attach everything so it could come on and off my body had to be worked out before we made pieces.

I wish I had taken more photos of patterning, but I didn't start until we started molding. We used mostly Wonderflex backed with craft foam to make the pieces. I wouldn't do that again. The craft foam did not like sticking to the Wonderflex and it was a pain in the butt. I think several layers of Wonderflex is a much better option.

So, here's the front belt piece after the first mold, and then with the layers on top to add dimension.

Wonder Woman Cosplay from Craftastical using Wonderflex

Wonder Woman Cosplay from Craftastical using Wonderflex

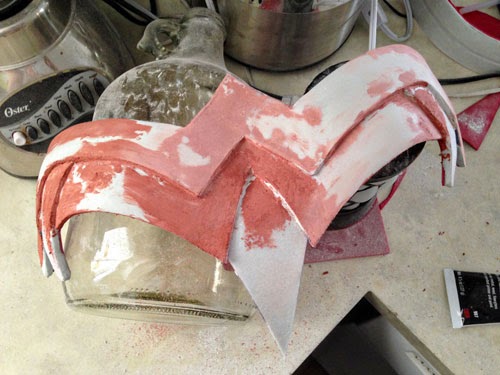
I can't believe I don't have more in progress shots of the breastplate. Urg! It was the most challenging, because it had more complicated curves and levels. I did put in one little dart and that helped mold the curves a bit.
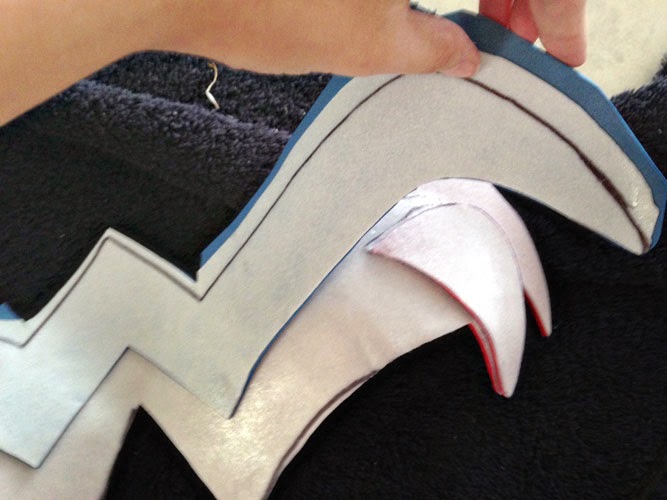
Wonder Woman Cosplay from Craftastical using Wonderflex

There you can see I'm building up the levels.
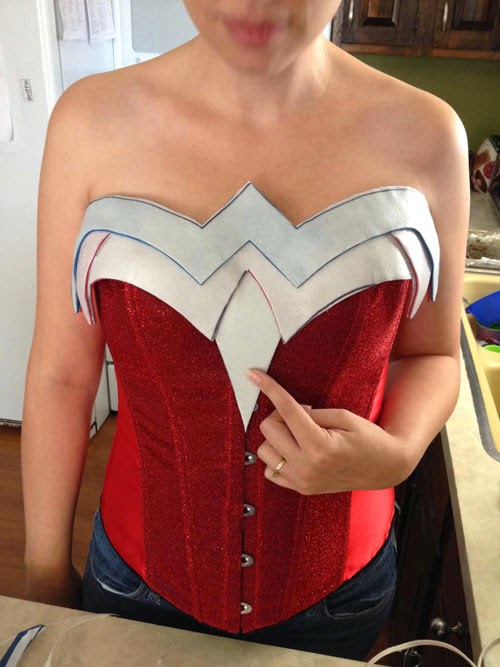
Wonder Woman Cosplay from Craftastical using Wonderflex

 You can see at this point, there are still a lot of waves and bumps.
Wonder Woman Cosplay from Craftastical using Wonderflex

We ended up covering a lot of it with Apoxie Sculpt, which was another giant pain. I don't think I mixed it correctly, so it was sticky, and impossible to get where I wanted it. And then it dries to concrete. You can sand it, and I spend hours sanding it.

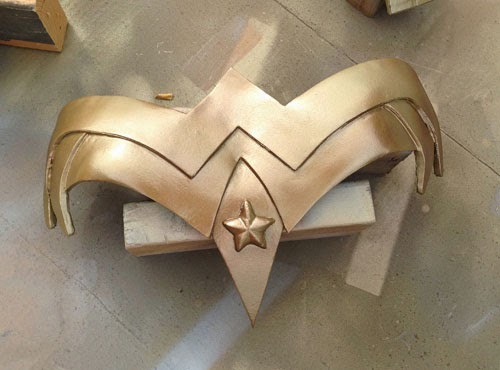
We also made the stars out of Apoxie Sculpt. The stars were also a pain in the rear. I would do them differently now. I knew I wanted that shape and type of star, but how to get the very sticky stuff in the mold (which took us AGES to find--we were even going to make our own mold at one point), and then out again without destroying the star? We end up using olive oil. Which was ok. But, I would have lined it with cling wrap and then coated the inside with olive oil. I bet they would have come out so nicely.

The red you see up there isn't the Apoxie Sculpt, it's filler. Which then had to be sanded. Again.
Wonder Woman Cosplay from Craftastical using Wonderflex

First coat of paint! I actually ended up painting them three times. I wanted a slightly aged look, but couldn't figure out the right balance. Eventually, did a mix of two spray paints, and then mixed gold acrylic paint with browns, yellows, blacks and whites to age the top, and then ever so slightly misted that with spray paint. And then a top coat of polyurethane.

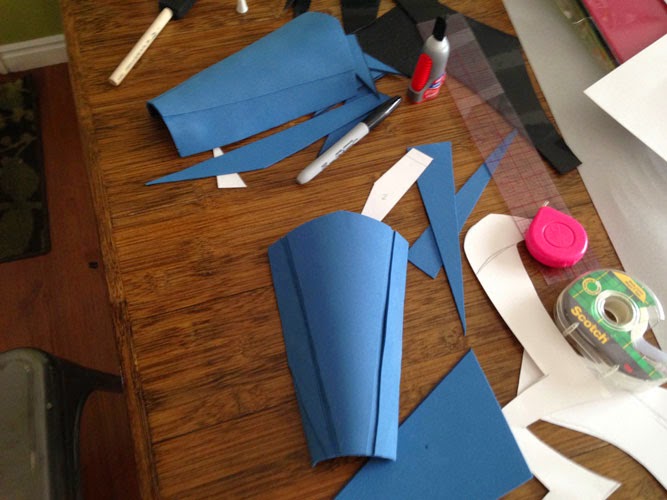
The bracers were actually done with a sheet of ABS plastic, craft foam and a touch of Wonderflex. Same with the tiara. It was a lot harder to heat to mold--but we were using my embossing gun from my stamping days. With an actual heat gun, it might have been a bit easier.
Wonder Woman Cosplay from Craftastical using Wonderflex

The basic bracer with a layer of craft foam, and then another layer for the dimension. (On the right is one of the paper pattern pieces.)

Wonder Woman Cosplay from Craftastical using Wonderflex

Adding the stars. I had to sand them down for ages to get them to curve. I wish I had figured out a better way to mold them so I could have just stuck down the clay when wet and avoided that whole mess. Next time!

Wonder Woman Cosplay from Craftastical using Wonderflex

The pieces to make the recesses traced and ready to cut out.

Wonder Woman Cosplay from Craftastical using Wonderflex

The tiara ready for paint. You can see the black ABS plastic (Wonderflex is white).

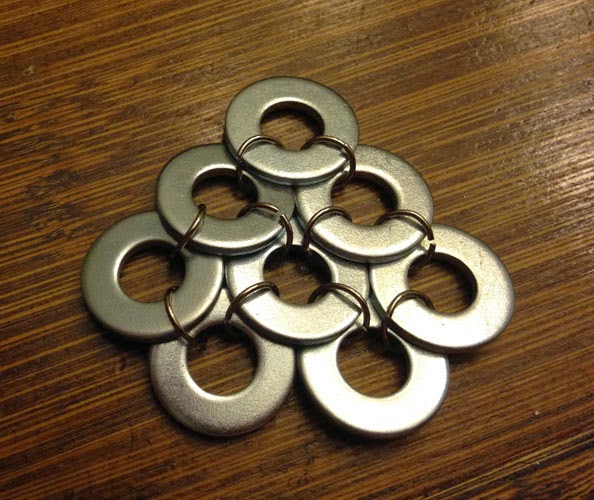
The chainmail was all handmade from washers and jump rings.
Wonder Woman Cosplay from Craftastical--handmade chainmail

Wonder Woman Cosplay from Craftastical--handmade chainmail

We found the red belt on the back at a thrift store and attached it to the armor with screws. The belt also comes apart in the front with overall hooks. Yes, the kind of overalls that are currently coming back into style. I found the hooks at JoAnn Fabrics.

Wonder Woman Cosplay from Craftastical using Wonderflex


The skirt I sewed from suede fabric. The star on the front is hand-stitched, and the other stars are metal--those things that you stick into fabric with the prongs that bend to attach. Studs, maybe? The bottom metal looking things on the end of each flap is wonderflex again, painted, with metal spike studs on each end.

The skirt is all attached to the belt. The back piece velcros so the belt still can unbuckle in the back. I got a swimsuit bikini bottom to wear under the whole thing.

Wonder Woman Cosplay from Craftastical using Wonderflex

Wonder Woman Cosplay from Craftastical using Wonderflex

Wonder Woman Cosplay from Craftastical using Wonderflex

Wonder Woman Cosplay from Craftastical using Wonderflex

Wonder Woman Cosplay from Craftastical using Wonderflex

I've started a new blog: Come follow my crafting adventures on my new blog. Find me at: creativeirony.com.

Tuesday, January 24, 2012

The Bee's Knees Digital Scrapbooking Kit Freebie

New to digital scrapbooking? Never downloaded a digital kit before? What in the world are .rar files anyway? Get your answers here: How to Unzip Files So You Can Digi Scrap.

Apparently, I've gone too long without designing a kit. Shaunte, over at This Too Shall Pass has progressed to harassment in order to get me to design another digital kit. This is good, because I apparently need harassment levels of persuasion in order to get me motivated to do anything after graduating. While harassment isn't supposed to make you feel desirable, I feel privileged to be Shaunte's object of harassment. If she progresses to stalker I will probably never be able to deflate my ego.

(If you don't read Shaunte's blog, you should. She's the type of funny that makes me realize that my attempts at humor are. . .how can I be kind? . . .underdeveloped. Perhaps if I had gone the extra step and had five children like her instead of four, I would have gone that extra bit of insane that would have imbued me with the truly funny stuff--not that I'm commenting on Shaunte. Really. Just on me. But, it's too late now to add any more crazy to our house. I must be content with envying Shaunte's comedic ability and forever wishing I had her finely-honed thrift-store shoe-finding abilities.)


I'm also hoping that this kit will be helpful to another friend who is in charge of an girl's camp this summer. Their theme is centered around bees, hence the theme of this kit. It just so happened to work perfectly with Aubriana's Halloween costume from this past year. Even if you don't have a need for a bee theme, there are plenty of unrelated papers in this kit--I'm quite fond of the clouds and the chevrons.

So, cheers all around for my first digital kit in ages! I enjoyed making it--I forgot how much fun it is to have an excuse to watch endless TV and dink around in Illustrator. I hope you like it!


Kit contains: 33 pattern papers, 1 set stitches, 1 overlay, 1 sheet honeycomb stickers, tags, 1 mask, 1 torn edge, 2 bee stickers, 2 flower stickers

I've started a new blog: Come follow my crafting adventures on my new blog. Find me at: creativeirony.com.

Tuesday, November 01, 2011

Halloween!

So, I stayed up sewing until 3:30 am on Sunday night. Maxton, really wanted to be Aang, from Avatar: The Last Airbender. I couldn't find any in the stores and for some reason, it didn't occur to me to check online until it was too late. This is cooler, because he's the cartoon Aang, not the live-action movie Aang.

So, of course, I didn't have a pattern, so this is hodge-podged together. The pants I based off a super easy pattern, then I added elastic around the bottom. The cape I sewed in one try, making up my own pattern, and same with the belt.

The collar took me four tries to get right (it's separate from the shirt). I'd never sewn anything like that, and I had to make my own pattern, so that was some serious trial and error. The shirt was a nightmare. The pattern I chose for the shirt was all wrong--the directions did not make any sense (or I was just not getting it, I'm going with the first because it makes me feel better), so I ended up just doing my own thing with it. But, it's done!
Aang from Avatar: The Last Airbender Halloween costume

I've started a new blog: Come follow my crafting adventures on my new blog. Find me at: creativeirony.com.

Friday, November 05, 2010

Super Hero Halloween

We had a very fun Halloween, and no one was puking this year! I love it when people don't puke! Last year, Xander was so sick he couldn't move and he missed the Halloween party and trick or treating. We had quite the exciting Halloween. I meant to post earlier this week, but now you are going to get two posts in one day again. Our church did a trunk or treat in the parking lot at 5:00, and there was a front coming in, but it didn't look too bad. All of a sudden there was a blot of lightening, the wind was blowing leaves everywhere, children were screaming, and it starts HAILING. Parents are picking up their children and running for it. I've never seen someplace empty so fast in my life.

I will never believe action movies anymore. When there is a danger, people move and then they are gone. I never much believed that they hung around, mouths open and agog, waiting to be eaten or stepped on, but now I really won't believe it. And I can feel all superior, because even in a white wig and five inch heels, I grabbed Aubrey and ran for it! Although, I was Storm from the X-men, and someone yelled at me as the front was coming in, "Storm, what are you doing?" Yeah, something must have been off about my powers right then. I smacked my head a few times, but they didn't come back online in time to save trunk or treat.

Aubrey was not happy about the hail hitting her in the face and kept saying, "I don't like it when it rains ice cubes."

Oh, and then when we got home a few minutes later, the drain outside our house was clogged, and we got a lot of rain in a very short time, so we had a lake in front of our house and up one third our lawn on Halloween night. So, we don't have a garden rake (seriously, we are new homeowners, give us a break), so we called the dispatch line to ask if there was someone we could call to have them come unclog the drain. A very nice officer came out with a rake and unclogged the drain. The kids and I watched and ate candy. David went outside to talk to him. Then there was the most beautiful double rainbow I've ever seen.

We went up to my mom's and did a little more trick or treating with the kids, because we had beautiful weather by then. And then David and I put the kids to bed at her house, and went to Olive Garden and a movie in our costumes.

And since I just basically wrote a whole Halloween post, I guess I might as well show you what David and I would have looked like on our date. David gets into the whole Halloween thing. So, he was Wolverine from X-men, and I was Storm. He did the whole Origins thing, with the street clothes and claws--and yes, that is all his hair and facial hair. He made the claws himself out of wood, dowels and spray paint. I did the more X-men uniform thing. I could alternately say I was Lady Gaga (and I've lost 30 pounds in the last year--crazy, eh?).


Unless I do this to my eyes in Photoshop, then I think it's pretty clear who I am.

Xander was Ironman, Maxton was Cyclops, Griffin was Spiderman and Aubrey was a penguin. We tried to get her to be Pixie, a character from the X-men comics, and she loved the idea (she had pink butterfly wings and pink hair), right up until she had to put on the costume every time. Then she would fight us about everything. I have no idea what was up with that. So we pulled out the costume box and she picked a penguin costume, which she loved wearing.

I'm so bad, I didn't get pictures of all of them yet (one year I didn't pictures of them in their costumes until December), but here's Maxton as Cyclops. David and Max made his visor together, and I think he looks awesome!
I've started a new blog: Come follow my crafting adventures on my new blog. Find me at: creativeirony.com.

Friday, October 29, 2010

Trick Or Treat Bags

Posting again today!

I pulled out the kids' trick or treat bags and remembered that I never shared them last year. I was literally sewing them minutes before we were due out the door.

They came out a lot larger than I was picturing in my head. I was really worried they would be too small and it would be hard for people to get treats into the bags and I overestimated the seam allowances. So I kept adding inches. Then I got the first one sewed and realize it was huge, but I didn't want them to end up different sized and incite a riot.

At least they will last until the kids are too old for trick or treating. No pillow cases for my kids. Well, pillow cases are cool, so maybe they will abandon them at some point.

When we got them out today, Griffin was ticked that his was candy corn. He wanted something hard core like spider webs or skulls. Candy corn is sooooo baby. Tough cookies, darling. I have no (working) sewing machine, no fabric and no time to sew him a new one, so he could be happy about candy corn or have no bag (by the way, he picked out the fabric last year). He seems to have made peace with it, as he was just pretending to be the "Candy Corn Power Ranger" a minute ago.
The names I printed out--the font is Century Gothic (funny considering my video I posted today--really, I love that font), and then I traced it onto the fabric and embroidered it by hand, adding the little x's for the dots on the i's.

David picked out the zebra fabric. I'm telling you, the mad has an obsession with zebra print. You can see how I used the leftovers in this skirt here.
I've started a new blog: Come follow my crafting adventures on my new blog. Find me at: creativeirony.com.

Tuesday, January 29, 2008

Only Three Months Late

I finally took some pictures of my kids in last year's Halloween costumes. I know, I know, I'm three months late. Fall is just crazy for us and I didn't ever take the time to get some portraits. I still need to take some of Aubrey, but she was sleeping. I'll catch her when she wakes up, then maybe post again.

I just couldn't resist sharing. They are so dang cute!
I've started a new blog: Come follow my crafting adventures on my new blog. Find me at: creativeirony.com.