Follow My New Blog

I've started a new blog. Follow my crafting adventures on creativeirony.com.

Showing posts with label spray paint. Show all posts

Friday, May 27, 2011

Flying Birds

I've crossed off a few more things from my UFO list! I'm determined to finish that list this summer. I realized the oldest thing on there is a cross stitch I started back before I was married, about 11 years ago. 11 years (that's a little over 1/3 of my life). I guess I should just be happy there aren't older objects sitting about. The cross stitch is actually all finished, but it's never been framed; it's been sitting in a box for 11 years. I think I'm going to make a pillow out of it.

Anyway, that has nothing to do with my post today! I hung up some art in the corner of my bedroom where my chair sits.

I happened to see this tray by Eskil Design on Young House Love somewhere in the advertising sections and was very attracted to the graphic elements of the trees, clouds and birds. I designed something highly inspired by it (ok, I nearly copied it--although I went off memory and tried not too look at it and also put my own spin on it).

The tray:
Eskil Design tray with birds and clouds
  My version:
Eskil Design inspire graphic design print

I've started a new blog: Come follow my crafting adventures on my new blog. Find me at: creativeirony.com.

Thursday, May 19, 2011

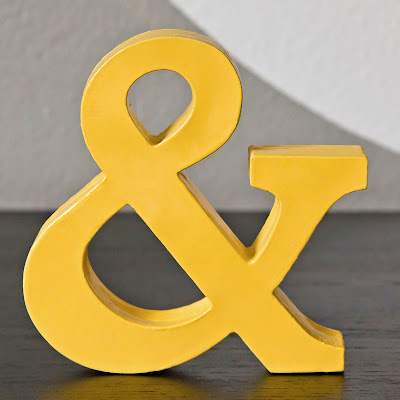
Tutorial: Ampersand for a Shelf

A little while back, I bought a K and D from Hobby Lobby to put on my picture ledges once they were built. The plan was to get an ampersand to put between them. Awww, too adorable, right? Kara and David=forever. But, I couldn't find one I liked. I'm sort of a font snob. Ok, not sort of. I am. Like nearly every other female craft blogger, I started a Pinterest account, and there are a lot of snobby font things pinned to my funny board. Most of them make fun of Comic Sans. Poor Comic Sans. If only people wouldn't put it where it has no business being! Then Comic Sans wouldn't be the ugly dog of the font world.

Anyway, I pondered on this problem for several months. I could have cut my own ampersand out of wood with my mom's scroll saw, but it's about 20 minutes away, and that's kind of annoying to get exactly right. I've cut out complicated things with a scroll saw before (see the cake topper here), so I could do it, I was just being moody about it.

Then it hit me. A way in which I didn't have to drive round trip 40 minutes and get out the scroll saw from the caverns of my parents' garage. And this is that tutorial.

cardstock ampersand, made by layering cardstock cut with Cricut


Supplies needed:
Scrap cardstock (or pretty cardstock in pretty colors)
Cricut machine or Silhouette machine or traditional die cut machine--I used a Cricut and Plantin Schoolbook cartridge
Mod podge
Sandpaper or rotatory tool
Wood filler
Spray Primer
Spray Paint

Step 1: Cut out a bunch of shapes of the same size. I didn't care about color, because I knew I was going to paint mine later. If you don't want to paint, you can use pretty colors in the same shades or coordinating shades for very pretty effects, or use all the same colors.

I've started a new blog: Come follow my crafting adventures on my new blog. Find me at: creativeirony.com.

Friday, July 30, 2010

Project Progress: Kitchen Update Week 9

I know. I can't believe I'm still working on the kitchen. It seems like such a huge project. And I'm sorry to report that things at our house have not stopped breaking. One of the boys broke my tripod, which puts a wrench into the whole blogging thing, since I use it nearly daily to take pictures. I won't mention which boy it was, because he felt really bad about breaking it. So, that will have to be replaced soon too.

Luckily, it's not nearly as bad as replacing a dishwasher, which we have now done! So, yay, new dishwasher! It does great. Except, there is a leak under the sink in the line that goes to the dishwasher. So the water to the dishwasher has to be turned off until David can get to fixing the leak, and turned on when I want to do a load of dishes. Yeah, not too great.

David will fix it soon. David will fix it soon. David will fix it soon.

The home ownership gods are laughing at our rather eventful initiation passage.

Anyway, I finally went out and bought the primer, spray paint and clear vinyl I needed to recover my chairs. We got these chairs from an ad on KSL. For some reason, in Utah, KSL is the place where all the ads get put. It's a local news station. You can find some things on Craig's List, but KSL is where everyone goes. Anyway, we saw these chairs for $8 a pieces and bought 8 of them. I knew I could make them amazing.

Yeah, that's green metal and bright orange vinyl. Picture in our old basement apartment.

When we got there, the lady selling them said they were related to the people who ran the Provo Leatherby's, which sadly closed a while back, and that is where all the chairs came from. We loved Leatherby's. They still have a few Utah locations open. Anyway, when we were living in Provo while I was pregnant with Griffin, we used to walk to Leatherby's several times a month and eat there. They have good food and the most amazing ice cream EVER.

Once, I went to a Two Peas in a Bucket Utah gathering and we met at Leatherby's and I totally did a caramel "shot" which means I drank straight caramel out of a cup. It was yummy.

Anyway, it's pretty awesome that these were the chairs from Leatherby's.

So I took off the seats.

Lightly sanded the metal. Primed it.

Then David sprayed the charcoal metallic finish on for me, because we are discovering I'm not very patient with the spray paint when it comes to a big project like this.

Then I recovered the seat cushions. Added clear vinyl because have you met my kids? Well, probably not, but you've heard about them. They are not neat and tidy children and I want my seats to last more than 10 minutes.

I cannot even describe the process I went through to pick out this fabric. I could write a full-length novel on it. It would be the most boring novel ever, even worse then Ulysses by James Joyce, but maybe read by more people, and it could rival it in length. Anyway, when I found this fabric, I liked it a lot and thought it might work, so I called David to come check it out, and he liked it, so I bought it, and now I love it and can't image anything else. It's Modern Meadow by Joel Dewberry for Westminster Fibers.


Then I put the seat covers back on.

And I had one chair finished.

Only seven more chairs to go!

Linking Up Here:
Chic on a Shoestring Decorating


I've started a new blog: Come follow my crafting adventures on my new blog. Find me at: creativeirony.com.

Monday, July 12, 2010

Tutorial: Aged Compass Decor Stand

Back when I begged David to help me do the great epoxy cake stand marathon, I also stuck together this hideous dollar store candle stand and a slightly less ugly plate, and got this:

Yeah, we can do way better than that. Pretty sure that mottled mess on the bottom needs to go.

A little later, after some spray paint, aging and vinyl, I had this pretty thing:

So much better! This is pretty much the exact green that is on my kitchen walls, although this is probably going to end up in our downstairs family room.

For this project, you will need:
A candle stand
A plate
Epoxy glue or other strong adhesive
Spray primer
Spray paint
Black acrylic paint
Paint brush
Spray bottle
Rag
Round vinyl decal
Clear spray sealer

Step 1:
Mix epoxy according to directions. Apply to surface of candle stand. Center on plate. Allow to sit for 5 minutes. You can move after time specified on epoxy, although full strength is usually not reached until 24 hours. You are probably ok to move onto step 2 before 24 hours.

Step 2:
Prime and paint with desired color. Allow to dry overnight.

Step 3:
After letting it dry overnight, I aged it a bit with some black acrylic paint. This was my first time trying this sort of aging technique, and I really liked the way it turned out. First, have on hand a largish paint brush, a spray bottle filled with water and a rag. Squirt a little paint on the surface, and spread around in different directions with paint brush, squirting with water. Once you have it everywhere, wipe off the excess with the rag. Work quickly. Repeat on underside. Let dry (it dries pretty quickly).

One of my kids needs to hurry up and get old enough to press the button on my camera in a reliable manner so I can get action shots of these sorts of things. I didn't get great shots of this process cause it was just so fast to do.

Step 4:
Cut out vinyl with Cricut. I used the Graphically Speaking cartridge, which has this cool compass star. My plate was 10.25", so I cut it out 8.75" tall. If you are using your Cricut to cut the vinyl, I used the settings blade depth 6, speed 4, pressure 2 to cut through the vinyl, but not the paper backing (you may need to adjust slightly).

Find the center of your plate and mark. I use a quilting pencil, which will rub right off. Apply your vinyl, and burnish. I admit to cheating a bit and not using transfer tape, although that probably would have been a lot easier.

Step 5:
Coat with a clear spray to protect the finish and your vinyl. This is going to go perfectly in my world/travel themed family room. . .

Linking Up Here:


Keeping It Simple
mmm button
I've started a new blog: Come follow my crafting adventures on my new blog. Find me at: creativeirony.com.

Friday, June 25, 2010

Project Progress: Kitchen Update Week 6

When I hung my shelves, I left plenty of room underneath for a gallery style collection of artwork. I've already posted a lot of it, like my silhouette frames, my crochet butterfly, and my kitchen message center.

I started collecting larger frames for this a while ago. I bought most of them at Savers or at Dollar Tree. I didn't pay more than $5 for any of them, and I got most of them for a dollar.

When I started to do this, I first put all the frames on the floor, trying to get a good arrangement. After a little tweaking, I had this arrangement:

Yeah, some of what are in those frames are scary, from the evil looking bears on the far left, to the sappy motivational poster on the far right, and those 80s geese prints (one you can't see because of the glare, but completely not my style).

I immediately started plugging in digitally some of the artwork I wanted to use:

Already, I'm feeling better about this.

I spent the better part of two days spray painting these. Of course, I didn't have to sit outside and watch the paint dry, thank goodness. That's so boring, they coined a cliche about it.

After that, I traced them on leftover paper we used to wrap the breakables in, and put them up on my wall with painter's tape. I also put up some of the ones I knew were at key points and not moving anywhere. I used command strips for these, the picture hanging ones. They are expensive, but I love them for projects like this, because they tend to hang much straighter than regular nails and you can tweak them a little bit, or even move them completely if you have some adhesive refills. And my kids don't knock them off the wall when they go by. Usually.

Once I got up the paper, I realized that I needed to make the whole thing a rectangle, and not have the variation in the bottom line, because it was looking messy and busy. It reads much more as a single unit now.

Then I started plugging in my digital images again (how amazing are digital cameras and Photoshop? We live in an age of wonders--there should be a song about that, because, seriously, I feel like breaking into song right now.).

And after a lot more tweaking, and a lot more making of art, my wall is currently looking like this:

Still a few things to do, but it's shaping up nicely.
I've started a new blog: Come follow my crafting adventures on my new blog. Find me at: creativeirony.com.
Monday, May 17, 2010

Tutorial: Alphabet Frame Makeover

I am working on decorating my kitchen.

Step one was my painted laminate countertops. Step two was hanging some shelves, which I'm going to show you later this week. Step three is hanging art. I've been having a blast making up art in my kitchen colors, which are teal, olive green and mustard yellow.

This was one project I recently finished. I'm not sure where they are going to hang just yet (hence the pictures on my kitchen table), but I love the graphic feel of it.

This is a fairly easy project that makes a big impact. I can't take credit for the idea. I saw a fabulous chair in a magazine that inspired the frames.

Ok, for this project, you are going to need:
Flat Frames
Spray Paint
Mod Podge or craft glue or hot glue (maybe I should just say adhesive?)
Chipboard alphabets
Craft knife

Here are my frames before I started. I was thrilled to find three matching frames at Savers last time I went. They are from IKEA and were $.99 each. I don't think IKEA sells these anymore, but my guess is I probably didn't save all that much money, but I did save an hour trip, so there's that.

Ok, onto the steps:

Step 1:
Remove glass from frames. Put metal tabs or staples back into place.

Step 2: Start gluing on chipboard letters. This is a great time to use up the last of some alphabets you already had. I think it would look awesome with numbers, as I always have numbers left over. Chipboard alphas aren't too expensive, and I bet you could do three frames with one of a larger size, if you needed to buy them new.

Step 3: Once your chipboard is all glued down, turn the frame over and trim with a craft knife. Do lots of shallow cuts for a cleaner cut, and it's less likely your alphabets pieces will come off.

Step 4: Sand down the edges and the tops of any really glossy letters. Also, make sure there aren't any glue drips or anything else that will mar the look of your finished piece. I freely admit I had some trouble with this. Don't look too closely.

Step 5: Prime your frames, then do light coats of spray paint to cover the chipboard. Let dry between coats.

Step 6: Clean your glass and put artwork in your new frames. I designed these prints just for my kitchen.


See, pretty simple and I such a fun look! Maybe someday I will do a chair. . .

Sharing Here:
Making

The Girl Creative
Sumo's Sweet Stuff
The Persimmon Perch
I've started a new blog: Come follow my crafting adventures on my new blog. Find me at: creativeirony.com.

Tuesday, May 11, 2010

Eclectic Picture Wall--My Second House Project

I was going to call this my first project, but I guess I have to let my painted laminate countertops be the first project. I feel like it was first, because I started planning for it the minute our offer was accepted.

I wanted to do something really striking on entering the house. I had this idea to do a lot of different pictures on a wall with a monogram in the middle. I actually started gathering and painting frames weeks ago, and the quilling monogram was the last piece of it.. I didn't pay more than a dollar for any frame, except the middle one, which was $5. I did probably go through two or three cans of spray paint. I actually have a cool idea for how to dress up some of the plainer frames, but that is going to wait for later. Right now, I'm loving it.

I totally splurged on those new Command strips, the picture hanging ones which are sort of velcro-ish and you can take the pictures on and off. I'm so glad I did, although it was probably as much as the frames, because they are all hanging pretty straight, will likely remain so, they are easy to get on and off and I don't worry about the kids knocking them off the wall, AND they were a lot easier to put up than putting nails everywhere.

I knew for a while that I wanted to do teals in the living room. The kitchen is going to have some in it too, since the spaces need to relate to each other. One thing I really love about this house is that the kitchen feels integrated into the living space, but it's not just floating around. It has a defined area too.

Anyway, I wanted to paint the wall behind the pictures teal. It was a bit of a challenge to figure out how to do this, with the way the stairs are set up, with the railing on one side and the half wall on the other, but I finally decided to just paint the long rectangle. I think it works pretty well.

One of the hardest parts was narrowing down the pictures. I think I had 72 in a folder once I finished going through all the pictures since we were married. These are really some of my very favorites.

Also, dang, my kids are CUTE!

So, here's the before:

And the after:
That light fixture has got to go! It's ugly and it doesn't even work.

Oh, and if you're interested, here are the photos I choose.


Linking Up Here:


Blue Cricket

Me and My Bucket

Photobucket

Make it Yours @ My Backyard Eden
I've started a new blog: Come follow my crafting adventures on my new blog. Find me at: creativeirony.com.