Follow My New Blog

I've started a new blog. Follow my crafting adventures on creativeirony.com.

Showing posts with label upcycling. Show all posts

Monday, March 16, 2015

How to Convert a Dress into a High-Low Tunic

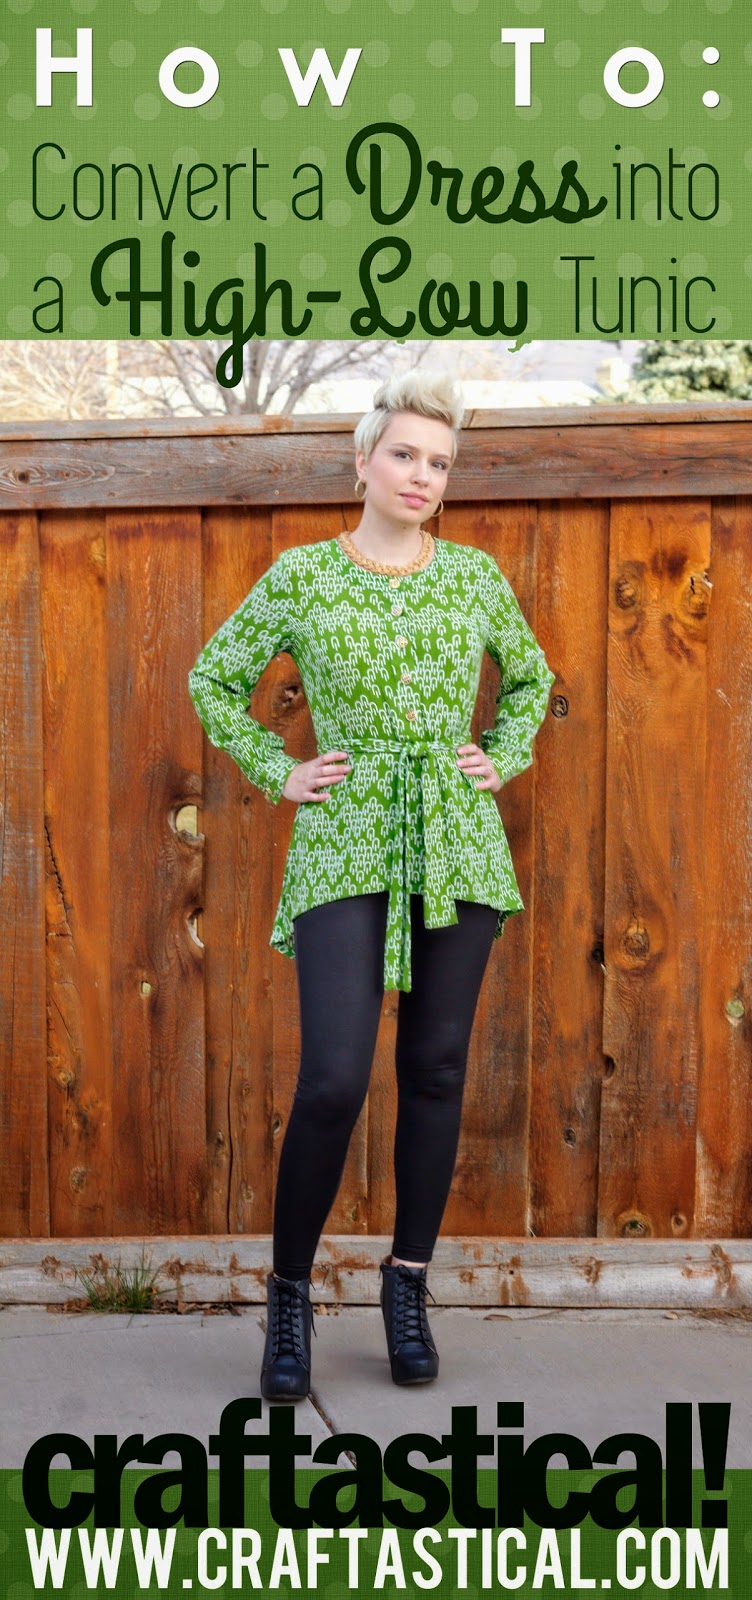
How to convert a dress into a high-low tunic from Craftastical!

Saint Patrick's Day is upon us, and I realized I have very little green in my wardrobe, which is unacceptable. I searched through three stores, not finding anything green that looked good on me, and finally found a cute green dress at the local thrift store in town, AND it was half off day, so the grand total for this dress? $2.50. Only, it was a bit. . . frumpy? Action had to be taken.
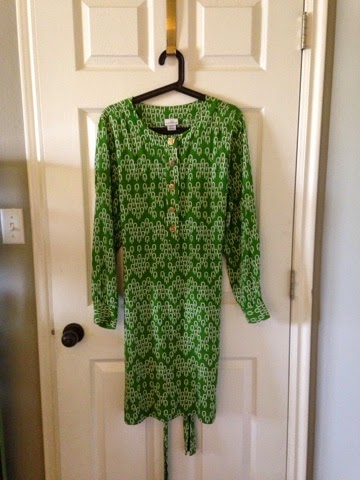
Dress before high-low tunic conversion

I decided to modernize it by making it into a high-low tunic. It was actually a lot easier than I was expecting and only took me about 30 minutes. I love any sort of thrift store find (half my wardrobe is from thrift stores or consignment shops), and I love all things upcycled and restyled.

Here's my tutorial, so you can try it too.

STEP ONE
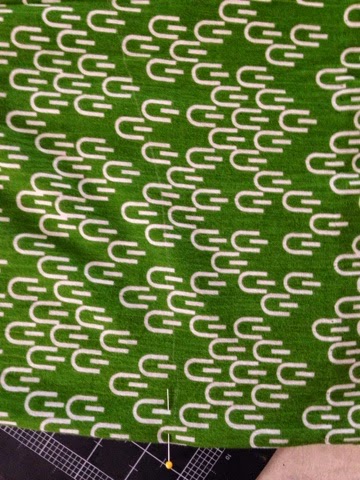
First, put on your dress/skirt/extremely long shirt, whatever you are converting. Mark the length of the front hem with a pin exactly in the middle (I would actually use safety pins--one of mine fell out when I took off the dress). Do the same with the back. Obviously, the back is going to be anywhere from 3-4 inches longer to, well, as long as you want. Drama, baby.

Front pin (hard to see with that pattern, but it's there):
Marking the dress hem in the front

Back pin:
marking the dress hem in the back

STEP TWO
Next, you're going to cut your hem. Remember to leave 1-2" of seam allowance.

To mark the hemline, lay the garment on its side, with the side seams matched up. This should leave your marking pins on the fold lines for the front and back.

Side seams matching and folded exactly along the front and back:
setting up the hem to be cut

Draw your line for your hem (remember seam allowance). This is probably the trickiest bit. Remember you're going to want to hit the fold at a right angle so you don't create a point, and you're going to want most of the "high-low" movement to happen at the sides, leaving the front and back fairly level.

I used a white fabric pencil to mark my line:
marking the hem line

I used a rotary cutter to make a smooth cut. Fabric scissors will do the same thing though. Cut through both layers of fabric at the same time. Once you've cut your line, try on the garment again before hemming, to make sure you like the line. I realized my cut wasn't curvy enough the first time, and cut a tiny bit more off, after I lined everything back up again.

My finished cut:
the finished cut hem line

STEP THREE
Once I had my hem line like I liked it, it was time to iron the hem. Turn up however much you allowed, and iron. You're going to want to finesse this a bit--you've got some curves and that's always a bit tricky to get to iron flat, but most fabrics will adjust if you work them a bit.

Raw edge turned up:
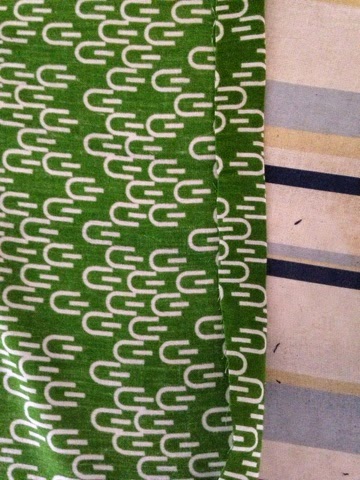
ironing the hem line

Then turn the raw edge under again, making it meet the ironed fold and press.

Raw edge turned under again towards fold:
ironing the hem line

Once that's all done, stitch the hem down. You can use a machine or hand sew. I chose to hand-stitch my hem, but a machine will do the job just as well. Just make sure to ease as you go, since you're sewing curves here.

Hand stitching my hem down with matching thread:
hemming upcycled dress

Then wear your new tunic with pride! I love how mine turned out.

How to upcycle a dress into a high-low tunic from Craftastical!

Also, one of my friends calls this hemline a mullet hem, and I'm pretty sure that wins the internet.

Linked Up Here:
Tatertots and Jello
I've started a new blog: Come follow my crafting adventures on my new blog. Find me at: creativeirony.com.

Monday, August 05, 2013

Craft Room Furniture! This is Finally Happening!

Hello! It's been a while since I've blogged. I'm afraid to look at how long. If you were reading my blog before, I'm sure you thought it was dead. I meant to keep blogging. I never meant to stop. But, I got very busy trying to be Utah's sole source of actresses between the ages if 17-35. I think I was in every community production In Utah County in the last year. If I wasn't, I saw it or knew someone in it. I got sucked into the vortex of community theater and almost the only crafting I did was sewing my costumes for productions. 

Recently, I was Ms. TeaVee in Willy Wonka. Using a mash up of vintage patterns, I made this dress: 

Ms. TeaVee 50s vintage dress from Willy Wonka

Anyway, I'm getting distracted. What I really came to post about is this disaster: 


Yep, my craft room. Sad, isn't it? And, this is after cleaning up for a while (a long, long while--and paying one of my kids $10 to help me). A huge part of it is that I have no workspace, so stuff ends up everywhere when I'm working. (Also, I have too much stuff, but I'm pretending that isn't a problem.)

Well, my friends, that is about to change! I recently came into a very cool couch and about $100. I want the couch to fit in this room so people can hang out with me while I craft, and the $100 is perfect for building a huge desk.

Last Saturday, David and I went to the Habitat for Humanity Restore looking for kitchen cabinets to use to make this desk. We got a big fat zero, and they were more expensive than I was hoping. I could have cobbled something together, but it would have eaten my entire budget and nothing would have matched. Nothing would have matched! It was not working for me. So, on the way home I got the bright idea to look on KSL (basically the Craig's List of Utah--no idea why everyone posts there, but we do).

And there it was. Some guy remodeled four matching kitchens and was selling off the cabinets for $10 a piece. And he was home when we called! And didn't sound too eccentric! We were wrong about that last part, but that's okay. 

So, we go to this guy's house (which is upgraded in every possible way--the doorbell chime lasted longer than Beethoven's Symphony No. 9); he makes us remove our shoes to walk across the hardwood floors. Then we ride his elevator (yes, elevator) down to the walkout basement four car garage where he has the kitchen cabinets. We pick out six of them, and pay the guy. We was a perfectly nice normal guy. I'm not sure why he had an elevator, but I'll go with it. Our daughter was with us, and she thought it was cool. 

So, here they are, my new cabinets. 

Used kitchen cabinets to convert to office desk

The dude who sold them to us told us there was nothing wrong with them; that they were just outdated. Dude might have an elevator, but he was wrong about that. They are stinky--like old apartment smell--and greasy and damaged in spots. The hinges have plastic pieces that were breaking apart. There is some nasty gunky on one of the shelves that I am not even going to attempt to clean off. That thing is just getting replaced.

However, they are perfect for what I want them to do. More on that soon. Very, very soon. 
I've started a new blog: Come follow my crafting adventures on my new blog. Find me at: creativeirony.com.

Tuesday, October 02, 2012

Inexpensive Organizing

This is Part 3 of my How I Organized My Entire House for $0.00 (Really!) series.
Part 1 (Intro) is here.
Part 2 (Simple Rules to Create Organization that Sustains Itself Plus Master Bath Organization) is here.

10 Tips for Inexpensive Organization


Some things I've learned for organizing on the cheap:

  1. Organizing is about your life, not about how much money you spend (obvious, but it took me a little while to learn. I love pretty, fresh school supplies, um, I think I've mentioned my love of pretty containers, I love pretty interior design--all that generally costs money--even though I try to manage to spend as little money as possible). I used to want it to be pretty and perfect or not at all. It doesn't work that way. It can be pretty later. Right now, it just needs to be organized. In fact, it's better to see if what you come up with works, then buy whatever pretty things to put it in. That way you're not investing a money in a system that won't work for you in the long run anyway.
  2. Don't get caught up trying to create the perfect system. Very related to #1. Trying to make the perfect system generally has the effect of making me want to spend $. No system is perfect, but there are systems that work. Like I've said before, if you see a problem, think about how to fix it. Sometimes it's as easy as providing a trash can in the right spot, grouping the right things together, or moving something so that you have easier access. And sometimes it's just accepting that you have to change your habits (hard!).
  3. Get rid of stuff. Less to organize! I recently made a goal to get rid of 100 things. This is something I plan to do regularly. Along with that, don't buy new things. I recently read that if you are contemplating buying a (non-perishable) item, put it on a list and wait a designated period of time: two weeks, a month, whatever. If at the end of that time, you still want/need it, buy it.* I find delayed gratification so hard, but it does help a lot with clutter.
  4. Use "trash" to organize.** Food comes in great containers. If all you have are oatmeal containers, cardboard boxes from cereal boxes, fruit snacks, peanut butter jars, strawberry baskets, mayonnaise jars, peanut containers, empty spice jars, even boxes of soda, then use those. There are lots of ways to dress them up, if you want.*** Baby wipe containers are also quite amazing--ask friends if you don't buy wipes yourself. I've seen great things done with paper towel rolls--and toilet paper rolls, but that grosses some people out.
  5. Use what you have already.**** You've probably bought baskets or plastic containers already. As you organize, you'll find you get rid of things (see #3) or find new systems. A lot of shifting will occur and you can reuse those old containers.
  6. To help with costs, go second-hand. Thrift stores and garage sales can be great for finding containers (the flower vase in the picture came from a garage sale). Canning jars are often easy to find and make pretty good storage containers; also, muffin tins. Sites like Craig's list can be great sources for free cardboard boxes people are looking to ditch after they move. This can work great for some things (the free section even has furniture if you are looking for bigger storage solutions--it doesn't have to be pretty--think basement or garage and hide it--and even if it's ugly for a while, if it's free, you won't feel like you wasted money by buying a cheap temporary option). Even cups or bowls you don't use much can make great storage containers.
  7. Hit up your friends. Trade around. Find an organizing buddy and see if you might have things they can you use and vice versa. When I told my friend Natalie about my project, she said she might have some things I could use--funnily enough, I just realized she gave me those jars that appear in the picture above! 
  8. Another cheap source is the dollar store or bargain stores (although I think this can add up quickly if you're not careful and sometimes you don't get much for your money. Caution.)
  9. Make your own storage.***** There are great tutorials out there for sewing your own fabric boxes, and if you use fabric you already have on hand, it doesn't have to be too much out of pocket. Or use the $4 bed sheets from Walmart for the fabric to get a more uniform look. I've even seen sturdy baskets woven out of paper.
  10. Make your own cleaning supplies. This isn't really about organization, but it will save you tons of money, and when things are clean, you want to keep them organized. There are a few products that I really love that I still buy, but for tons of things, I make my own. There are dozen of recipes out there, and I will probably do a post on my favorites at some point.

I've started a new blog: Come follow my crafting adventures on my new blog. Find me at: creativeirony.com.

Wednesday, August 03, 2011

The Pinterest Challenge--A Floor Lamp Make-Over

String ball lamp--cool lamp make-over for a Pinterest challenge

A little bit ago, Sherry from Young House Love got together with a few of her friends and issued a Pinterest challenge, the idea being to actually use Pinterest to inspire you to make something, and not just to glamour you like a time-sucking vampire with the pretty colors. Oooooo, pretty colors.

Surprisingly, I actually have used Pinterest a few times to inspire real-life projects. How is it that so many projects do not end up on the blog??? My sister and I spent a whole day once doing naughty things to t-shirts (like cutting them up and then not even sewing proper hems on them!) inspired by Pinterest projects. I guess most of those ended up belonging to Melissa, which is why they didn't show up here.

I've started a new blog: Come follow my crafting adventures on my new blog. Find me at: creativeirony.com.

Wednesday, June 15, 2011

UFO, I'm coming for you.

Over the past three weeks, I've been working on my unfinished objects. I'm killing them off, one by one. 13 out of 41 are done (although I don't thing everything in my unfinished box is on that list--I may need to do a little revising--still it's close enough).

Some of them have turned out cute. Some of them, not as cute. But, the most important part of this process is that they are done and I can either give them away (even if it's to the thrift store) or start using them or realizing that I'm not going to use them. Such is the way of the things I make. I'm pretty sure that Aubrey does not like the dress I finished for her.

Anyway, here's the list as it looks so far.

Spray paint frames
Tree tote bag
Pettycoat skirt
Ampersand
Yellow rosette pillow
Patches on jeans
Long blue tank refashion
Box purse
Let out Citrus halter
Sew pom pom on poncho
Crochet tan bag
Blue and brown crochet hoodie
White floaty scarf

Pink shirt refashion
Wrap around vest refashion
Crochet fingerless gloves
Repair pink and grey hair flower
Hexagon quilt
Thanksgiving wall hanging
Rehang crochet butterfly in kitchen
Garden quilt
Grandkid silhouettes
Gold sweater
Yellow flower/pink flower/pink felted flower/purple headband/pink cuff
Curtains
Green knitted buckets
Painted linen skirt
Blue serving stand
Braided rug
Mom's messenger bag
Santa Claus wall hanging
Repair grey and pink hair flower
Grandma Jensen quilt--blues and purples
Crochet beaded bag
Butterfly embroidery
Wool scarf
Cross stitch Noah's Ark
Blue and Pink diamond quilt
Orange and green diamond quilt
Mom's Christmas present albums
Bag embroidery

Now to the good stuff. Pictures.

I've started a new blog: Come follow my crafting adventures on my new blog. Find me at: creativeirony.com.

Monday, November 29, 2010

Make It Your Own--Northridge Publishing

A few weeks ago, I had the chance to film with Kristine McKay from Northridge Publishing. It was so much fun to be in front of the camera and I hope I don't seem too goofy, shifty-eyed or nervous. I had a blast, and here's one of the segments we filmed.

Many thanks to them for having me!


And the super-sassy photo of Aubrey I took with her in the skirt (which weirdly printed up backwards on my printer the morning of filming, but I didn't have time to print a second, not-backwards version):

And, a close up of the owl:
I've started a new blog: Come follow my crafting adventures on my new blog. Find me at: creativeirony.com.

Friday, July 30, 2010

Project Progress: Kitchen Update Week 9

I know. I can't believe I'm still working on the kitchen. It seems like such a huge project. And I'm sorry to report that things at our house have not stopped breaking. One of the boys broke my tripod, which puts a wrench into the whole blogging thing, since I use it nearly daily to take pictures. I won't mention which boy it was, because he felt really bad about breaking it. So, that will have to be replaced soon too.

Luckily, it's not nearly as bad as replacing a dishwasher, which we have now done! So, yay, new dishwasher! It does great. Except, there is a leak under the sink in the line that goes to the dishwasher. So the water to the dishwasher has to be turned off until David can get to fixing the leak, and turned on when I want to do a load of dishes. Yeah, not too great.

David will fix it soon. David will fix it soon. David will fix it soon.

The home ownership gods are laughing at our rather eventful initiation passage.

Anyway, I finally went out and bought the primer, spray paint and clear vinyl I needed to recover my chairs. We got these chairs from an ad on KSL. For some reason, in Utah, KSL is the place where all the ads get put. It's a local news station. You can find some things on Craig's List, but KSL is where everyone goes. Anyway, we saw these chairs for $8 a pieces and bought 8 of them. I knew I could make them amazing.

Yeah, that's green metal and bright orange vinyl. Picture in our old basement apartment.

When we got there, the lady selling them said they were related to the people who ran the Provo Leatherby's, which sadly closed a while back, and that is where all the chairs came from. We loved Leatherby's. They still have a few Utah locations open. Anyway, when we were living in Provo while I was pregnant with Griffin, we used to walk to Leatherby's several times a month and eat there. They have good food and the most amazing ice cream EVER.

Once, I went to a Two Peas in a Bucket Utah gathering and we met at Leatherby's and I totally did a caramel "shot" which means I drank straight caramel out of a cup. It was yummy.

Anyway, it's pretty awesome that these were the chairs from Leatherby's.

So I took off the seats.

Lightly sanded the metal. Primed it.

Then David sprayed the charcoal metallic finish on for me, because we are discovering I'm not very patient with the spray paint when it comes to a big project like this.

Then I recovered the seat cushions. Added clear vinyl because have you met my kids? Well, probably not, but you've heard about them. They are not neat and tidy children and I want my seats to last more than 10 minutes.

I cannot even describe the process I went through to pick out this fabric. I could write a full-length novel on it. It would be the most boring novel ever, even worse then Ulysses by James Joyce, but maybe read by more people, and it could rival it in length. Anyway, when I found this fabric, I liked it a lot and thought it might work, so I called David to come check it out, and he liked it, so I bought it, and now I love it and can't image anything else. It's Modern Meadow by Joel Dewberry for Westminster Fibers.


Then I put the seat covers back on.

And I had one chair finished.

Only seven more chairs to go!

Linking Up Here:
Chic on a Shoestring Decorating


I've started a new blog: Come follow my crafting adventures on my new blog. Find me at: creativeirony.com.

Thursday, July 01, 2010

Share-A-Craft: Cupcake Towers

I saw these adorable cupcake stands ages ago (ages ago in Kara time translates to a few months ago). I've been collecting plates ever since. I had the worst luck in finding the appropriate candlesticks, so I ended up using cups mostly, plus one vase, and a 5-minute epoxy.

We used two of them the other day for family party, and they worked great. We had M&Ms in the top bowls, cookies around the sides and donuts and peanut butter bars on the bottom. They could also work great for cupcakes, or even veggies and dip. I'm sure we'll be using them a lot.


I picked up the plates and bowl for the blue ones from Walmart on clearance, and they were $1.50 each, with the glass coming from the dollar store. Total cost was $5.50.

These plates came from Savers for $1 each, and the glass from the dollar store. Total cost was $3.

These plates and the glass also from Walmart on clearance at $1 each, for a total cost of $3.

I think this is my favorite. The everything came from Savers. The plates were a dollar each, as was the vase and the little metal cup on top, for a total cost of $4.

The 5 minute epoxy was about $4. I also used it for something else, so I'm calling it an average of $4 per cupcake stand. That's a whole lotta cute for $4.
I've started a new blog: Come follow my crafting adventures on my new blog. Find me at: creativeirony.com.

Thursday, June 10, 2010

Share-A-Craft: Toddler Rag Tag T-shirt Skirt

I have an addiction to sewing skirts. They are just so simple, fast and fun, and Aubriana loves to wear them.

I didn't get a before picture, but this skirt is made out of an old t-shirt of mine. I've always loved the color and it's so soft, but it had gone the way of all cotton shirts in my house and shrunk. I hope it shrunk. I might have increased a tiny bit.


I love the flowers on the side and the easy draw-string (made out of the hem of the shirt). I basically followed this tutorial, with a few modifications. I plan on doing this pattern again, with a few more modifications to make it a tiny bit easier (like cutting two tiers, sort of like I did with my petal skirt).

Of the three skirts I made her for her birthday, I think this is my favorite, but only by a tiny margin.

Linking Up Here:
HookingupwithHoH


Show and Tell Green


I've started a new blog: Come follow my crafting adventures on my new blog. Find me at: creativeirony.com.

Monday, May 17, 2010

Tutorial: Alphabet Frame Makeover

I am working on decorating my kitchen.

Step one was my painted laminate countertops. Step two was hanging some shelves, which I'm going to show you later this week. Step three is hanging art. I've been having a blast making up art in my kitchen colors, which are teal, olive green and mustard yellow.

This was one project I recently finished. I'm not sure where they are going to hang just yet (hence the pictures on my kitchen table), but I love the graphic feel of it.

This is a fairly easy project that makes a big impact. I can't take credit for the idea. I saw a fabulous chair in a magazine that inspired the frames.

Ok, for this project, you are going to need:
Flat Frames
Spray Paint
Mod Podge or craft glue or hot glue (maybe I should just say adhesive?)
Chipboard alphabets
Craft knife

Here are my frames before I started. I was thrilled to find three matching frames at Savers last time I went. They are from IKEA and were $.99 each. I don't think IKEA sells these anymore, but my guess is I probably didn't save all that much money, but I did save an hour trip, so there's that.

Ok, onto the steps:

Step 1:
Remove glass from frames. Put metal tabs or staples back into place.

Step 2: Start gluing on chipboard letters. This is a great time to use up the last of some alphabets you already had. I think it would look awesome with numbers, as I always have numbers left over. Chipboard alphas aren't too expensive, and I bet you could do three frames with one of a larger size, if you needed to buy them new.

Step 3: Once your chipboard is all glued down, turn the frame over and trim with a craft knife. Do lots of shallow cuts for a cleaner cut, and it's less likely your alphabets pieces will come off.

Step 4: Sand down the edges and the tops of any really glossy letters. Also, make sure there aren't any glue drips or anything else that will mar the look of your finished piece. I freely admit I had some trouble with this. Don't look too closely.

Step 5: Prime your frames, then do light coats of spray paint to cover the chipboard. Let dry between coats.

Step 6: Clean your glass and put artwork in your new frames. I designed these prints just for my kitchen.


See, pretty simple and I such a fun look! Maybe someday I will do a chair. . .

Sharing Here:
Making

The Girl Creative
Sumo's Sweet Stuff
The Persimmon Perch
I've started a new blog: Come follow my crafting adventures on my new blog. Find me at: creativeirony.com.