Follow My New Blog

I've started a new blog. Follow my crafting adventures on creativeirony.com.

Showing posts with label David. Show all posts

Friday, November 28, 2014

Wonder Woman Cosplay

Wonder Woman Cosplay from Craftastical using Wonderflex

It's been a while since I went all out on a Halloween costume, but David talked me into trying out Wonder Woman this year. Of course, this involved figuring out how to make my own custom-made armor, because why do anything the sensible, easy way?

This tutorial about how to make Wonderflex armor was invaluable in this process.

So, I started with the idea. After looking through hundreds of photos of Wonder Woman online, I sketched my own concept based on what I liked the best.

wonder woman costume sketch

Now, it was time to shop for boots and the corset. We got one corset, and it was too small. I wanted the corset lacing to either meet, or to have a panel, and it probably had a six inch gap with no panel. The peril of ordering on the internet. So, we tried a different style. This time it was too big. Of course. So, I ended up just taking it in.

I also looked at probably hundreds of pairs of boots. I could have got the classic Wonder Woman boots, but I thought it would be more fun to go with something a little more realistic looking, to match the mood of the costume, and so I could wear them after Halloween too. I love the pair I got. When they came in the mail, I put them on and told David I was never taking them off.
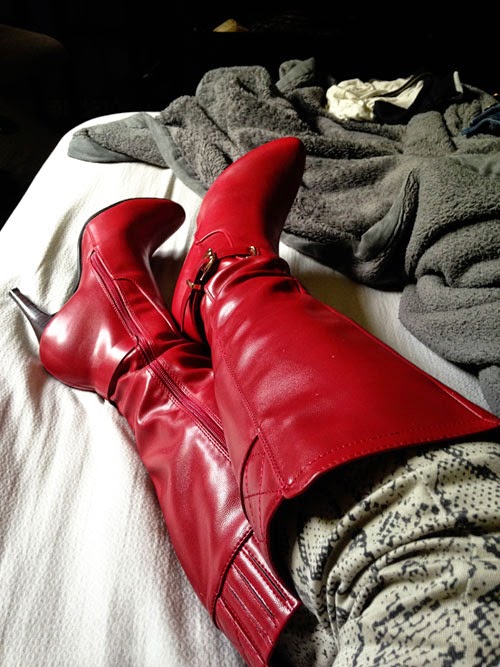
Wonder Woman Cosplay from Craftastical using Wonderflex


Once we had the corset sorted, we started patterning the armor. It didn't seem like much, but there were a ton of different pieces to pattern, and then the problem of how to actually attach everything so it could come on and off my body had to be worked out before we made pieces.

I wish I had taken more photos of patterning, but I didn't start until we started molding. We used mostly Wonderflex backed with craft foam to make the pieces. I wouldn't do that again. The craft foam did not like sticking to the Wonderflex and it was a pain in the butt. I think several layers of Wonderflex is a much better option.

So, here's the front belt piece after the first mold, and then with the layers on top to add dimension.

Wonder Woman Cosplay from Craftastical using Wonderflex

Wonder Woman Cosplay from Craftastical using Wonderflex

I can't believe I don't have more in progress shots of the breastplate. Urg! It was the most challenging, because it had more complicated curves and levels. I did put in one little dart and that helped mold the curves a bit.
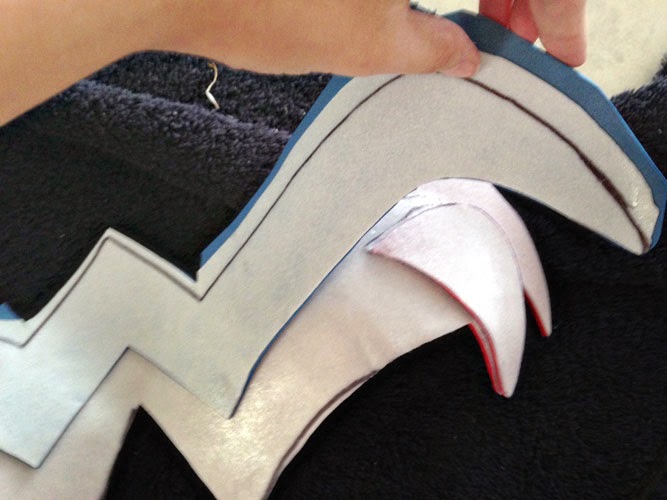
Wonder Woman Cosplay from Craftastical using Wonderflex

There you can see I'm building up the levels.
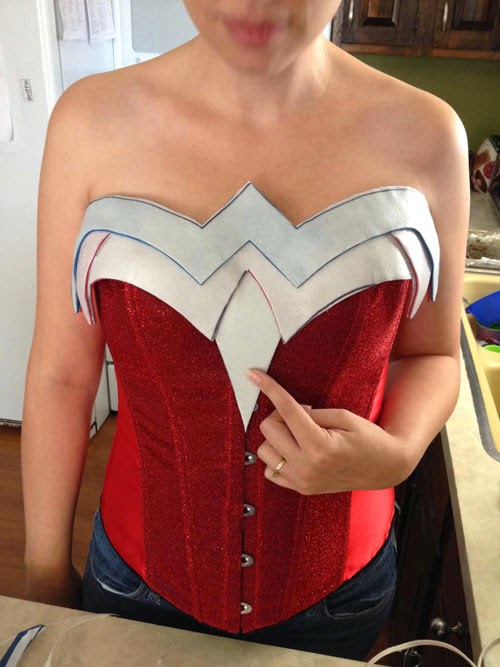
Wonder Woman Cosplay from Craftastical using Wonderflex

 You can see at this point, there are still a lot of waves and bumps.
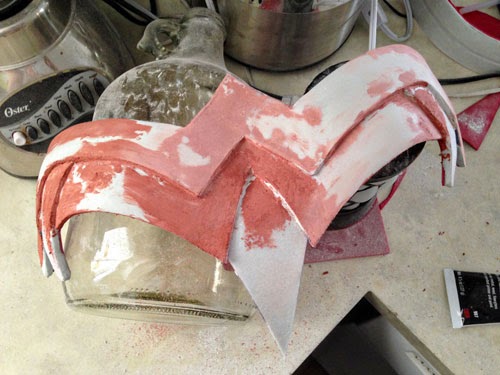
Wonder Woman Cosplay from Craftastical using Wonderflex

We ended up covering a lot of it with Apoxie Sculpt, which was another giant pain. I don't think I mixed it correctly, so it was sticky, and impossible to get where I wanted it. And then it dries to concrete. You can sand it, and I spend hours sanding it.

We also made the stars out of Apoxie Sculpt. The stars were also a pain in the rear. I would do them differently now. I knew I wanted that shape and type of star, but how to get the very sticky stuff in the mold (which took us AGES to find--we were even going to make our own mold at one point), and then out again without destroying the star? We end up using olive oil. Which was ok. But, I would have lined it with cling wrap and then coated the inside with olive oil. I bet they would have come out so nicely.

The red you see up there isn't the Apoxie Sculpt, it's filler. Which then had to be sanded. Again.
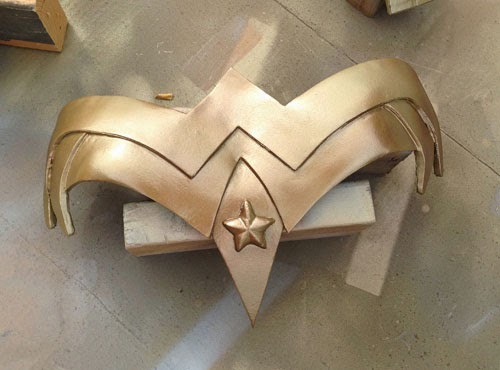
Wonder Woman Cosplay from Craftastical using Wonderflex

First coat of paint! I actually ended up painting them three times. I wanted a slightly aged look, but couldn't figure out the right balance. Eventually, did a mix of two spray paints, and then mixed gold acrylic paint with browns, yellows, blacks and whites to age the top, and then ever so slightly misted that with spray paint. And then a top coat of polyurethane.

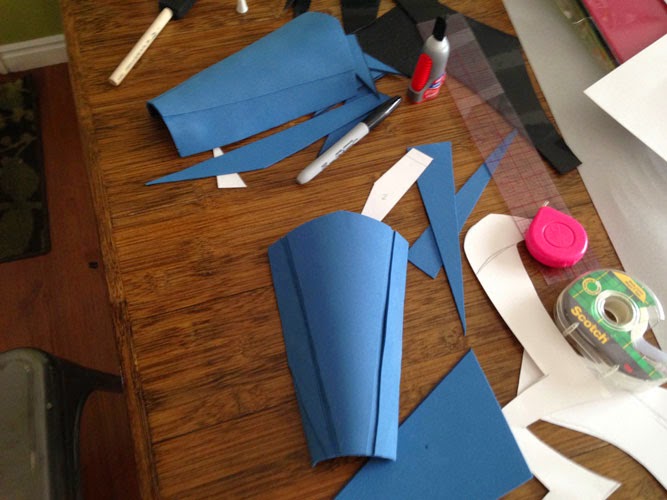
The bracers were actually done with a sheet of ABS plastic, craft foam and a touch of Wonderflex. Same with the tiara. It was a lot harder to heat to mold--but we were using my embossing gun from my stamping days. With an actual heat gun, it might have been a bit easier.
Wonder Woman Cosplay from Craftastical using Wonderflex

The basic bracer with a layer of craft foam, and then another layer for the dimension. (On the right is one of the paper pattern pieces.)

Wonder Woman Cosplay from Craftastical using Wonderflex

Adding the stars. I had to sand them down for ages to get them to curve. I wish I had figured out a better way to mold them so I could have just stuck down the clay when wet and avoided that whole mess. Next time!

Wonder Woman Cosplay from Craftastical using Wonderflex

The pieces to make the recesses traced and ready to cut out.

Wonder Woman Cosplay from Craftastical using Wonderflex

The tiara ready for paint. You can see the black ABS plastic (Wonderflex is white).

The chainmail was all handmade from washers and jump rings.
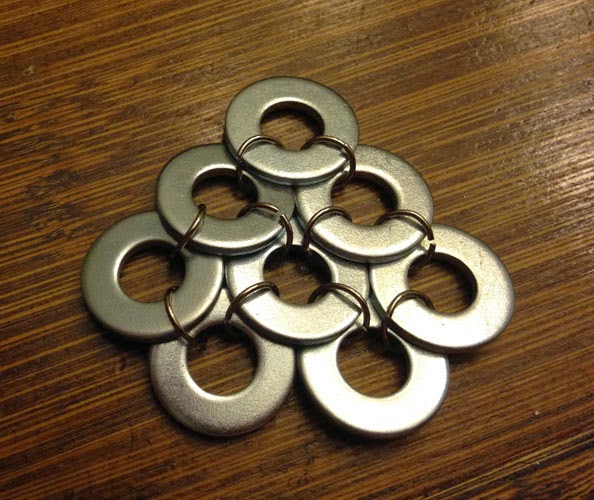
Wonder Woman Cosplay from Craftastical--handmade chainmail

Wonder Woman Cosplay from Craftastical--handmade chainmail

We found the red belt on the back at a thrift store and attached it to the armor with screws. The belt also comes apart in the front with overall hooks. Yes, the kind of overalls that are currently coming back into style. I found the hooks at JoAnn Fabrics.

Wonder Woman Cosplay from Craftastical using Wonderflex


The skirt I sewed from suede fabric. The star on the front is hand-stitched, and the other stars are metal--those things that you stick into fabric with the prongs that bend to attach. Studs, maybe? The bottom metal looking things on the end of each flap is wonderflex again, painted, with metal spike studs on each end.

The skirt is all attached to the belt. The back piece velcros so the belt still can unbuckle in the back. I got a swimsuit bikini bottom to wear under the whole thing.


Wonder Woman Cosplay from Craftastical using Wonderflex

Wonder Woman Cosplay from Craftastical using Wonderflex

Wonder Woman Cosplay from Craftastical using Wonderflex

Wonder Woman Cosplay from Craftastical using Wonderflex

Wonder Woman Cosplay from Craftastical using Wonderflex

I've started a new blog: Come follow my crafting adventures on my new blog. Find me at: creativeirony.com.

Monday, August 05, 2013

Craft Room Furniture! This is Finally Happening!

Hello! It's been a while since I've blogged. I'm afraid to look at how long. If you were reading my blog before, I'm sure you thought it was dead. I meant to keep blogging. I never meant to stop. But, I got very busy trying to be Utah's sole source of actresses between the ages if 17-35. I think I was in every community production In Utah County in the last year. If I wasn't, I saw it or knew someone in it. I got sucked into the vortex of community theater and almost the only crafting I did was sewing my costumes for productions. 

Recently, I was Ms. TeaVee in Willy Wonka. Using a mash up of vintage patterns, I made this dress: 

Ms. TeaVee 50s vintage dress from Willy Wonka

Anyway, I'm getting distracted. What I really came to post about is this disaster: 


Yep, my craft room. Sad, isn't it? And, this is after cleaning up for a while (a long, long while--and paying one of my kids $10 to help me). A huge part of it is that I have no workspace, so stuff ends up everywhere when I'm working. (Also, I have too much stuff, but I'm pretending that isn't a problem.)

Well, my friends, that is about to change! I recently came into a very cool couch and about $100. I want the couch to fit in this room so people can hang out with me while I craft, and the $100 is perfect for building a huge desk.

Last Saturday, David and I went to the Habitat for Humanity Restore looking for kitchen cabinets to use to make this desk. We got a big fat zero, and they were more expensive than I was hoping. I could have cobbled something together, but it would have eaten my entire budget and nothing would have matched. Nothing would have matched! It was not working for me. So, on the way home I got the bright idea to look on KSL (basically the Craig's List of Utah--no idea why everyone posts there, but we do).

And there it was. Some guy remodeled four matching kitchens and was selling off the cabinets for $10 a piece. And he was home when we called! And didn't sound too eccentric! We were wrong about that last part, but that's okay. 

So, we go to this guy's house (which is upgraded in every possible way--the doorbell chime lasted longer than Beethoven's Symphony No. 9); he makes us remove our shoes to walk across the hardwood floors. Then we ride his elevator (yes, elevator) down to the walkout basement four car garage where he has the kitchen cabinets. We pick out six of them, and pay the guy. We was a perfectly nice normal guy. I'm not sure why he had an elevator, but I'll go with it. Our daughter was with us, and she thought it was cool. 

So, here they are, my new cabinets. 

Used kitchen cabinets to convert to office desk

The dude who sold them to us told us there was nothing wrong with them; that they were just outdated. Dude might have an elevator, but he was wrong about that. They are stinky--like old apartment smell--and greasy and damaged in spots. The hinges have plastic pieces that were breaking apart. There is some nasty gunky on one of the shelves that I am not even going to attempt to clean off. That thing is just getting replaced.

However, they are perfect for what I want them to do. More on that soon. Very, very soon. 
I've started a new blog: Come follow my crafting adventures on my new blog. Find me at: creativeirony.com.

Monday, October 15, 2012

Dealing with Those Pesky Sewing Patterns: Organizing Solution

This is Part 4 of my How I Organized My Entire House for $0.00 (Really!) series.
Part 1 (Intro) is here.
Part 2 (Simple Rules to Create Organization that Sustains Itself Plus Master Bath Organization) is here.
Part 3 (Inexpensive Organizing) is here.

Did you think I abandoned my organizing project? Oh no, I have not. I have only stared into the abyss that is my craft room, and it is not a short thing. It is a long, multi-part thing.

I started with my sewing patterns, which is what this post is about. I recently started crafting for a great company again, you know, on a professional basis, and that means lots of time in the craft room. And that place is scary. We don't have a garage, so storage is a rare and precious commodity at our house. Stuff that has no where to go ends up in the craft room. If a kid comes to me to ask where something goes, it's usually phrased this way, "Where does this go? The craft room?"

David has started calling it "the junk drawer." I know another crafter who calls hers "the room of requirement."

I have slowly started to change this. It was a major milestone when I could reach the closet--which by the way, is right next to the door.

I've also started changing my habits. I don't craft the same way I used to. I put things away as I go. It's a novel concept, I know, and more about how I made it easier to do later, but it does make my brain more clear. I spend a lot less time looking for the scissors (or other craft tool) that are somewhere on my table and clean-up afterward is so much easier.

But, I'm getting ahead of myself. Back to the patterns.

Sewing patterns organized by brand and number, and cataloged with photo on computer


I picked up a huge box of retro patterns at a garage sale a few Saturdays ago, and nearly doubled my pattern collection in one go. I desperately needed a way to look at what I had and also find what I had.

I've started a new blog: Come follow my crafting adventures on my new blog. Find me at: creativeirony.com.

Monday, August 06, 2012

How I Spent My Summer Vacation

I spent it at rehearsals for Spanish Fork Community Theater's production of My Fair Lady. And then I performed in 8 shows of My Fair Lady. My part wasn't anything too big: a member of the ensemble, but David was cast as Colonel Pickering.

One of the funnest things about being in the ensemble was that I had nearly as many costume changes as anyone else. Five. While the theater provided three, it ended up that I offered to make two of mine: my dress for Ascot (possibly one of the most famous scenes for costumes ever) and my Embassy Waltz dress. For both of them, I didn't use a pattern. Edwardian style is stunning.

Black and white upcycled Ascot costume for My Fair Lady
I've started a new blog: Come follow my crafting adventures on my new blog. Find me at: creativeirony.com.

Tuesday, November 01, 2011

Halloween!

So, I stayed up sewing until 3:30 am on Sunday night. Maxton, really wanted to be Aang, from Avatar: The Last Airbender. I couldn't find any in the stores and for some reason, it didn't occur to me to check online until it was too late. This is cooler, because he's the cartoon Aang, not the live-action movie Aang.

So, of course, I didn't have a pattern, so this is hodge-podged together. The pants I based off a super easy pattern, then I added elastic around the bottom. The cape I sewed in one try, making up my own pattern, and same with the belt.

The collar took me four tries to get right (it's separate from the shirt). I'd never sewn anything like that, and I had to make my own pattern, so that was some serious trial and error. The shirt was a nightmare. The pattern I chose for the shirt was all wrong--the directions did not make any sense (or I was just not getting it, I'm going with the first because it makes me feel better), so I ended up just doing my own thing with it. But, it's done!
Aang from Avatar: The Last Airbender Halloween costume

I've started a new blog: Come follow my crafting adventures on my new blog. Find me at: creativeirony.com.

Monday, July 25, 2011

More Photos from My Over-scheduled Summer


I'm going to have to reassess my evaluation of myself as a person who isn't very busy. This summer has been the most intense of my life. I have never tried to have so much fun in so little time. Note previous posts about Disneyland and Arches, plus all the little things, like a movie every week with my sister, craft day every week, hanging out with friends more, playing baseball for the older two boys, and then there are still four more majorish trips we have planned for this summer. Zion, Yellowstone, another family reunion and climbing Mt. Nebo. I swear, this is turning into a travel blog. Sorry, I swear I'll stop after the summer is over.

In the past few weeks, we went to David's family reunion. His parents and all their eight children, their spouses and then all the grandchildren gather every other summer--the only time we are all in the same spot. It's an event.

Some of my favorite pictures from the week:

Maxton playing the piano at the piano recital
Maxton playing the piano at the piano recital.

I've started a new blog: Come follow my crafting adventures on my new blog. Find me at: creativeirony.com.

Tuesday, May 17, 2011

In which I Go to Disneyland

I keep thinking about my blog and how much I want to update it. I keep doing 10 projects in steps and rotating them in such a way that I never finish one project. Ever. I have some really cool things to show you. Probably one or two more cycles through my rotation and I'll be exploding with things to show you.

In the meantime, we went on a trip to Disneyland last week or so. It was my kids' first trip. We didn't tell them we were going--which was so fun! We picked up the older two from school and left. It was literally snowing huge snowflakes as we left. In MAY! I was never so glad to leave.

I had a huge bag of activities for the kids to do in the car. Every 30 minutes (I brought a timer), they got something new out of the bag. I'll do a post with a list soon. It worked amazingly well. Almost no whining.

We decided to only go to Las Vegas the first day and stay overnight there (about a six hour drive). We drove with the kids down the strip and let them see all the cool hotels. We saw the volcano going and the fountains in front of the Bellagio. Nice timing.

Then, we woke up and drove the rest of the way to California. We went with my parents and my youngest brother, Ty, and we all rented a house. It was a great vacation--you know, all the regular vacation cliches. Which is why the rest of this post is going to be photos with a tiny bit of commentary.

Maxton waiting to leave the Las Vegas hotel.


The kids getting a bit restless now. We did eventually leave.


Griffin lying on the bed of nails at the Discovery Science Center.


I've started a new blog: Come follow my crafting adventures on my new blog. Find me at: creativeirony.com.

Friday, April 15, 2011

I feel like I am living a lie (that was really dramatic).

It's past due to update my photo.

See, I used to look like this (last summer):


But, I cut my hair a few months ago, and I've been running around looking like this ever since.


When I come onto the blog, I feel all weird, like I am deceiving you with my long hair. I guess that means I am scrupulously honest. That or a huge drama queen? Isn't there a Lady Gaga song to that effect, "Don't be a drama, just be a queen"? Just kidding, I know it's "Don't be a hag, just be a queen."

Funny story about why I cut my hair. I started loosing it in handfuls. That sounded funnier in my head. Not spotty, just all over my head. It was nearly the longest it's ever been, so it was quite interesting when it started falling out at an accelerated rate. I lost a 1/3 to 1/2 of my hair over about three months--I could wrap my pony tail holders around two more times than I could before. So, rather than continuing to freak out about it, I decided to go with a pixie cut--which I totally love, by the way. It's so easy and I feel adorable.

My dermatologist and I have been trying to figure out why I lost it. The most likely thing is stress! Which didn't make sense to me! I am such a calm, relaxed, easy-going person! Stress and me in the same sentence? Hahaha. ha. I'm laughing in confusion.

By the way, I got my grades for last term yesterday. An A in each class. I happen to know that three of the four A's came in at 99%. David keeps trying to convince that I can get B's, but I don't believe him. Perfectionist here.

Anyway, I'll leave you with some photos of David and I together. I had my sister take these so I can put one on my photo ledge. I'm very excited! I think I'm going to take the summer off school (even though I only have 13 credits left to finish, which makes me want to go sign up for all them RIGHT NOW and start writing papers). If I take the summer off, I might be able to grow some of my hair back (sweet!) and I probably will be doing more projects around the house (also very saccharine!).


I've started a new blog: Come follow my crafting adventures on my new blog. Find me at: creativeirony.com.

Friday, May 21, 2010

Project Progress: Kitchen Update Week 1

I get sort of crazy about projects. Maybe you don't realize it, but when I get something in my brain, I cannot let it go. I don't hear people talking to me. I lie in bed at night thinking obsessive thoughts. I will bargain hunt until I have migraines from the cacophony of smells at yard sales and thrift stores. I make sketches and draw diagrams with newly sharpened pencils. I am a serious project person.

My newest project? My kitchen. I've gone completely laser focused on updating it and making it a totally cute, vintage inspired, fun, funky with a modern twist place to hang out. You know, in case I ever deign to make dinner and have to spend more than 10 minutes in the place. You might want to move aside. Wouldn't want to lose any fingers to my laser vision.

This is what the kitchen looked like when we moved in:

I'm sure this is going to be a huge transformation, even if a lot of the basics are staying the same.

So, do date, I've already updated the countertops, and I have a kitchen table, thanks to David's efforts. I have a fairly long list of things I want to do in this room, and I pretty much have no money to do it with. I mean, I have a little bit, but not a huge budget, probably less than $500. Ummm, I should probably firm that up with the husband, now that I think about it. I painted the walls a yellowish green. It's Spanish Olive by Glidden if you're interested in the specifics. Then I hung my kitchen message center.

Anyway, after the painting was done, getting some shelves up was a high priority. We used these fabulous plans from Ana at Knock Off Wood via Young House Love. If you don't already read those blogs, you are seriously missing out. David pretty much already knew how to do it, so we didn't use the plans too much, but it was looking at them that firmed up my plans for shelves in the kitchen.

We spent less than $30 on materials, and they are seven feet long and eight inches deep. Yep, I said seven feet long. We also had enough left over to make two 24" shelves that are in our master bathroom.

I did a lot (most?) of the work. I made all the cuts myself, David nailed the frames together, then I sanded, puttied and painted for hours to get them looking like this. They were a bit of a pain to hang, but we did it. I wanted them really high for two reasons: 1. to keep small children from reaching all my precious breakables (all from my Grandma Jensen, thrift store finds or art I made myself), and 2. so I could hang a gallery style art display underneath them.
Isn't Maxton so cute? He's reading his homework assignment. It's really meant for the parents, but he doesn't know that. Reading apparently requires a furrowed brow and pursed lips. And some serious bed-head.


I haven't finished dressing the shelves yet. I've basically been sticking anything I want in the kitchen up on the shelves. I'm planning on arranging things a little bit better once I have some art hanging beneath them, all of which I'm designing myself. See what I mean about obsessed?
I've started a new blog: Come follow my crafting adventures on my new blog. Find me at: creativeirony.com.

Thursday, May 20, 2010

Share-A-Craft: My Kitchen Table

I've alluded to it before, but now I'm finally going to show my kitchen table.

I need to find some more verbs that are synonymous with adore, because I want to say I adore my table, but I know I say that about everything. Ok, so maybe I am crazy about, I'm nuts for, I'm smitten with, I'm sweet on, I delight in, I dote on, I flip over, I prize my kitchen table.


Not only is it pretty, with a beautiful dark bamboo top, but I love that David made it for us. I helped a little. This thing is the perfect size for our kitchen and our family, plus it is sturdy, which is a must with our children. Those kids can destroy anything.

Anyway, it's basically a frame, with an apron covering it. Then the top is a board with bamboo flooring over. The trim we made from some extra flooring. It's surprisingly light-weight as well, which was nice for moving it in.

You can see a lot of the structure in this picture:

And of course, if I get out the camera, Aubrey insists on getting her picture taken, so here she is under the table.

David put hours and hours into it, and it shows. I'm not sure these pictures really show off how glossy and beautiful the top is. I love the bamboo stained a dark walnut, as the grain really stands out. We spent just under $200 for it, which isn't too bad for a table as pretty as this one.

I've started a new blog: Come follow my crafting adventures on my new blog. Find me at: creativeirony.com.