Follow My New Blog

I've started a new blog. Follow my crafting adventures on creativeirony.com.

Showing posts with label master bedroom. Show all posts

Friday, September 07, 2012

Simple Rules to Create Organization that Sustains Itself Plus Master Bath Organization


This is Part 2 of my How I Organized My Entire House for $0.00 (Really!) series. Part 1 (Intro) is here.

Simple Rules (well, more like guidelines) to create organization that sustains itself

I want to start off this series by giving myself a set of rules (more like guidelines) to follow. It's easy to get carried away and easy to lose sight of your goals, so this will help keep me on-track.
  1. Think about how you live your life. It doesn't make sense to have a system that doesn't work with how you live. Have the things you use together grouped together, not always like with like*. You usually use tape and scissors and wrapping paper together. Have them together. You usually use toothpaste and toothbrushes together (if I'm making any weird assumptions here, feel free to educate me! :) )--make it so you only open one drawer or one cabinet to get them. Think efficiency.
  2. Have the things you use the most in easiest reach. The stuff you use less can be harder to get to. Make things easier on yourself.
  3. Along with number 2, have the things where you use them, or put them where you are more likely to use them.** Don't get too caught up in where things are "supposed" to go. Put them where they work for you.
  4. Make things easy to put away. If they aren't (and you are like me), they won't get put away.
  5. Make it simple. Don't go overboard labeling stuff. Don't make a tiny compartment for everything. Have a place for everything, but there's no need to make it more complicated than it needs to be. If you want. Simple systems are the most self-perpetuating.***
  6. Reevaluate. Organize, then go back a week later and see if it's working. If not, tweak. Just because you organized it one way doesn't mean it has to stay that way. And it's easier to rework it when it's still somewhat organized than when it's completely disorganized because the system didn't work with the way you live.
  7. Get rid of stuff you don't use. I've heard if you haven't used it in the last year, get rid of it. But, I think that's unrealistic. I have things I haven't used in the last year that I want to keep and it would tick me off to replace. But, there is a lot of good in honestly evaluating if you are going to use it. Are you holding onto something because of guilt? Because of what it represents?**** When getting rid of stuff, the biggest thing is to be honest with yourself.
  8. Educate your family on your new system, but don't overwhelm them. Make it fun. Get their input if it affects them (I've found it works a lot better if ideas come from everyone, instead of my trying to impose a top down approach).
  9. It doesn't have to be perfect. It won't be perfect. What you organize now will probably have to be organized again at some point. Hopefully a long, long time from now. But, your life will change. Your needs will change. Don't get caught up in perfectionism or get overwhelmed. One little piece at a time.
*For example, put a pair of scissors in the places where you need them the most--not all the scissors in the same spot. Then the scissors will be where you need them, they won't travel all around the house, end up in tossed random drawers and never make it back to the scissor drawer and then you can't find a pair when you need them. For example, I have a pair of scissors in my bedside table, so does David, a pair in the kitchen for opening food packages, a pair in the office, a pair in the wrapping paper box, a pair in the kids' art box, and then the specialty scissors where they go--do not touch my sewing scissors please

**I have a topical acne medication I need to use every day, but not within 30 minutes before or after showering. When it was in the bathroom, I didn't use it regularly. But, put it by my laptop, and suddenly I remembered to use it twice a day like I am supposed to.

***It's my experience that I will put something box in a drawer, but not necessarily a certain spot in that box in drawer. For example, if I have a box for often-used medicines: works great! If I have a certain spot for Tylenol in the box, it doesn't get put there every time by everyone and I get frustrated. It doesn't work across everything (forks have a certain spot, dang it!), but it's a generally good rule of thumb.

****Sometimes that's ok--you may pry my great-grandma's quilts out of my bloody fingers--but sometimes it means you need to let go of that to get rid of it. I kept some kitchen gadgets for a long time, because if I had kitchen gadgets, then surely it meant that someday I was going to be fabulous and motivated to cook all the time, right? And, it would make life easy, and I would transform into super chef-type "good mom" person. I was invested in seeing myself as "person with cool kitchen gadgets" and invested in thinking that a good mom cooks every night. Once I let go of that--good moms don't have to cook every night--then I could get rid of the clutter that wasn't helping my life. Or my cooking.

Do you all have any other tips? I'd love to hear what has and hasn't worked for you! 

(Also, I need to take my own advice! I am just horrible at putting things away and not always good at setting up things that work for me, but that's the point--right? To take time to set this stuff up; to stop and think about it.)

Now, onto the bathroom!

I've started a new blog: Come follow my crafting adventures on my new blog. Find me at: creativeirony.com.

Tuesday, November 15, 2011

Sunshine Paisley Throw Pillow Tutorial

Ok, here it is. What I've been meaning to write and put up for ages. If I didn't have to keep doing that pesky schoolwork (five more weeks until graduation, five more weeks!), this would have happened a lot sooner.

Once I finished the five embroidered paisley squares (click for pattern), I knew I wanted to make a pillow out of them. I was worried though, because I didn't want it to get too "patchwork quilt." I didn't think that would go with the modern feel of my bedroom.

I wanted to do solid yellows and grays, but the quilt story nearby (Gracie Lou's--sooooo awesome!) didn't have any. This was perplexing. Normally, when I get an idea, there is nothing that can prevent me from doing that idea. I mean, small adjustments, they normally make the project turn out better. Large adjustments like substituting a print for a solid? I will normally not proceed. I think the saleswomen in the shop thought I was being completely unreasonable (although she was very perplexedly kind about it). Like, I had gone into a restaurant and said, "But, these green beans aren't green enough, I wanted more of a Christmas green, not so much an olive green. And I wanted them cut 1/4" longer. Do you have different green beans in the back?" (I did not ask for super-secret back-room fabric, FYI).

I've started a new blog: Come follow my crafting adventures on my new blog. Find me at: creativeirony.com.

Monday, October 10, 2011

Sunshine Paisley Embriodery Pattern

Oooohhhh dear. Pinterest has done me in again. I kept seeing all these beautiful embroidery stitches and projects. Which means, of course, I have been embroidering a lot lately.

I had so much fun trying new stitches. My favorite site is this one, which has the best directions and such beautiful work and I used a bunch of stitches I learned there on my paisley.

I'm very proud to share my very first embroidery pattern. I have a thing for paisley. My sister doesn't get it. I think I may be talking her around with my unrelenting love, but she always compares them to a certain male reproductive cell. If she hadn't just deserted me and moved to St. Louis, she would punch me in the arm for telling you that. I'm sure the comparison has already occurred to you. If it hasn't, my apologies for putting it into your brain. Hopefully my pattern is so awesome that you will now forget about it.

I made five different squares and my recent activities (here and here) may give you a clue as to what I did with them. But, that's coming a different day.


I've started a new blog: Come follow my crafting adventures on my new blog. Find me at: creativeirony.com.

Monday, September 12, 2011

Bamboo Blinds

Alas, today is my first day back at college. Which means, my very fun summer is over. Sad face. But, I have the very small number of only 12 credits left. I have debated, made my mind up and changed it back so many times this summer over the question of whether to go full time this semester and finish already or to finish up gently and go half time this year. I'm STILL not sure. I've been going to college for 10 years on and off and I want to be done! However, if I go half time, less stress, I could maybe get a part time job from home, I can defer my student loans a little longer. On the other hand, I could be done in time for Christmas and graduating would be the very best Christmas present in the entire history of the world. It seems surreal that I could actually have a college degree.

On the other hand, going half time would leave me free to do other things, like admire my bamboo blinds and make really horrible videos featuring them. I think the voice over isn't too bad, but the visuals leave much to be desired. But, shaky, dark video aside, I still saved a ton of money.


Humm, maybe the pictures weren't too bad after all. Here are the pictures:

I've started a new blog: Come follow my crafting adventures on my new blog. Find me at: creativeirony.com.

Tuesday, August 16, 2011

Tutorial: Cable Knit Pillow

I am now the proud owner of TWO throw pillows. It's hard to believe that I have reached such a high number; I have managed to accomplish this feat in the short time period of nearly ten years of marriage.

Cable knit pillow tutorial--such a cheery yellow!

All last week I spent knitting. After a particularly long day of knitting, every time I closed my eyes, I literally would see cables floating in front of my eyelids. It's not that it really took that long to knit; it's that I was making my own pattern. I also had an insert I was trying to match, so it had to be the exact right size. That's pretty much a recipe for frogging. A lot. I also have a beautiful new washcloth when I completely finished a front that ended up being too small.

I've started a new blog: Come follow my crafting adventures on my new blog. Find me at: creativeirony.com.
Wednesday, August 03, 2011

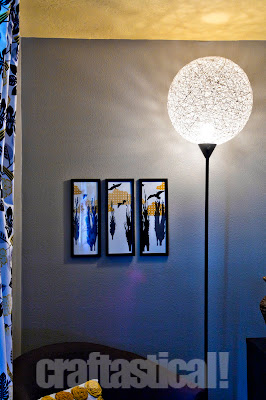
The Pinterest Challenge--A Floor Lamp Make-Over

String ball lamp--cool lamp make-over for a Pinterest challenge

A little bit ago, Sherry from Young House Love got together with a few of her friends and issued a Pinterest challenge, the idea being to actually use Pinterest to inspire you to make something, and not just to glamour you like a time-sucking vampire with the pretty colors. Oooooo, pretty colors.

Surprisingly, I actually have used Pinterest a few times to inspire real-life projects. How is it that so many projects do not end up on the blog??? My sister and I spent a whole day once doing naughty things to t-shirts (like cutting them up and then not even sewing proper hems on them!) inspired by Pinterest projects. I guess most of those ended up belonging to Melissa, which is why they didn't show up here.

I've started a new blog: Come follow my crafting adventures on my new blog. Find me at: creativeirony.com.

Friday, May 27, 2011

Flying Birds

I've crossed off a few more things from my UFO list! I'm determined to finish that list this summer. I realized the oldest thing on there is a cross stitch I started back before I was married, about 11 years ago. 11 years (that's a little over 1/3 of my life). I guess I should just be happy there aren't older objects sitting about. The cross stitch is actually all finished, but it's never been framed; it's been sitting in a box for 11 years. I think I'm going to make a pillow out of it.

Anyway, that has nothing to do with my post today! I hung up some art in the corner of my bedroom where my chair sits.

I happened to see this tray by Eskil Design on Young House Love somewhere in the advertising sections and was very attracted to the graphic elements of the trees, clouds and birds. I designed something highly inspired by it (ok, I nearly copied it--although I went off memory and tried not too look at it and also put my own spin on it).

The tray:
Eskil Design tray with birds and clouds
  My version:
Eskil Design inspire graphic design print

I've started a new blog: Come follow my crafting adventures on my new blog. Find me at: creativeirony.com.

Thursday, May 19, 2011

Tutorial: Ampersand for a Shelf

A little while back, I bought a K and D from Hobby Lobby to put on my picture ledges once they were built. The plan was to get an ampersand to put between them. Awww, too adorable, right? Kara and David=forever. But, I couldn't find one I liked. I'm sort of a font snob. Ok, not sort of. I am. Like nearly every other female craft blogger, I started a Pinterest account, and there are a lot of snobby font things pinned to my funny board. Most of them make fun of Comic Sans. Poor Comic Sans. If only people wouldn't put it where it has no business being! Then Comic Sans wouldn't be the ugly dog of the font world.

Anyway, I pondered on this problem for several months. I could have cut my own ampersand out of wood with my mom's scroll saw, but it's about 20 minutes away, and that's kind of annoying to get exactly right. I've cut out complicated things with a scroll saw before (see the cake topper here), so I could do it, I was just being moody about it.

Then it hit me. A way in which I didn't have to drive round trip 40 minutes and get out the scroll saw from the caverns of my parents' garage. And this is that tutorial.

cardstock ampersand, made by layering cardstock cut with Cricut


Supplies needed:
Scrap cardstock (or pretty cardstock in pretty colors)
Cricut machine or Silhouette machine or traditional die cut machine--I used a Cricut and Plantin Schoolbook cartridge
Mod podge
Sandpaper or rotatory tool
Wood filler
Spray Primer
Spray Paint

Step 1: Cut out a bunch of shapes of the same size. I didn't care about color, because I knew I was going to paint mine later. If you don't want to paint, you can use pretty colors in the same shades or coordinating shades for very pretty effects, or use all the same colors.

I've started a new blog: Come follow my crafting adventures on my new blog. Find me at: creativeirony.com.

Tuesday, March 29, 2011

Picture Ledges (from scrap wood--so basically free!)

David and I are nearly finished with a huge project in the basement family room, which I will show you very soonish. I'm very excited about it and I will give you a clue--it's made out of wood. Soon, my friends, soon.

Anyway, we had some scrap pieces, so I commissioned David to build me some picture ledges out of the scraps. Which apparently annoyed him, as I wanted him to do it while he was building the other thing he was building. I was helping with the other thing he was building here and there, but I was also sitting around sometimes, so I thought it would give me something to paint.

He built them out of MDF and cut the groove in them with the table saw. Then it was a matter of nailgunning the pieces together.

Then I painted quite a few coats.

Then I bugged him again to help me hang them. Apparently, David is a methodical builder who likes to do one project at a time, finish it, and then move onto the next project. I didn't realize that. Technically, I was asking him to help when he wasn't working on the other thing he was building, but oh well. He was nice about it, but he usually doesn't betray that much annoyance with me.

Which reminds me of this morning, actually. I got up when he did (I usually get up right as he leaves for work) and he was in the shower) and I knocked to get into the bathroom. I drank too much water last night right before bed, so I had a bladder about the size and approximate weight of a bowling ball; I hate getting up at night and I probably should have anyway. He was definitely annoyed when he asked what I wanted (we don't technically have a master bathroom--it's across the hall). I said I wanted to use the bathroom and he told me to go downstairs. No way was I using that pit. I make the kids clean it unless we are expecting company (then I double clean it and use highly concentrated cleaners before I will touch it), and I'm not sure when the last time I made them clean it was anyway. We have three boys. Enough said. The bowling ball was staying until he got out the shower.

Apparently he thought I was Maxton.


Anyway, here's some of the stuff I put on it. You can see how I made the dragonfly frame here. The tree and the monogram letters (they are hard to make out in the bottom left corner; I need to set them on something) are from Hobby Lobby. The bird is from Dollar Tree. The frame near the monograms is getting an ampersand and the other two frames will get photos of David and me as soon as I figure out a way to scan our wedding negatives. I never could get my negative scanner to work and I got rid of it.

I don't particularly want to take it to a developer, as it's a medium format negative and I'd like to get them all done and I've only seen 35mm offered. I'm sure I could have it done for a fortune. I'd rather do it myself, but I'd like a negative scanner that would work with my existing scanner and would work with my medium format negatives and I have no idea where to find one. Our photographer let us have the negatives after 5 years--how awesome is that! Just need to have them digitized to make them really useful.
I've started a new blog: Come follow my crafting adventures on my new blog. Find me at: creativeirony.com.

Tuesday, March 08, 2011

Where Are the X-Box and DVD Player?

One of the reservations I had about putting a TV in our bedroom was that it usually comes with a lot of accoutrements. Accoutrements that usually have little lights that glow and clutter up the area about the TV. The above photo is missing the little lights and clutter. So, where did we put all that clutter?

Well, this is not my idea. My friend, Natalie, from Get Scatty, had this idea for her own house, but she ended up not using it.

We hid it in the top drawer of one of the dressers. First, we reinforced the particle board of the dresser with a board behind drawer supports/slat/trim between the drawers (whatever that part is called), because it wasn't exactly strong. We used a long piano hinge that turned out to be the exact correct length. I'm planning on painting it to match, but it's still fairly unobtrusive. I was hoping we could hide it, but with the way the drawer is situated, it didn't work.


Then David put in a sliding drawer and magnet closure. The cords go up through a hole in the back of the dresser.


I always think these are going to be quick projects, but this took a good part of a Saturday. David did most of the work, although I helped. It's so worth it though and the cool part is that the X-Box controls work through the drawer, so we don't even have to leave it down! You can even turn it on without flipping it down. We use the X-Box as a DVD player and watch Netflix instantly through it, so that is very convenient.

Even though I had to give up a drawer, it's so worth it for the clean surface of the top of the dresser.
I've started a new blog: Come follow my crafting adventures on my new blog. Find me at: creativeirony.com.

Tuesday, March 01, 2011

I Added a Chair (I need to work on these titles)

You may have noticed that I've been focusing mostly on home decor lately. I have done a few crafty things lately. I knitted a project I'm pretty excited to show you, but I think I have the itch to make my bedroom pretty because I feel trapped in it. I spend most of my time in it, working on my college work. There are parts of it that look really good, and then parts of it that don't. For instance, somehow none of the closet doors in this house are fully functional. So, in the master bedroom, I get a nice view of my clothes nearly constantly. I hate looking at my clothes all day.

But that really has nothing to do with what I'm about to show you. My brain does tangents well.

I went to IKEA and bought a chair. I'm hoping that I will sit in it occasionally. Chairs are functional like that.

The corner of the room it hangs out in how looks like this. It's sort of drab, but I think it has potential. It needs pops of yellow and a lamp and something on the wall.


So, I had a lot of fun playing with Photoshop and picking out accessories to go in my reading nook. I might actually end up with that lamp ($20 from IKEA), but everything else is an approximation. The pillow I'll most likely make myself. Same with the art. The ottoman I like, but it's too bright a yellow when it's not hanging out in fantasy land (I messed with the saturation in Photoshop) and it costs three times as much as the chair. Therefore, ottoman situation to be determined. The vases I like--also from IKEA, but who knows (I paid no attention to scale--they could be three inches tall for all I know). I think I want something more cylindrical. Plus, I believe I'm going to mount the TV on the wall, leaving more room for accessories.

 Woah, that yellow makes a serious difference! Drab gone!
I've started a new blog: Come follow my crafting adventures on my new blog. Find me at: creativeirony.com.

Monday, February 21, 2011

Light Fixture Time!

Next step in the bedroom makeover was replacing the light fixture. When we moved in, we had a fan over the bed. I'm not a fan of fans in general. I don't like wind on my face. I won't even drive with the window down. David, on the other hand, loves fans. Last summer, we tried sleeping with the overhead fan on a few times. It dried out my eyes. Did not like. So, we agreed that if he wants a fan, he can use the box fan on his side of the bed, and I can keep moisturized eyes. That means the outdated fan could go!

This is the before:
We found this light fixture on Amazon for $64. Which was a steal! When it got here, I was impressed. It looks more high-end than I expected from the photo. The only thing I don't love is the plastic light box part on the underside. I will probably end up covering that with fabric soon, but it doesn't look so bad.

I love the slightly retro look and the modern flair. The brushed nickel finish is perfect with the gray walls and the clean lines make me happy. It's a lot less intrusive than the fan and it opens up the room. It gives off some major, bright light too.


And, David bought me these potted tulips for Valentine's Day and I've been enjoying the pop of color in the room. They make me anxious to accessorize!


I've started a new blog: Come follow my crafting adventures on my new blog. Find me at: creativeirony.com.

Friday, February 11, 2011

One Window with Curtains!

Woah. One window in my house now has curtains. Actually, it's had curtains for a little bit now, but I did not have the means to show you said curtains. I can probably stop telling you that now, but somehow it seems dishonest to leave it out.

Anyway, we had quite the drama with the curtains. We bought the fabric online and the place that sold it sold it by the half yard. I have never yet encountered such a thing. So, we bought only half the amount we needed for the two windows in our bedroom. I had just enough to do one window, if I added a black stripe to the bottom. I think I like it, although I wish they were three inches longer. I may do something about that still.

For now, I'm loving that I have a window covering and I adore this fabric, which is Waverly Small Talk Blackbird. Heart! Heart! I picked out my color scheme and painted before I picked up this fabric and it coordinates perfectly. Amazing.

A close up, with some folds due to the fact that it is hanging on my window:

These actually whipped up much more quickly than I had thought they would. I wanted to figure out a way to do cheap curtains, but after searching everywhere, I figured out that I could get what I wanted and spend a little more, or get what I didn't want and spend about the same, or I could get what I really didn't want and spent a lot less. I'm scared to add it up though, what with my paying waaaayyy more for the fabric than I needed to pay.

Here they are open:

I have a serious wire problem in my bedroom. That wire is the TV cable. We need to tuck it under the baseboard or something. We have wires all over the bedroom that need some attention.

And closed:

To jog your memory, I painted some leaves on one wall and made over my bedside table. This room is slowly coming together. I bought a new light fixture which I will show you soon. Now to buy more fabric for the other window and make the curtains.
I've started a new blog: Come follow my crafting adventures on my new blog. Find me at: creativeirony.com.

Monday, January 03, 2011

Bedside Table Makeover

Greetings, Faithful Readers!

I have not posted in a while. I have a lot of excuses for this. I'm about to bore you with them. I was finishing up last semester. Enter braggy brag time. I earned an A in my Organizational Effectiveness class. I earned an A- in my Public Speaking class. That minus is making me very, very mad. I could get all ranty about it. I did get all ranty about it to my family. Very often. They are sick of my ranting. I will not bore you with the ranting that I can do. It is impressive ranting. Have you noticed that I am a perfectionist? I am a perfectionist.

Then we did the Christmas thing, which was very nice. I love Christmas.

I have been doing projects. I have been taking pictures of projects. The pictures that I have been taking are not very good pictures due to my broken camera situation, which I have ranted about before (see major themes of this blog lately: perfectionistic tendencies, ranting, broken equipment. Funny, I thought I was writing a crafting blog. Whatever happened to that, anyway?) These less than good pictures have made me reluctant to post to the blog, because I want to show off my projects in the best possible way (I'm thinking that if you google perfectionist, I will be among the top hits).

All that to say--Da-da-dah-DAH!--here's my bedside table that I made over a little while ago for the master bedroom makeover.

David picked up this little guy for free once while buying something else off KSL (the Utah version of Craigslist--it's actually a local TV channel. Not sure why everyone posts stuff to KSL instead of Craigslist, but we do. Quirky Utahans.)

Yeah, yuck. I love that it has three drawers. I need three drawers. The inside of the drawers looked like this:

Again with the yuck. This picture does not show the dirtiness of this drawer.

So, I sanded it down and painted it black and added some wrapping paper from Hobby Lobby (I geeked OUT when I found out we were getting one nearby--I nearly passed out in the car when David pointed it out to me) with mod podge for drawer liners.

Then I added zebra print drawer pulls, also from Hobby Lobby. My goal is to have a touch of zebra print, a mirror and a clock in each room of the house, so here's the zebra print for the master bedroom.
 

Ahhhhh, much better than the before, even if the pictures are not the best and my wires are out of control. I'm going to work on that. . .
I've started a new blog: Come follow my crafting adventures on my new blog. Find me at: creativeirony.com.

Monday, November 22, 2010

Leaves Paint Treatment in My Master Bedroom

Ages ago, before we even moved into the house, I planned on doing our bedroom in greys, yellows and blacks. I knew I was going to paint the walls grey, the ceiling yellow, put up crown molding and have a grey bedspread. I've been looking for ages for an acceptable king-size bedspread that also didn't require a 2nd mortage. I happened to find a fuzzy grey one at Shopko for $30 not too long ago, more than 1/2 off. It's basically just a huge throw, but it works for me. I'm just happy it didn't cost $300. Eventually, I want to get lots of pillows and make a cheerful quilt to put at the bottom of the bed. I'm thinking I will probably even knit at least one of the pillows.

So, the throw started a chain reaction. Mostly, I've just painted the bedroom and the bathroom grey. I had the idea forever ago to paint the wall opposite our bed with a huge white graphic vine leafy design, so as I painted the room, I had to work out how to do that too. I was pretty darn proud that I figured out how to get it even, with my low tech painter's tape and poster-board template. It's not perfect, but you all are not supposed to notice that, 'kay?

First, I did some rough white as an undercoat. Probably should have just bit the darn bullet and risked the cracked teeth and consequential dental work and painted the whole area white, because it would have saved me work in the end. You can see how pathetically uneven my leaves are here, so when I did the measured ones, parts of the tan showed through. Eventually, David ended up filling in the whole area white for me for the bottom three sets of leaves.

(KEEP SCROLLING, THIS IS NOT THE FINISHED PRODUCT. DISCLAIMER ADDED BECAUSE OF A CERTAIN PERSON IN THE COMMENTS. YOU KNOW WHO YOU ARE!)

Then, I ran a level piece of painter's tape from ceiling to floor. It was of the 3" wide variety. Then I made a template for the angle of the stems, and measured off the spacing of the stems, and used painters tape again for the width.

Then I made a template for the leaves (and extended the angle of the stems up onto the template so it stayed the same) and traced them on the wall and cut in the leaves in with a paint brush. Which was annoying, but not as annoying to me as trying to tape it off and having the tape bleed. And yes, the tape bled on the stems, so I came back with the brush to touch them up. I've heard about various methods to prevent this, but I've never had much luck with them--so rather than go through that, I cut in when I can and touch up when I can't . Maybe I need to buy better tape.

Repeat down for five sets of leaves and about a million coats, and I got this (which I took when it was still wet; it looks a lot more even now):

Another angle (it has low dressers in front of it now, and it looks awesome!):
All this was done between school assignments. When I couldn't stand to work on school anymore, I would paint. When I could stand to paint anymore, I would work on school. It worked well. David did all of the rolling, bless him. I don't like rolling much. I'm going to show the bathroom soon, which looks sooooo much better!

I'm dying to make some curtains for the bedroom. I have a fabric picked out. I fought the idea of making curtains, but I shopped around and discovered the curtains, they are not cheap. This fact was previously unknown to me. I do not own a single curtain. So, I could have generic yellow curtains for the same price as fabulous, beautiful, graphic patterned curtains. Guess which one I am going to pick. Eventually. When I decide I want to spend $100 on curtains for my two bedroom windows. I could probably do yellow curtains for a lot less if I made them myself, but if I'm going to make them myself, I think I will do the amazing ones.
I've started a new blog: Come follow my crafting adventures on my new blog. Find me at: creativeirony.com.